GAMATRONIC, A SOLAREDGE DIVISION
Centric Installation Guide, rel. 4.7
10.3 Maintenance Procedures and Report ................................................................................ 75
11. SERVICE AND REPAIRS .................................................................................................................. 78
LIST OF FIGURES
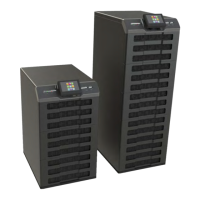
Figure 1: Major components of the Centric (200 and 100 kW models) ....................................... 10
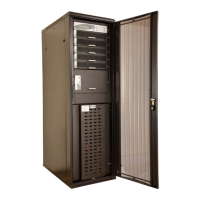
Figure 2: Major components of the Centric (50 kW model) ......................................................... 11
Figure 3: Recommended clearances around the Centric UPS .................................................... 15
Figure 4: Main power terminals on the rear of the Centric .......................................................... 18
Figure 5: Close-up of the main terminals (200 kW model) ........................................................... 19
Figure 6: Close-up of the main terminals (100 kW model) ........................................................... 19
Figure 7: Close-up of the main terminals (50 kW model) ............................................................. 20
Figure 8: Recommended standard system connections ............................................................. 22
Figure 9: Recommended system connections, with input isolation transformer ..................... 23
Figure 10: Attaching the cable stress reliever .............................................................................. 26
Figure 11: Attaching the cable stress reliever – another view .................................................... 26
Figure 12: Connecting the battery cabinet to the UPS ................................................................. 28
Figure 13: Initial configuration wizard, "Start" screen ................................................................. 30
Figure 14: Initial configuration wizard: password entry .............................................................. 30
Figure 15: Initial configure wizard: number of battery sets ........................................................ 31
Figure 16: Initial configure wizard: battery capacity in Ah ......................................................... 31
Figure 17: Initial configure wizard: set time zone ........................................................................ 32
Figure 18: Finish configuration wizard .......................................................................................... 32
Figure 19: The "alarms" icon indicates alarm conditions ............................................................ 33
Figure 20: IP address configuration ............................................................................................... 34
Figure 21: Minor connector groupings on the Centric rear panel ............................................... 36
Figure 22: Closer view of dry contact terminals in connector group 1 ...................................... 37
Figure 23: Close-up of connector group 2 ..................................................................................... 38
Figure 24: Pin numbers in D9 connectors ..................................................................................... 38
Figure 25: Connections for EPO switch and battery trip coil ...................................................... 39
Figure 58: LVD wiring diagram ........................................................................................................ 40
Figure 26: Location of the UPS modules in the 200, 100, and 100 kW models .......................... 43
Figure 27: Turning off a module (200 kVA system) ...................................................................... 44
Figure 28: "Status > Modules" screen ........................................................................................... 44
Figure 29: Verifying status of replacement module ...................................................................... 45
Figure 30: Status > Modules > Output ............................................................................................ 46
Figure 31: “Model Type” screen for a 175 kW system ................................................................. 47
Figure 32: ”Model Type” screen for a 200 kW system ................................................................. 47
Figure 33: “Number of modules” screen ....................................................................................... 47
Figure 34: Verifying status of added module ................................................................................ 48
Figure 35: Status > Modules > Output ............................................................................................ 49
Figure 36: “Number of modules” screen ....................................................................................... 50
Figure 37: Turning off a module ..................................................................................................... 50
Figure 38: "Status > Modules" screen ........................................................................................... 51
Figure 39: The static switch in context (stand-alone system) ..................................................... 52
Figure 40: Parallel comm. connections (cable cat.no. GPIN15350) ............................................ 53
Figure 41: Conceptual view of current sharing connections for 3 UPSs ................................... 54
Figure 42: Conceptual view of current sharing connections for 4 UPSs ................................... 54
Figure 43: Conceptual summary of special cabling for parallel operation ................................ 55
Figure 44: Current-sharing cable .................................................................................................... 56
 Loading...