68 69
• Ifthesteamwandremainsblocked,usethepinonthecleaningtooltocleartheopening.
• Ifthesteamwandcontinuestobeblocked,thetipofthesteamwandcanberemovedby
using the fitting in the middle of the cleaning tool.
• Unscrewthetipwiththecleaningtool.
• Soakthetipinhotwaterbeforeusingthepinonthecleaningtooltounblock.Replacethe
tip back onto the steam wand and secure with the cleaning tool.
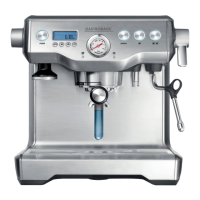
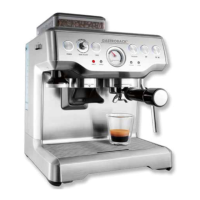
CLEANING / UNBLOCKING THE FILTERS, PORTAFILTER AND GROUP HEAD
Periodically run water through the machine with the portafilter in place, but without any
ground espresso in the filter, to rinse out any residual coffee particles.
Should the fine holes in the filters become blocked follow the following steps:
1. Place the filter into the portafilter. Run water through the machine with the filter and por-
tafilter, without any ground espresso, in place.
2. The fine pin on the cleaning tool can be used to clear any grinds in the filter holes.
3. To clean the single wall filters simply run water through the portafilter using the manual
pour function by holding down the one cup button.
4. For a thorough clean of the filters, run a cleaning cycle of the machine with the portafilter
and filter in place.
Note:PinonCleaningToolisextremelysharp.Usecarewhenusing.
CLEANING THE OUTER HOUSING / CUP WARMING PLATE
The outer housing and cup warming plate can be cleaned with a soft, damp cloth. Then
polish with a soft, dry cloth. Do not use abrasive cleansers, pads or cloths which can scratch
the surface.
CLEANING THE DRIP TRAY
The drip tray should be removed, emptied and cleaned at regular inter-
vals, particularly when the drip tray full indicator is showing ›Empty Me!‹.
Remove grid, compartments and ›Empty Me!‹ indicator from the drip
tray. Dispose of the grounds from the dry compartment into the waste
bin.Washthedriptraywithwarmsoapywater,usinganon-abrasivewashingliquid,rinse
and dry thoroughly. The ›Empty Me!‹ indicator can be removed from the drip tray by pulling
upwards to release the side latches. The drip tray base and cover are dishwasher safe.
CLEANING THE STORAGE TRAY
The storage tray can be removed after the drip tray is removed then
cleaned with a soft, damp cloth (do not use abrasive cleansers, pads or
cloths which can scratch the surface).
STORAGE
Before storing, press the POWER-button to off, turn the steam dial to off and unplug. Remove
unused beans from the hopper, empty the water tank and the drip tray. Ensure the machine is
cool, clean and dry. Insert all accessories into position or into the storage tray. Store upright.
Do not place anything on top.
WARNING: Do not immerse power cord, power plug or aplliancein water or any other
liquid.Tthewatertankshouldneverberemovedorcompletelyemptiedduringdecalcifying.
TROUBLE SHOOTING GUIDE
PROBLEM POSSIBLE CAUSES WHAT TO DO
When the machine is switched
on, the steam and hot water
lights are ashing.
Steam dial is not in STAND BY-position Turn the Steam dial to STAND BY-position. Machine
will commence normal heat up procedure.
Espresso does not run through. Machine is not turned on or plugged in Ensure the machine is plugged in and the POWER
button is pressed to on.
Water tank is empty Refer to ›Filling The Water Tank‹, page 53.
Espresso grind is too ne Ensure you use a suitable espresso grind. Refer to
›Adjusting the Grind Size‹ on page 54.
Too much ground espresso in the lter Refer to ›Adjusting the Grind Amount‹, page54.
Espresso grind tamped too rmly Refer to ›Tamping The Ground Espresso‹, page 55.
The lter is blocked Clean the lters. Refer to ›Cleaning The Filters‹,
page 65.
Espresso runs out too quickly The espresso grind is too coarse Ensure you use a suitable espresso grind. Refer to
›Adjusting the Grind Size‹ on page 54.
Not enough ground espresso in the lter Refer to ›Adjusting the Grind Amount‹, page54.
Ground espresso not tamped rmly enough Refer to ›Tamping The Ground Espresso‹, page 55.
Espresso is too cold Cups not preheated Preheat cups. Refer to ›Pre-Warming The Cups‹,
page 53.
Milk not heated enough (if making a
cappuccino or latté)
When the base of the jug becomes too hot to touch
this is when the milk is heated at the correct tempe-
rature. Refer to ›The Art of Texturing Milk‹, page 58.
No crema Espresso is not tamped rmly enough Refer to ›Tamping The Ground Espresso‹, page 55.
Espresso grind is too coarse Ensure you use a suitable espresso grin
Ground espresso is not fresh Change old beans with fresh roasted or pre-ground.
Ground espresso should not be kept for longer than
a week.
Filter holes are blocked Use the ne pin on the cleaning tool to clear the
holes. Refer to ›Cleaning The Filters‹, page 65.
 Loading...