Table of Contents
Precautions. . . . . . . . . . . . . . . . . . . . . . . . . . . . . . . . . . 3
Setup. . . . . . . . . . . . . . . . . . . . . . . . . . . . . . . . . . . . . . . 4
Parts and Controls . . . . . . . . . . . . . . . . . . . . . . . . . . . . 4
The OSD (On-screen Display) System. . . . . . . . . . . . . 6
Resetting the adjustments . . . . . . . . . . . . . . . . . . . . . 10
Specifications . . . . . . . . . . . . . . . . . . . . . . . . . . . . . . . 11
Monitor Information. . . . . . . . . . . . . . . . . . . . . . . . . . . 11
Power Saving Function and LED Indicators. . . . . . . . 11
If thin lines appear on your screen (damper wires). . . 11
Warning Messages. . . . . . . . . . . . . . . . . . . . . . . . . . . 12
Troubleshooting . . . . . . . . . . . . . . . . . . . . . . . . . . . . . 12
Precautions
Do not install the monitor in the following places:
• on surfaces (rugs, blankets, etc.) or near materials (curtains,
draperies) that may block the ventilation holes
• near heat sources such as radiators or air ducts, or in a place
subject to direct sunlight
• in a place subject to severe temperature changes
• in a place subject to mechanical vibration or shock
• on an unstable surface
• near equipment which generates magnetism, such as a
transformer or high voltage power lines
• near or on an electrically charged metal surface
• Clean the screen with a soft cloth. If you use a glass cleaning
liquid, do not use any type of cleaner containing an anti-static
solution or similar additive as this may scratch the screen’s
coating.
• Do not rub, touch, or tap the surface of the screen with sharp or
abrasive items such as a ball point pen or screwdriver. This type
of contact may result in a scratched picture tube.
• Clean the cabinet, panel and controls with a soft cloth lightly
moistened with a mild detergent solution. Do not use any type of
abrasive pad, scouring powder or solvent, such as alcohol or
benzene.
When you transport this monitor for repair or shipment, use the
original carton and packing materials.
• Use the supplied power cord. If you use a different power cord,
be sure that it is compatible with your local power supply.
For the customers in the US
If you do not use the appropriate cord, this monitor will not
conform to mandatory FCC Standards.
• Before disconnecting the power cord, wait at least 30 seconds
after turning off the power to allow the static electricity on the
screen’s surface to discharge.
• After the power is turned on, the screen is demagnetized
(degaussed) for about 3 seconds. This generates a strong
magnetic field around the screen, which may affect data stored on
magnetic tapes and disks placed near t he monitor. Be sure to keep
magnetic recording equipment, tapes and disks away from the
monitor.
Installation
Maintenance
Transportation
Warning on power Connection
The equipment should be installed near an easily accessible
outlet.
4
Getting Started
Setup
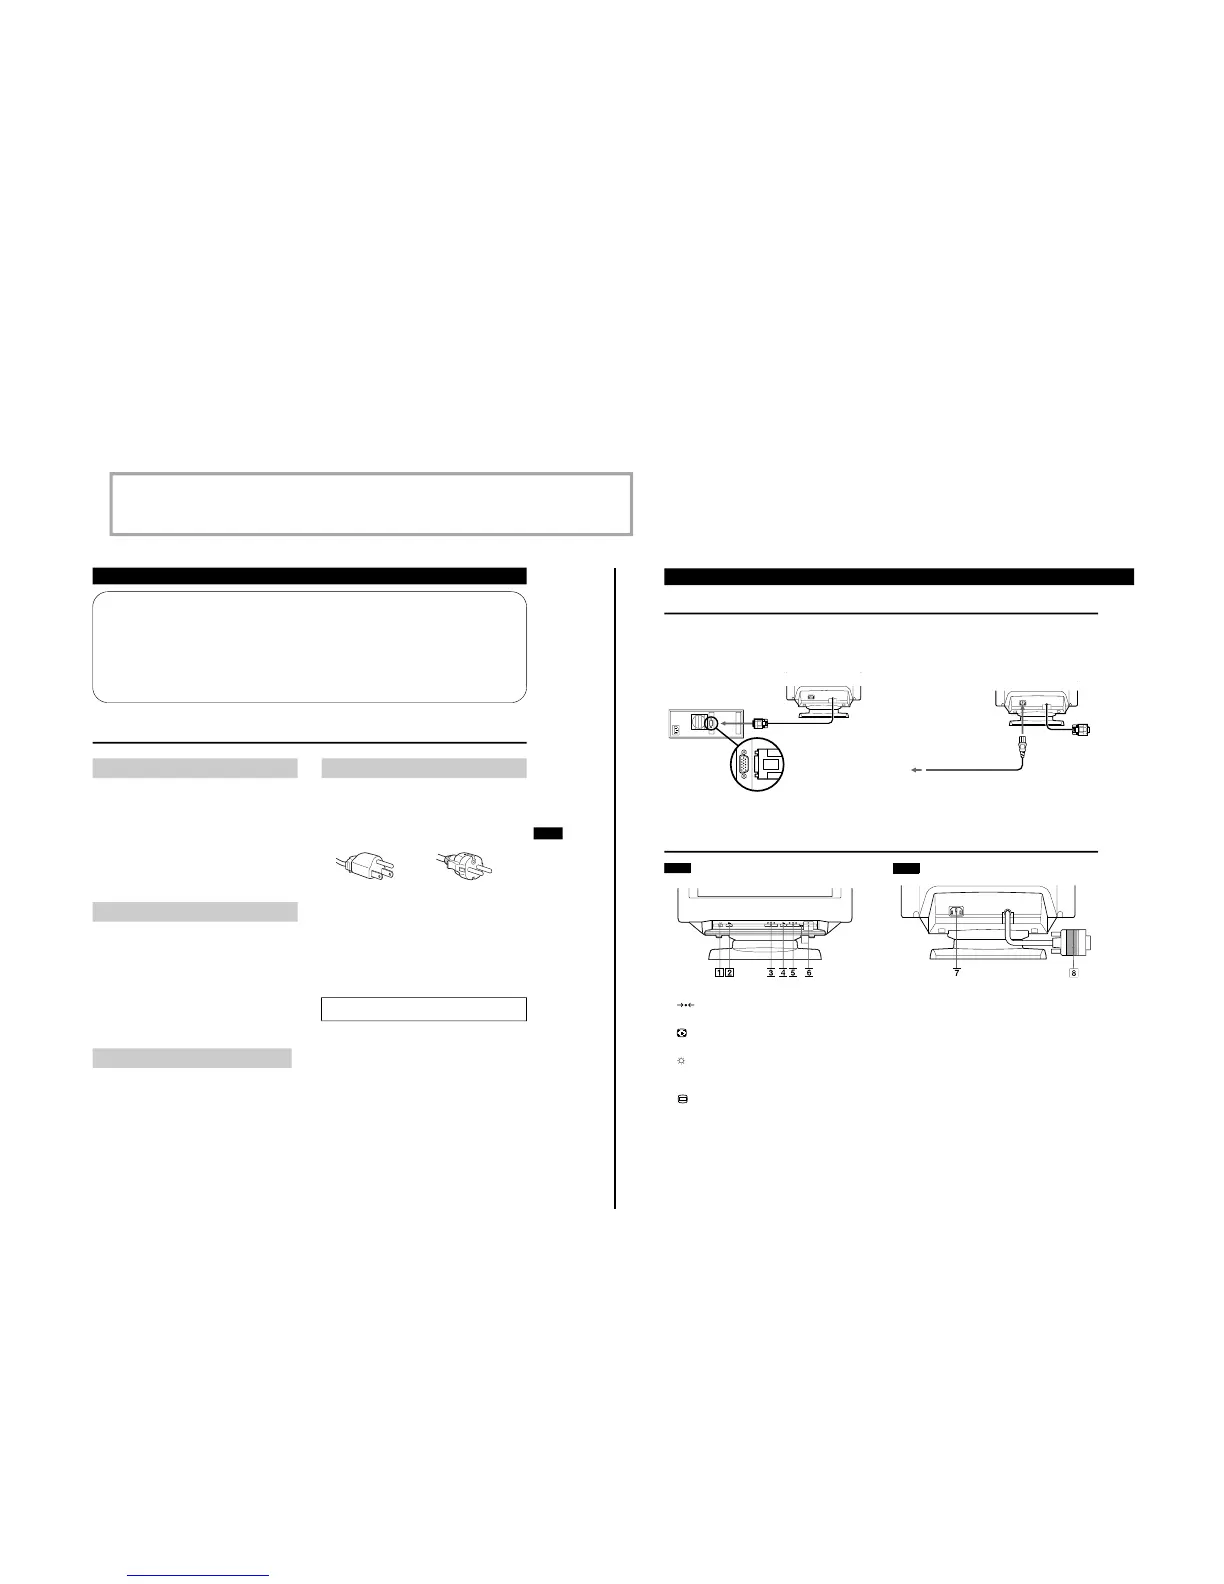
Connect the monitor to your computer system.
This monitor will sync to platforms running at horizontal frequencies between 30 and 96 kHz.
Step 1
Make sure the compuer system is switched off and attach
the video signal cable to the video output of the computer.
Step 2
Make sure the compuer is switched off and attach the
power cord the monitor. Then, attach the other end of the
power cord to a power outlet.
Step 3
Switch on the monitor and computer.
Step 4
Adjust the user controls according to your personal
preference.
Installation is complete.
Parts and Controls
1 (RESET) button (pages 6, 10)
Resets the adjustments to the factory settings.
2 Auto Sizing and Centering button (page 5)
Automatically adjusts the picture size and position.
3 (BRIGHTNESS) (v/V) buttons (page 5)
Adjust the picture brightness.
Operate as the (v/V) buttons when adjusting other items.
4 (MENU) button (page 6)
Displays the MENU OSD.
5 6 (CONTRAST) (B/b) buttons (page 5)
Adjust the contrast.
Operate as the (B/b) buttons when adjusting other items.
6 1 (POWER) switch and indicator
Turns the monitor on and off.
The indicator lights up green when the monitor is on, and lights
up green and orange when the monitor is in Power Saving
mode.
7 AC IN connector
Provides AC power to the monitor.
8 Video input connector (HD15) (page 5)
Inputs RGB video signals and SYNC signals.
Computer
to the video output