I
I
LOWER OVEN
How to Roast
in
Your Lower Oven
See Roasting Guide.
Roasting is cooking by dry heat.
It’s really a baking procedure
used for meats. That’s why you
use the Bake controls for roasting.
Roasting temperatures, which
should
be
low
and steady, keep
spattering to a minimum. When
roasting, it’s not necessary to
sear, baste, cover or add water
to your meat. Tender meat or
poultry can be roasted uncovered.
Check the weight of the meat and
place it fat-side-upon the rack in
the broiler pan that came with
your range. This helps the meat
to baste itself.
Always use a roasting pan that
fits the size of your meat. A roast
placed in a pan too small for its
size will drip over the edge.
Most meats continue to cook
slightly while standing in the
oven or after being removed
from it.
Take this into
consideration when determining
your cooking time.
To cook frozen meat roasts
without thawing, allow more
cooking time. For large roasts,
add
10 to 25 minutes per pound.
For roasts under 5 pounds, add
10 minutes per pound.
To slow down surface browning
on turkeys, you can use a foil
“tent.” The tent-shaped foil
should be laid loosely over the
poultry so the heat can circulate
under the foil.
Most frozen poultry should be
thawed before cooking to make
sure it’s done evenly. Some,
however, can be cooked
successfully without thawing.
Check the package label for
specific directions.
-—
.-..
.—.
--.
.-.—.
.—.
-.—.
-.,
,.-—,——-.
How to Set Oven
for Roasting
Step 1: Use shelf position
indicated on the Roasting Guide.
For very large roasts, remove the
second oven shelf.
Step 2: Place meat inside the oven
and close the door.
~m~
:A
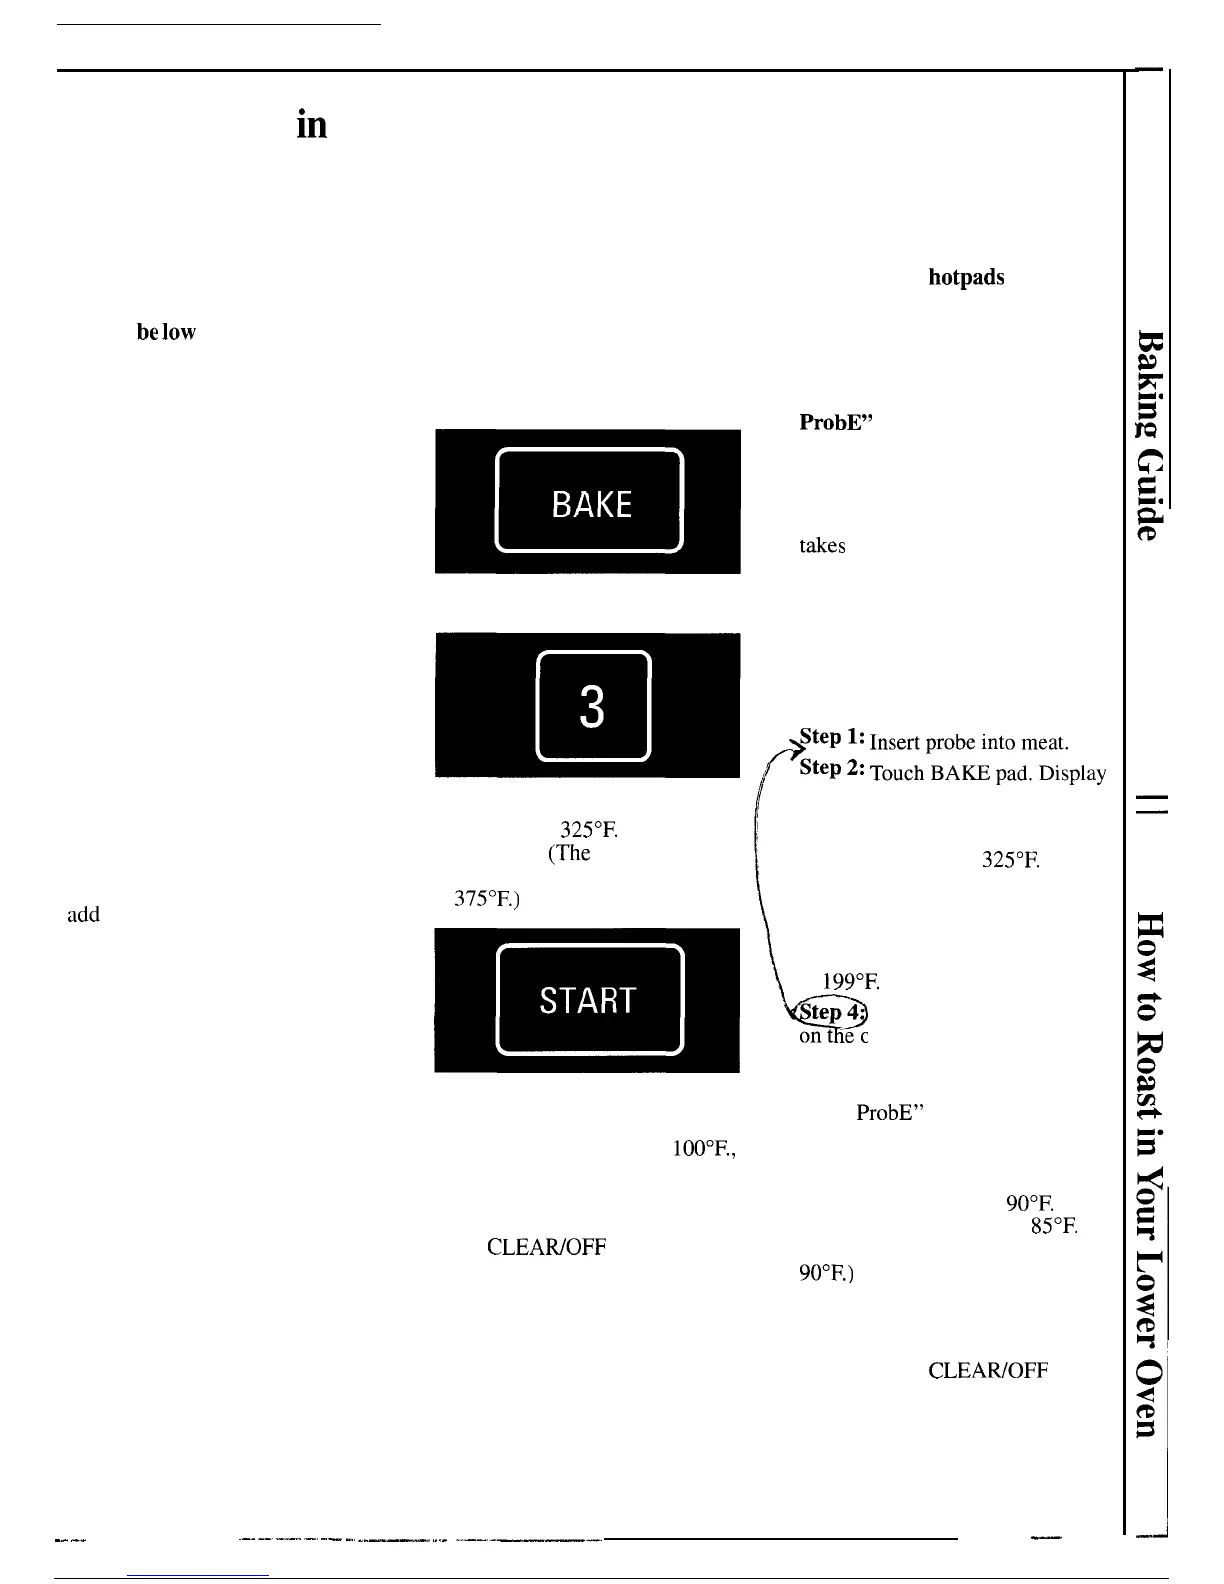
Step 3: Touch BAKE pad.
Step 4: Touch number pads 3,2
and 5 to enter
325°F.
oven
temperature.
(The
exception is
small poultry which is roasted
at
375°F.)
~m~
Am
Step 5:
Touch START pad to begin
roasting. Display shows oven
temperature as it rises past
100°F.,
and signal sounds when desired
temperature is reached.
Step 6: When food is cooked,
touch
CLEAWOFF pad to turn
oven off.
How to Set Oven When
Using Temperature Probe
Caution: Use
hotpads
when
removing probe after cooking is
done. Do not use tongs to pull on
it—they might damage it.
Do not unplug probe from oven
receptacle during cooking. “USE
ProbE”
will flash.
For many foods, especially roasts
and poultry, internal food
temperature is the best test for
doneness. The temperature probe
takes
the guesswork out of roasting
by cooking foods to the exact
doneness you want. When the
internal temperature of the food
reaches the temperature you set,
oven automatically shuts off,
“End” and “BAKE” flash on
display and oven beeps four times.
$~~
~;
;;;:~~n;dm~;~play
[
shows “BAKE,” “SET TEMP”
and a temperature. Touch number
pads 3,2 and 5 to enter the desired
oven temperature of
325°F.
Step 3: Touch PROBE pad.
“SET FOOD TEMP” flashes.
Use number pads to enter desired
finished meat temperature from 90
to
199°F.
Q
tep
4 Plug probe into receptacle
on t ‘e oven wall.
Step 5:
Touch START pad. Probe
must be inserted into receptacle or
“USE
ProbE” flashes on display.
The lower left display shows the
set food temperature, and the lower
right display shows actual food
temperature rising past
90°F.
(The
lower right display shows
85°F.
until food temperature is at least
90°F.)
When desired temperature
is reached, oven automatically
shuts off, “End’’and “BAKE”
flash on display and oven beeps.
Step 6: Touch CLEAWOFF pad
and remove the probe.
39
,...
..——-———
.-, —...
-.——.
-.,-—