7
BREAKER
6 Fitting Instr6 Fitting Instr
6 Fitting Instr6 Fitting Instr
6 Fitting Instr
uction - Accessoriesuction - Accessories
uction - Accessoriesuction - Accessories
uction - Accessories
6.1 L.T. Auxiliary Blocks Replacement
A set of 32 self-aligning secondary cir cuit isolating contacts is provided in two
blocks, B and C, each clearly numbered 1 to 16. These are easily accessible at
the top of the circuit breaker and ensure isolation of secondary circuits when
M-PACTPLUS is in the DISCONNECTED position. Wiring terminals have a dual
connecting facility to allow termination of secondary wiring by screw or spade
connectors.
6.1.1 Connectors for auxiliary circuits
The LT auxiliary terminal blocks - B1 to B16 & C1 to C16 are situated at the top,
right hand side of a
M-PACTPLUS air circuit breaker. Withdrawable units have a
“moving” auxiliary contact block fitted to the moving portion of the
ACB and
fixed portion fitted to the cassette (cradle/housing). Fixed pattern breakers, hav e
both moving and fixed L.T blocks fitted to a mounting bracket and can be
replaced as a complete assembly. The following, demonstrates how to gain
access, remove and replace the auxiliar y terminal contact blocks.
6.1.2 Tool kit required
• Flat Bladed screwdriver 8 mm (Used for removal of front panel fixing
screws and operation of racking shutter drive).
• Allen key set various (Used for removal horizontal part of spring
charging handle to allow complete removal of M-PACT Plus front
fascia and LT mounting bracket fixing scr ews).
6 Einbau Anleitung - Anbaugeräte6 Einbau Anleitung - Anbaugeräte
6 Einbau Anleitung - Anbaugeräte6 Einbau Anleitung - Anbaugeräte
6 Einbau Anleitung - Anbaugeräte
6.1 Steuerleitungskontakte
Ein Satz von 32 selbstausrichtenden Steuerleitungskontakten ist in zwei Blöcke
B und C mit nummerierten Anschlüssen (1 bis 16) aufgeteilt. (Hinweis für
bestimmte weitere Schutzfunktionen ist ein dritter Block A eingebaut). Diese
leicht zugänglichen Kontakte oberhalb des Schalters trennen die Steuerleitungen
selbsttätig wenn der Schalter in Trennstellung verfahren wird. Die Steuerleitungen
können entweder mit Schraub oder Stecktechnik angeschlossen werden.
6.1.1Die S teuerleitungsklemmleisten B1-B16 und C1-C16 befinden sich oben
links am Schalter. IAusfahrtechnik hat einen beweglichen Block (am Schalter)
und einen festen Klemmblock (am Einschubträger). Festeinbauschalter haben
beides einen fest Block und einen beweglichen Klemmblock der mit eine Halter
in Position gehalten wird. Wie man sich Zugang zu den Klemmen verschafft um
sie ggf. zu ersetzen wird im folgenden gezeigt:
6.1.2 Werkzeug:
• 8 mm Schraubendreher (Für Deckelschrauben)
• Imbus Schlüsselsatz.
Einbau AnleitungEinbau Anleitung
Einbau AnleitungEinbau Anleitung
Einbau Anleitung
6.1.3 Spannungsfreiheit sicherstellen, Schalter in ‘Trennstellung’ verfahren bzw.
für Festeinbau alle elektrischen und mechanischen Verbindungen lösen, Schalter
entnehmen und auf eine geeignete Werkbank stellen.
Fitting InstrFitting Instr
Fitting InstrFitting Instr
Fitting Instr
uctionsuctions
uctionsuctions
uctions
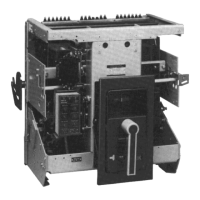
6.1.3 The breaker should be safely isolated, fully withdrawn to DISCONNECTED
position, removed from the switchboard and placed on a suitable working
surface.
FITTING
6.1.4
a) Schalter wieder Aufstellen, und nun den horizontalen Teil des Handspannhebels
abmontieren durch lösen der Imbus Schraube (Größ e 5) die sich Seitlich im Griff
befindet.
b) Nun die 4 Deckelbefestigungsschrauben lösen und den Deckels bei
gleichzeitigen teilweisen Bestätigen des Hansspannhebels abnehmen.(Fig. b1
& b2)
6.1.4
a) Remove horizontal part of charging handle using 5 mm hexagonal key.
b) Unscrew 4 off front fascia fixing screws and remove front fascia by partially
pulling the charging handle downwards. (Fig. b1 & b2)
6.1.5 Access to a fixing screw situated behind the ‘electronic release’ protec-
tion relay is required. To remove an ‘electronic release’ protection relay (if fit-
ted), 3 x fixing nuts should be backed off (not removed) and the relay will slide
off the mounting plate.It may be necessary to remove a cable tie which sup-
ports the secondary wiring harness.
6.1.5 Es ist notwendig eine Schraube zu erreichen die sich hinter der
Auslöseeinheit befindet. Daher zunächst den Auslöser entfernen. Hier zu die drei
Haltemuttern leicht lösen die Einheit ca 10mm nach oben schieben und dann
herausnehmen. Es ist unter Umständen notwendig einen Kabelbinder der den
Kabelbaum hält zu entfernen.
(b1)(b1)
(b1)(b1)
(b1)
(b2)(b2)
(b2)(b2)
(b2)
(a)(a)
(a)(a)
(a)
 Loading...