of)
m
p-
©
Z
m
p=.
©
©
"1-
o©
La.J
...J
©
rv,
p-
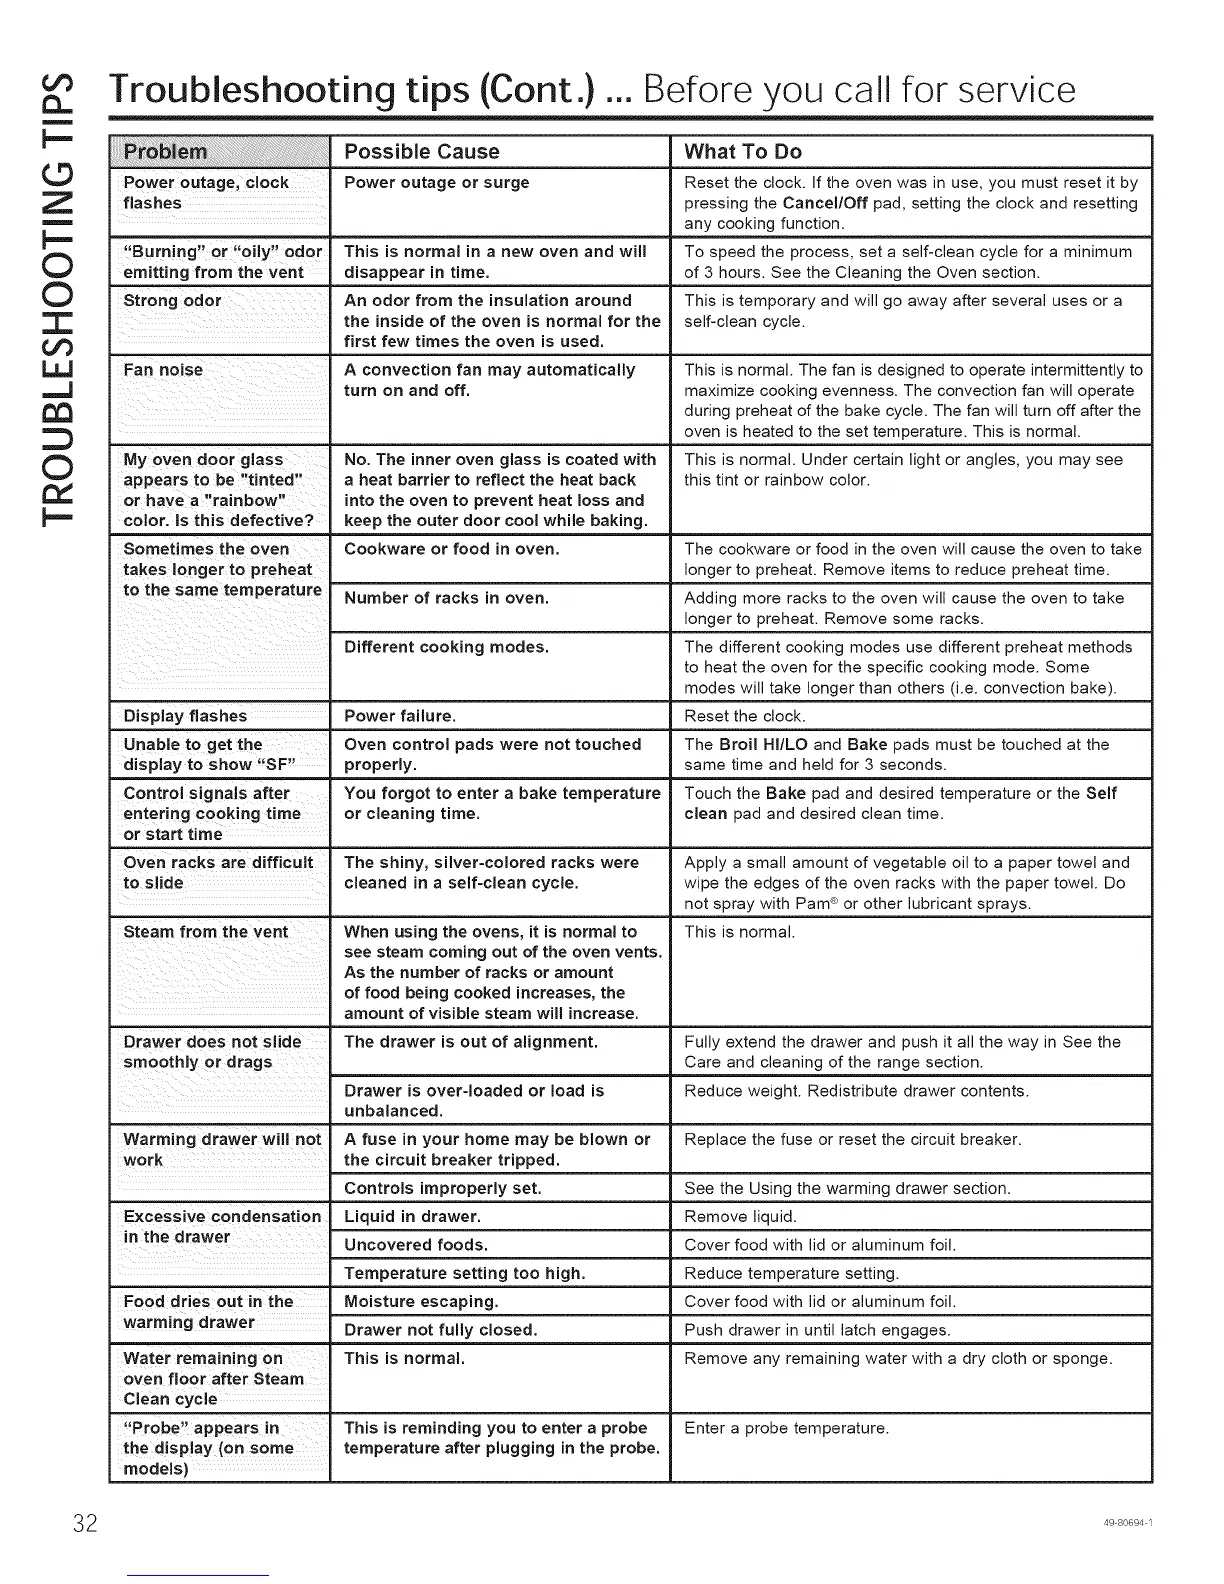
Troubleshooting tips (Cont.) ... Before you call for service
Possible Cause What To Do
Power outage, clock Power outage or surge Reset the clock. If the oven was in use, you must reset it by
flashes pressing the Cancel/Off pad, setting the clock and resetting
any cooking function.
"Burning" or "oily" odor To speed the process, set a self-clean cycle for a minimum
emitting from the vent of 3 hours. See the Cleaning the Oven section.
Strong odor This is temporary and will go away after several uses or a
self-clean cycle.
My oven door glass
appears to be "tinted"
or have a "rainbow"
color, is this defective?
Sometimes the oven
takes longer to preheat
to the same temperature
Display flashes
Unable to get the
display to show "SF"
Control signals after
entering cooking time
or start time
Oven racks are difficult
to slide
Steam from the vent
This is normal in a new oven and will
disappear in time.
An odor from the insulation around
the inside of the oven is normal for the
first few times the oven is used.
A convection fan may automatically
turn on and off.
No. The inner oven glass is coated with
a heat barrier to reflect the heat back
into the oven to prevent heat loss and
keep the outer door cool while baking.
Cookware or food in oven.
Number of racks in oven.
Different cooking modes.
Power failure.
Oven control pads were not touched
properly.
You forgot to enter a bake temperature
or cleaning time.
This is normal. The fan is designed to operate intermittently to
maximize cooking evenness. The convection fan will operate
during preheat of the bake cycle. The fan will turn off after the
oven is heated to the set temperature. This is normal.
This is normal. Under certain light or angles, you may see
this tint or rainbow color.
The cookware or food in the oven will cause the oven to take
longer to preheat. Remove items to reduce preheat time.
Adding more racks to the oven will cause the oven to take
longer to preheat. Remove some racks.
The different cooking modes use different preheat methods
to heat the oven for the specific cooking mode. Some
modes will take longer than others (i.e. convection bake).
Reset the clock.
The Broil HI/L© and Bake pads must be touched at the
same time and held for 3 seconds.
Touch the Bake pad and desired temperature or the Self
clean pad and desired clean time.
The shiny, silver-colored racks were Apply a small amount of vegetable oil to a paper towel and
cleaned in a self=clean cycle, wipe the edges of the oven racks with the paper towel. Do
not spray with Pam <R_or other lubricant sprays.
This is normal.
When using the ovens, it is normal to
see steam coming out of the oven vents.
As the number of racks or amount
of food being cooked increases, the
amount of visible steam will increase.
Drawer does not slide The drawer is out of alignment. Fully extend the drawer and push it all the way in See the
smoothly or drags Care and cleaning of the range section.
Drawer is over-loaded or load is Reduce weight. Redistribute drawer contents.
unbalanced.
Warming drawer will not A fuse in your home may be blown or Replace the fuse or reset the circuit breaker.
work the circuit breaker tripped.
Controls improperly set. See the Using the warming drawer section.
Excessive condensation Liquid in drawer. Remove liquid.
in the drawer
Uncovered foods. Cover food with lid or aluminum foil.
Temperature setting too high. Reduce temperature setting.
Food dries out in the Moisture escaping. Cover food with lid or aluminum foil.
warming drawer Drawer not fully closed. Push drawer in until latch engages.
Water remaining on This is normal. Remove any remaining water with a dry cloth or sponge.
oven floor after Steam
Clean cycle
"Probe" appears in This is reminding you to enter a probe Enter a probe temperature.
the display (on some temperature after plugging in the probe.
models)
32 49 80694 1