1.
Carefully clean the in-line housing and closures.
2.
Lightly grease new O-rings and fit them onto blanking plates.
Hint!
Do not use conventional greases and oils for seals in contact with the product.
Observe the safety data sheets of the lubricant manufacturers. Tuchenhagen
recommends Rivolta F.L.G. MD-2 and PARALIQ GTE 703. These lubricants are
approved for foodstuff and are resistant to beer froth. They have the NSF-H1 (USDA
H1) registration. PARALIQ GTE 703 can be ordered from Tuchenhagen under part no.
413-064 and Rivolta F.L.G. MD-2 under part no. 413-071.
®
Done.
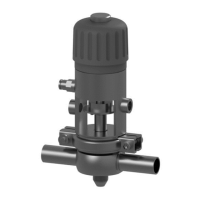
1.5 Assemble the housing
Caution!
Danger of injury due to caustic liquids
The cleaning agent residues contained in the pipelines can be caustic.
► Therefore, always flush the pipeline section of the in-line housing sufficiently before
assembly.
Notice
Damage to fitting and sealing surfaces
Tilted blanking plates damage the fitting and sealing surfaces and lead to leaks.
► When installing the blanking plates, ensure that they are correctly seated.
Hint!
Requirement:
•
There must be no objects (tools, cleaning rags, cleaning agents) in the pipe before installing the
in-line housing.
•
The installation position must ensure that the VARINLINE housing can safely run empty.
For in-line housings with welding supports, proceed as follows:
1.
Basically weld in-line housings free of stress and distortion with mounted blanking plates and
hinged rings, but without O-rings.
2.
Flush the housing with forming gas from the inside to push the oxygen out of the system.
3.
Fit the housing into place and tack it.
4.
Use a suitable welding method. Tuchenhagen recommends pulsed TIG welding.
5.
Weld the housing into the pipe system; use welding filler, if necessary.
6.
Passivate the seam after welding.
7.
Insert the blanking plates with new O-rings into the housing.
! Ensure that the fasteners are correctly seated.
8.
Assemble the hinged rings.
Assembly Instructions VARINLINE
®
Housing
Assemble the housing
430BAL008619EN_3
29.02.2024 7