GEEVON Thermometer
Item No.T23190
User Manual
Thank you for purchasing T23190 Thermometer.
Please take a moment to read this guide and store it for
future reference.
Features & Benefits:
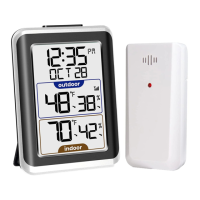
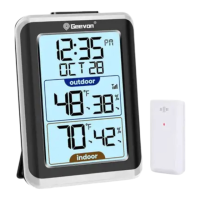
DISPLAY UNIT & OUTDOOR SENSOR
1.Indoor temperature and humidity
2.Current selected channel arrow
3.Channel 1 temperature alert
4.Channel 1 temperature and humidity
5.Comfort icon
6.Temperature trend
7.Channel 2 temperature and humidity
8.Channel 2 temperature and humidity max/min record
9.Channel 3 temperature and humidity
10.Channel 2 humidity alert
11.Hanging hole
12.Power socket (To keep the light always on )
13.Battery cover
14.Stand bracket
15.Outdoor temperature and humidity
16.Signal receive light
17. Sensor hanging hole
18.Sensor channel switch
19. Sensor batteries (2*AAA not includes)
Buttons
A: CH/▲
B:
C:LIGHT
D: MEM/▼/C/F
Package Contents:
1. Display Unit
2. 3 x Outdoor Sensor
3. Instructions Manual
4. 1 x USB line
5. Warranty card
Installing or Replacing Batteries:
•We recommend using high quality lithium battery for the
best product performance.
•Heavy duty or rechargeable batteries are not recommended.
•The outdoor sensor requires high quality lithium batteries in low
temperature conditions. Cold temperatures could cause
other batteries to function improperly.
•Do not mix old and new batteries. Do not mix alkaline,
standard, and/or rechargeable batteries.
Default settings:
1. Default temperature: °F
The LCD display fully for 3 seconds when changing new
battery or resetting, then with a sound BI into the normal
state, after testing temperature, receiving RF for 3 minutes.
Display / Button Details:
There are 3 buttons on the back,1 touch button on the top .
They are includes: MEM/▼/C/F , , CH/▲.
1. MEM/▼/ C/F buttons:
a. Press to decrease the setting value during setting.
b. Press and hold 2 seconds button for fast adjust during setting mode.
c. In normal display mode, press this button to display max/min
temperature/humidity of the channel where the arrow is located.
d. In normal display mode, press and hold this button to switch
between °C and °F.
e. Press and hold this button to clear the record of MAX/MIN
temperature and humidity when display shows MAX or MIN
temperature and humidity.
2. buttons:
a. In normal display mode, press this button to display HI/LO
temperature/humidity alert.
b. In checking mode, press and hold this button to enter alert mode.
c. In setting mode, press this button to confirm the setting;
press and hold this button to open or close alert.
3. CH/▲buttons:
a. Press to increase the setting value during setting.
b. Press and hold 2 seconds button for fast adjust during setting mode.
c. In normal display mode, press this button to select the setting channel.
d. In normal display mode, press and hold to clear data and search RF.
Indoor/outdoor temperature and humidity:
1. Indoor temperature 50°F ~ 140°F (-10°C ~ 60°C), display LL.L
when below 14°F and display HH.H when higher than 140°F.
2. Outdoor temperature-58°F ~ 158°F ( -50°C ~ 70°C), display LL.L
when below -58°F and display HH.H when higher than 158°F.
3. Temperature resolution: 0.1°C
4. Indoor and outdoor humidity range: 20%-95%, display 20%
when below 20% and display 95% when higher than 95%.
5. Humidity resolution: 1 %RH
Accuracy:
A B C D11
13
12
14
9
5
1
3
4
2
8
7
6
10
15
16
17
19
18