Do you have a question about the General 3DG and is the answer not in the manual?
Read instructions, use correct batteries, keep away from children, use approved accessories.
Avoid viewing beam directly or with optical tools, avoid reflective surfaces, do not disassemble the laser.
Proper positioning, supervision of children, turning off when not in use, securing the unit.
Lists all items included in the package: laser, mount, target, glasses, charger, batteries, case.
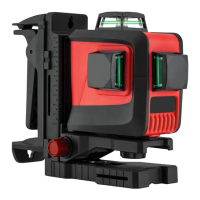
Identifies key external parts of the laser device: ports, tripod thread, switch, panel, cover.
Explains operations for Line mode and Pulse mode on the control panel.
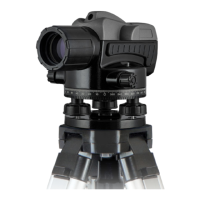
Identifies parts of the optional detector: LEDs, sensors, speaker, bubble vial, power.
Details on using AA Ni-Mh batteries, charging procedure, and battery replacement.
Instructions for selecting location, placing on level surface, turning on, and self-levelling.
How to turn on, move, and interpret the optional laser detector.
Identifies features of the multi-purpose mount: magnets, screws, threads, clamp, height adjustment.
Instructions for attaching the mount to magnetic surfaces and adjusting the instrument.
Instructions for using the clamp to mount the laser, e.g., on ceiling tracks.
Instructions for securing the mount using screws onto a surface.
Instructions for attaching the mount and laser to a tripod.
Solutions for common problems like laser not turning on or not levelling.
Guidelines for proper handling, transporting, and storing the laser instrument.
Instructions for cleaning the instrument and when calibration is recommended.
Details the 3-year manufacturer's warranty and consumer rights.
Provides contact phone numbers for Australia and New Zealand customer support.
Lists key technical specifications such as accuracy, range, battery life, and dimensions.
The General 3DG Multi-Line Laser is a precision measuring instrument designed for various leveling tasks, offering a range of features to enhance accuracy and ease of use. This instruction manual provides comprehensive guidance on its safe operation, setup, and maintenance, ensuring users can maximize its potential while adhering to safety protocols.
The General 3DG is a multi-line laser level that projects multiple laser lines for accurate leveling and alignment. It is primarily used for tasks requiring precise horizontal and vertical references, such as installing cabinets, tiling, framing, and other construction or renovation projects. The device utilizes a self-leveling mechanism to ensure the projected laser lines are always perfectly level, even on slightly uneven surfaces. When the instrument is outside its self-leveling range, the laser beam will flash, alerting the user to reposition the device for accurate operation.
The laser operates with a control panel that allows users to switch between different line modes, enabling the projection of horizontal, vertical, or a combination of lines as needed for specific tasks. It also features a pulse mode, which is essential when using an optional detector for extended working ranges or in bright conditions where the laser lines might be difficult to see with the naked eye. The pulse mode enhances the visibility and detection of the laser beam, making it a versatile tool for both indoor and outdoor applications.
The General 3DG is designed for user-friendly operation, starting with its power supply. It is powered by four AA Ni-Mh rechargeable batteries, which can be charged using the provided indoor charger. The manual outlines a clear process for charging and replacing these batteries, emphasizing correct polarity to ensure proper function.
Setting up the laser involves selecting a practical location close to the work site, ensuring the area is clear of traffic. The device should be placed on a level surface, such as a bench or a mount, to facilitate its self-leveling function. Once powered on, the instrument automatically commences self-leveling, and all beams activate. The line mode button on the control panel allows users to cycle through the active beams, selecting the appropriate configuration for their task.
For enhanced functionality, the General 3DG can be used with an optional detector, which significantly extends its operating range. To use the detector, the laser must first be set to pulse mode by pressing and holding the line/pulse mode button for five seconds. The detector is then switched on, and its speaker will beep to indicate operation. By moving the detector into the path of the laser beam, users can identify the beam's position, with LED direction indicators guiding them to the center of the beam for precise alignment. The detector can be held upright for horizontal beams and rotated 90 degrees for vertical beams, making it adaptable to various measurement orientations.
The multi-purpose mount is a key accessory that expands the versatility of the General 3DG. It offers several mounting options:
These diverse mounting options ensure that the General 3DG can be securely positioned in almost any work environment, providing stable and accurate laser lines for a wide range of tasks.
Proper care and maintenance are crucial for preserving the accuracy and longevity of the General 3DG. As a precision measuring instrument, it should always be handled with care and transported in its provided carry case to prevent damage. Before transporting or moving the instrument around a job site, the power switch should always be slid to the "off" position.
Users should be aware that reflective surfaces, such as glass, can cause the laser beam to reflect, potentially leading to inaccurate reference points. Therefore, care should be taken to avoid such reflections during operation.
For storage, the instrument should be kept in a dry, shady location whenever possible. Regular calibration is recommended every six months, especially if ongoing accurate leveling is required or if the instrument has experienced an impact. This ensures that the laser maintains its precision over time.
Before attempting any precision leveling tasks, the operator should always check the accuracy of the instrument. Failure to do so could result in inaccurate measurements and potentially costly errors. After use, particularly in dusty, damp, or wet conditions, the instrument should be cleaned with a dry, soft cloth before storage. Smudges and fingerprints can be removed with a damp tissue or a soft, lint-free cloth, ensuring the device remains in optimal condition.
Troubleshooting guidance is also provided in the manual to address common issues. If the laser does not turn on or does not remain on for long periods, users are advised to check the batteries for correct insertion, charge level, and signs of damage in the battery compartment. If the laser does not level off, it may be outside its self-leveling range, requiring adjustment of the instrument or tripod to a level position. Impact damage is also noted as a potential cause for leveling issues, highlighting the importance of careful handling.
The General 3DG is backed by a 3-year manufacturer's warranty, and customer support contact information is provided for any queries or technical questions, ensuring users have access to assistance when needed. This comprehensive approach to usage, maintenance, and support underscores the commitment to providing a reliable and durable multi-line laser level.
| Laser Class | Class II |
|---|---|
| Leveling Range | ±4° |
| Power Source | 4 x AA batteries |
| IP Rating | IP54 |
| Operating Temperature | -10°C to 40°C |