11
English
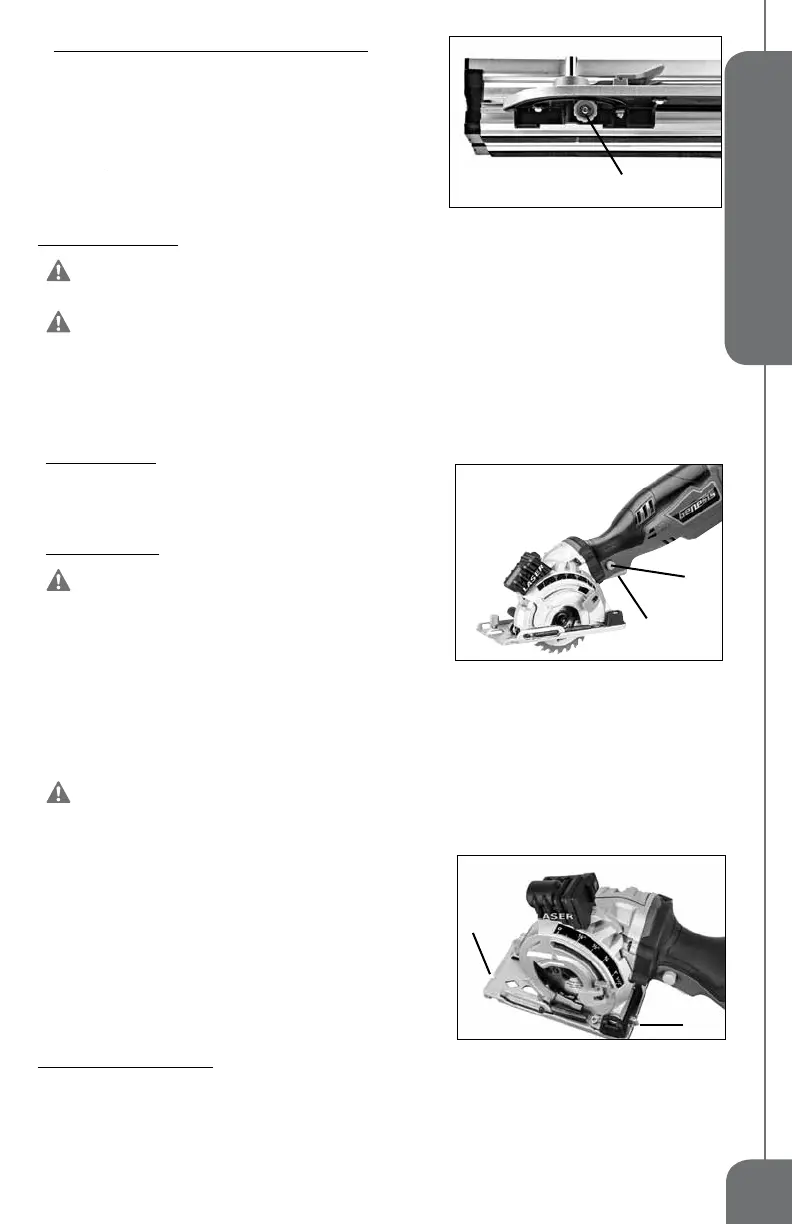
Repositioning the Miter Angle Scale and Base (FIG 10)
For increased versatility, the miter angle scale and base can be
fitted to either side of the track and positioned anywhere along
the length of the track.
1. Loosen the lock knob (26) underneath the miter base.
2. Slide the miter scale and base along the track to desired
position.
3. Fasten the lock knob to secure its position.
OPERATION
WARNING:
To reduce the risk of serious personal injuries, read and follow all
important safety warning and instructions before using this tool.
WARNING: Always be sure the tool is disconnected from the power source
before making any adjustments or setting up prior to cutting. Failure to disconnect or
unplug the tool may cause accidental starting, resulting in serious personal injury.
NOTE: Always check that the power supply corresponds to the voltage on the ratings plate.
STARTING AND STOPPING THE TOOL (FIG 11)
To Start the Tool
1. Press the lock-off / plunge release button (1) in and keep it
pressed.
2. Depress ON/OFF trigger switch (2) firmly to start the tool.
To Stop the Tool, release the ON/OFF trigger switch.
WARNING: The saw blade continues to
rotate after the tool is switched off.
RELEASING THE PLUNGE STOP (FIG 11)
1. Press the lock-off / plunge release button and keep it pressed.
2. Raise the body of the saw to plunge the blade into the workpiece.
NOTE: Pressing the lock-off / plunge release button unlocks the plunge cut mechanism so that the saw head
can be moved downwards, and the saw blade emerges from the tiltable protective cover.
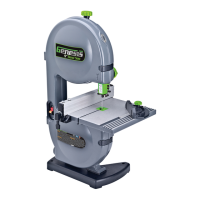
USING THE LASER FEATURE
WARNING: Laser light can cause severe eye damage. Never look directly into
the laser beam. Do not point the laser beam at other people or animals, either directly or
through reflective surfaces.
The laser feature on your saw is powered by two LR44 1.5V
button batteries (installed). The Laser feature clearly shows you an
extended cut-line, even over debris on the work piece. Turn it on
with the laser light ON/OFF switch right before cutting. Turn it off
immediately after use to conserve battery and laser life.
FOLLOWING A CUT LINE (FIG 12)
Pointers (6a,6b) at the front and rear of the base plate allow you to
follow a pre-marked cut line in your workpiece.
APPLICATIONS
This tool is primarily intended for the sawing, longitudinally and transversely, of solid wood, chipboard, plywood,
aluminium, tile and stone held in a fixed position. Please note that the blade pre-installed in the saw as supplied
is intended for use with wood only. Any other use or modification to the device shall be considered as improper
use and could give rise to considerable dangers.
FIG 10
26
FIG 12
6a
6b
FIG 11
1
2