9
English
UNPACKING AND CONTENTS
IMPORTANT: Due to modern mass production techniques, it is unlikely the tool
is faulty or that a part is missing. If you find anything wrong, do not operate the tool
until the parts have been replaced or the fault has been rectified. Failure to do so could
result in serious personal injury.
CONTENTS IN PACKAGE
Description Q'ty Description Q'ty
ASSEMBLY AND ADJUSTMENTS
WARNING: Always be sure that the tool is
switched off and unplugged before adjusting, adding
accessories, or checking a function on the tool.
WARNING: 3-1/2” is the maximum blade
diameter for your saw. Never use a blade that is too
thick to allow the outer flange washer to fit properly
on the spindle. Using a blade that is too thick will
prevent the blade bolt from securing the blade on
the spindle. Larger diameter blades will contact
the blade guards. Either situation could result in a
serious accident.
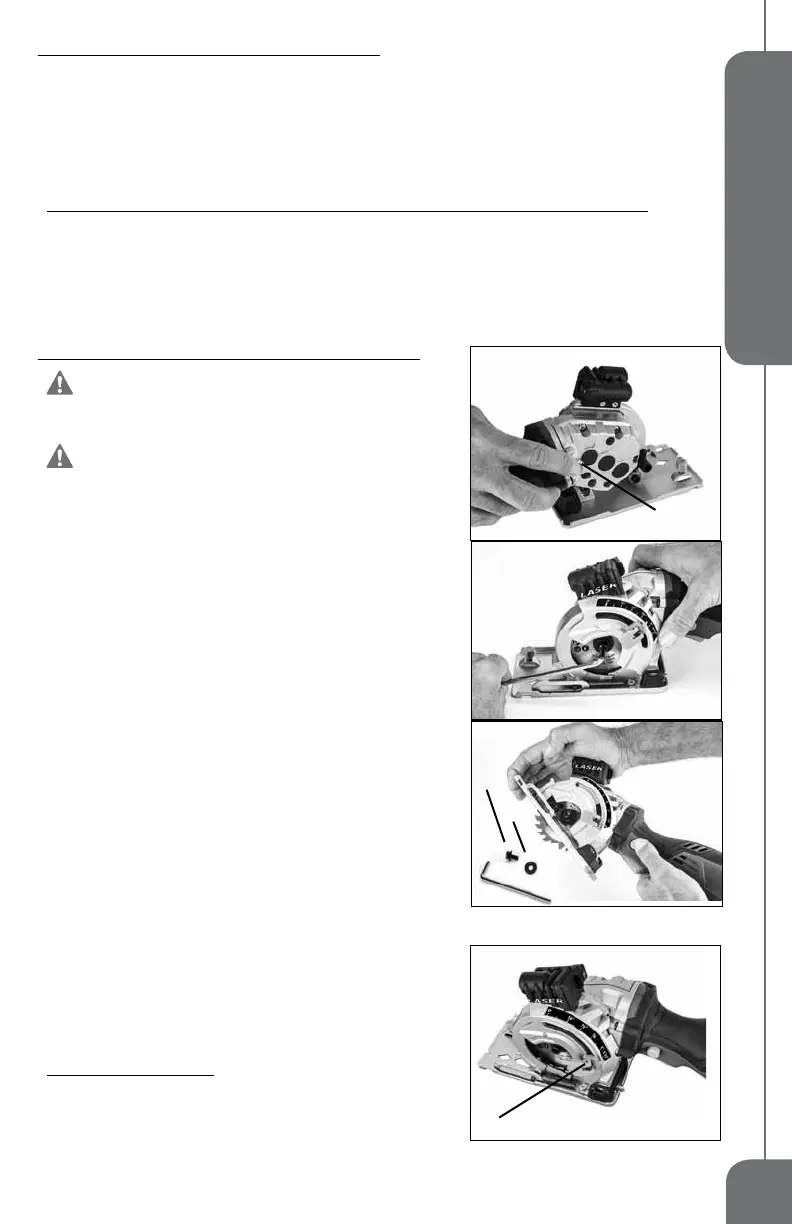
CHANGING BLADES (FIG 2, 3, 4)
1. Unplug the tool from the power source.
2. Press and hold the spindle lock (14), release the clamping screw
(12) by using the Allen key provided (turn clockwise to loosen).
Remove the clamping screw, and outer flange (31).
3. Set the cutting depth to the maximum. (See “Setting the Cutting
Depth” section)
4. Press down the lock-off / plunge release button (1) to lift up the
base plate.
5. Lift blade up off spindle then pull from the tool to remove blade.
6. The installation of a saw blade is done in the reverse order.
7. Press the spindle lock button (until it engages) and tighten the
clamping screw firmly.
NOTE: The arrow on the saw blade must match the arrow
showing direction of rotation on the guard.
SETTING CUTTING DEPTH (FIG 5)
NOTE: Always maintain the correct blade depth setting. For all
cuts the blade depth should not exceed 1⁄4” below the material
being cut. Excessive blade depth increases the chance of saw
KICKBACK.
To Set the Cutting Depth
1. Release the cutting depth clamp (8).
2. Move indicator to the desired cutting depth.
3. Lock the cutting depth clamp to secure depth of cut.
FIG 3
FIG 2
14
FIG 5
8
FIG 4
12
31
FIG 3
Plunge circular saw 1
24T Carbide tipped blade 1
44T HSS blade 1
Diamond blade 1
Rip guide 1
Vacuum adaptor hose 1
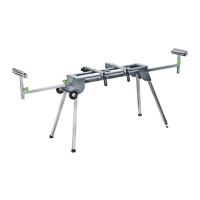
Miter base assembly 1
Allen key 1
Storage bag 1
Operator’s manual 1