EasyManuals Logo

Gigabyte BRIX User Manual

Gigabyte BRIX
30 pages
To Next Page IconTo Next Page
To Previous Page IconTo Previous Page
Page #29 background imageLoading...
Page #29 background image
- 29 -
System Hardware Installation
3-5 Installing the VESA Bracket
VESA Halterung / Support VESA / Soporte VESA / Suporte VESA / Staffa VESA / Кронштейн VESA
/ Wspornik VESA / VESA Braketi / VESA
󳻦󴌛
/ VESA
󳻦󴌛
/ VESA

/ VESA
󻭻󻔇󼸦
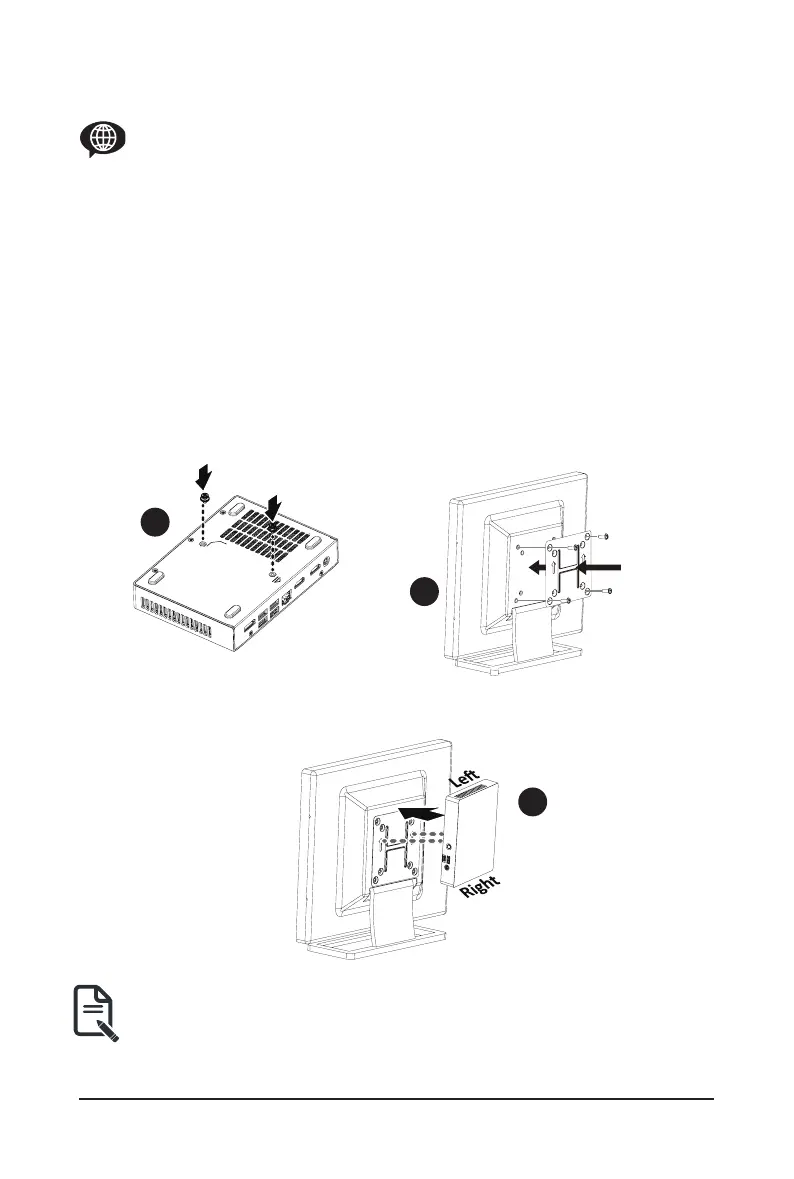
Follow these instructions to install the VESA Bracket:
1. Attach the screws on the underside of the system.
(
安裝 VESA 支撐架螺絲於系統底部。
)
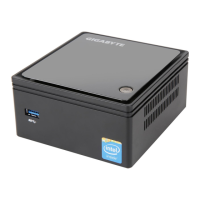
2. Attach the VESA mounting plate to the rear of a compatible display using the screws provided.
(
安裝VESA 支撐架於支援 VESA 支撐架的電腦螢幕或電視機後背。
)
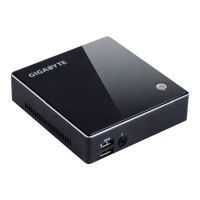
3. The system can now be mounted by sliding the device into place.
(
將已安裝 VESA 支撐螺絲的系統插入 VESA 支撐架的滑軌孔,
向下壓至定位點後即可固定。
)
NOTE!
The illustrations of the VESA bracket installation shown are for reference only.
Please follow the installation steps of actual purchased bracket.
注意! 安裝VESA 支撐架圖示僅參考,請依照實際購買的支架安裝步驟說明。
3
1
2

Other manuals for Gigabyte BRIX

Questions and Answers:

Question and Answer IconNeed help?

Do you have a question about the Gigabyte BRIX and is the answer not in the manual?

Gigabyte BRIX Specifications

General IconGeneral
Processor OptionsIntel Core i3/i5/i7
Memory Slots2 x SO-DIMM
Max Memory32GB or 64GB (depending on the specific model)
StorageM.2 SSD, 2.5" HDD/SSD (depending on model)
GraphicsIntel UHD Graphics (depending on the specific processor)
NetworkingGigabit Ethernet, Wi-Fi (depending on the specific model)
USB PortsUSB-C (depending on model)
Video OutputHDMI (depending on model)
Audio3.5mm audio jack
Operating Systemdepending on model
Power SupplyExternal power adapter
Weightdepending on model

Related product manuals