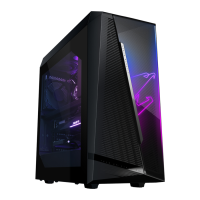
The AORUS MODEL X GAMING DESKTOP PC (AMXI9N8A-2171) is a high-performance desktop computer designed for gaming and demanding tasks. This user manual, Rev. 1001, provides comprehensive information on its setup, operation, and maintenance.
Function Description:
The AORUS MODEL X is a gaming desktop PC that offers robust performance and connectivity. It is designed to be used in a vertical position. Key functions include powering on/off the computer, connecting various peripheral devices, and supporting multiple display outputs. The system features a sophisticated BIOS setup for configuration and includes utilities for easy maintenance and updates.
Important Technical Specifications:
Front View Ports:
- Power Button: For turning the computer on and off.
- USB 3.2 Gen 1 Port: Supports USB 3.2 Gen 1 specification and is compatible with USB 2.0.
- USB Type-C® Port: A reversible USB port supporting USB 3.2 Gen 2x2 specification, compatible with USB 3.2 Gen 2, USB 3.2 Gen 1, and USB 2.0.
- Mic In Jack: For microphone input.
- Line Out Jack: For audio output.
Back View-A Ports:
- Q-Flash Plus Button: Allows BIOS updates when the power connector is connected but the system is not powered on.
- Clear CMOS Button: Resets CMOS values to factory defaults. Requires the computer to be off and unplugged before use.
- SMA Antenna Connectors (2T2R): For connecting antennas to improve signal reception.
- USB 3.2 Gen 1 Port: Supports USB 3.2 Gen 1 specification and is compatible with USB 2.0.
- USB 3.2 Gen 2 Type-A Port (Red): Supports USB 3.2 Gen 2 specification and is compatible with USB 3.2 Gen 1 and USB 2.0.
- DisplayPort: Delivers high-quality digital imaging and audio, supporting bi-directional audio transmission and HDCP 2.3. Supports a maximum resolution of 4096x2304@60 Hz (actual resolutions depend on the monitor).
- USB Type-C® Port (with USB 3.2 Gen 2 Support): Reversible USB port supporting USB 3.2 Gen 2 specification, compatible with USB 3.2 Gen 1 and USB 2.0.
- RJ-45 LAN Port: Gigabit Ethernet LAN port providing Internet connection at up to 10 Gbps data rate. Includes Speed LED (Green for 10 Gbps, Orange for 5/2.5/1 Gbps/100 Mbps) and Activity LED (Blinking for data transmission/receiving, On for no data transmission/receiving).
- USB 3.2 Gen 2 Type-A Port (Q-Flash Plus Port): Supports USB 3.2 Gen 2 specification and is compatible with USB 3.2 Gen 1 and USB 2.0. Used for Q-Flash Plus function with a USB flash drive.
- USB Type-C® Port (with USB 3.2 Gen 2x2 Support): Reversible USB port supporting USB 3.2 Gen 2x2 specification, compatible with USB 3.2 Gen 2, USB 3.2 Gen 1, and USB 2.0.
- Center/Subwoofer Speaker Out: Audio jack for connecting center/subwoofer speakers.
- Rear Speaker Out: Audio jack for connecting rear speakers.
- Optical S/PDIF Out Connector: Provides digital audio out to external audio systems.
- Line In/Side Speaker Out: Audio jack for line-in devices (e.g., optical drive, walkman) or can be retasked as a side speaker out.
- Line Out/Front Speaker Out: Audio jack supporting audio amplifying function, recommended for headphones/speakers.
- Mic In/Side Speaker Out: Audio jack for microphone input or can be retasked as a side speaker out.
Audio Jack Configurations:
Supports Headphone/2-channel, 4-channel, 5.1-channel, and 7.1-channel configurations. Specific jacks can be retasked via audio drivers for side speaker output.
Back View-B Ports (Graphics Card & Thunderbolt™ Add-in Card):
- DisplayPort (Graphics Card): Supports DisplayPort 1.4a version.
- HDMI Port (Graphics Card): Supports HDMI 2.1 version.
- DisplayPort (Thunderbolt™ Add-in Card): Supports DisplayPort 1.4, HDCP 2.2, and HDR. Maximum resolution of 8K (7680x3840)@60 Hz. Requires signal input from external devices.
- Thunderbolt™ 4 Port (Thunderbolt™ Add-in Card): Two ports supporting up to 40 Gbps bandwidth and a maximum display resolution of 8K (7680x3840)@60 Hz. Port 1 supports 5V/3A, 9V/3A, 15V/3A, and 19V/5A Power Delivery Spec. Port 2 supports 5V/3A and 9V/3A Power Delivery Spec. Requires signal input from external devices and supports up to two display outputs at a time.
- Mini-DisplayPort In Port (Thunderbolt™ Add-in Card): For connecting the graphics card to the GC-MAPLE RIDGE add-in card using the included Mini-DisplayPort cables.
Usage Features:
Getting Started:
- Vertical Position: The product is designed exclusively for vertical use.
- Connecting Peripheral Devices: Instructions for connecting keyboard, mouse, monitor, and other peripherals.
- Connecting Mini-DisplayPort: Detailed steps for connecting Mini-DisplayPort cables from the graphics card to the GC-MAPLE RIDGE add-in card for display output, including single and dual monitor setups.
- Connecting the Power Cord: Connect the included power cord to the desktop computer and a power outlet.
- Turning On: Press the power button on the front panel.
BIOS Setup:
- Entering BIOS Setup: Press the key during POST.
- Function Keys:
: BIOS SETUP/Q-FLASH- : BOOT MENU (for one-time boot device selection)
- : Q-FLASH (direct access to Q-Flash utility)
- Setting BIOS Display Language: Accessible via the "System Info." menu, allows selection of default language.
- Setting Administrator/User Password: Configurable in the "Boot" menu to secure BIOS settings. Administrator password allows full access, while user password has limited access.
- Loading Optimized Defaults: Found in the "Save & Exit" menu, restores optimal BIOS settings, recommended after BIOS updates or CMOS clearing.
- Saving BIOS Settings and Exiting: Saves changes to CMOS and exits BIOS Setup.
- Exit Without Saving: Exits BIOS Setup without saving changes.
- Boot Override: Allows immediate boot from a selected device.
Appendix (Installation & Maintenance):
- Installing a 2.5" Drive: Steps include removing the side panel, detaching the drive bracket, securing the 2.5" drive, replacing the bracket, connecting cables, and reattaching the side panel.
- Installing a 3.5" Drive: Steps include removing the side panel, pulling out the drive bracket by pressing tabs, securing the 3.5" drive by inserting pins into mounting holes, and replacing the bracket and side panel.
- Using Q-Flash Plus:
- Before You Begin: Download the latest compressed BIOS update file from GIGABYTE's website, rename it to GIGABYTE.bin, save it to a FAT32/16 formatted USB 2.0 flash drive. Connect power cables (12V and main power connector) and turn on the power supply.
- Using Q-Flash Plus: Insert the USB flash drive into the Q-Flash Plus port on the back panel and press the Q-Flash Plus button. The button will flash during the BIOS matching and flashing process (6-8 minutes).
Maintenance Features:
- Cleaning the Dust Filter: Regularly clean the dust filter for effective ventilation. Steps involve pulling the front panel outwards from the bottom, removing it in the direction of the arrow, cleaning the filter, and then replacing it.
- BIOS Flashing Caution: BIOS flashing is risky; only flash if necessary and with caution. Inadequate flashing can cause system malfunction.
- CMOS Clearing: If system instability occurs due to altered BIOS settings, clear CMOS values and reset to default.
- Motherboard Battery Replacement: Refer to the motherboard's User Manual for instructions.
- Ensure power cable voltage compatibility.
- Connect to a properly wired and grounded power outlet.
- Ensure power outlet is easily accessible.
- Do not touch the plug with wet hands.
- Protect the power cord from damage.
- Avoid placing the product on vibrating surfaces.
- Operating temperature: 5~35°C.
- Avoid heat sources.
- Do not cover or block ventilation holes.
- Do not insert objects into cabinet slots.
- Do not spill liquid onto or into the product.
- Do not use near water or liquids.
- Product is not waterproof or oil-proof.
- Clean with a soft, dry cloth.
- Thumbscrews should be tightened with a screwdriver.
Regulatory Notices:
Includes Supplier's Declaration of Conformity for FCC, Canada-Industry Notice, European Community Radio Equipment Directive Compliance Statement (CE, RoHS, WEEE), Korea KCC NCC Wireless Statement, and Japan Wireless Statement. Provides information on antenna use, explosive device proximity warnings, and aircraft use restrictions.
GIGA-BYTE TECHNOLOGY CO., LTD.
Address: No.6, Baoqiang Rd., Xindian Dist., New Taipei City 231, Taiwan
TEL: +886-2-8912-4000, FAX: +886-2-8912-4005
Tech. and Non-Tech. Support (Sales/Marketing): https://esupport.gigabyte.com
WEB address (English): https://www.gigabyte.com
WEB address (Chinese): https://www.gigabyte.com/tw
EU contact point: GIGABYTE TECHNOLOGY Trading GmbH, Am Stadtrand 63, 22047 Hamburg, Germany, Tel: +49-40-25 33 040
UK contact point: GBT TECH. CO. LTD, 13 Warren Yard, Wolverton Mill, Milton Keynes MK12 5NW, United Kingdom, Tel: +44 (0)1908 322878