The modes appear in the following sequence:
• Audible & Automatic mode selected (Factory default)
• Automatic mode only selected
• Audible mode only selected
• Zone disabled
• Manual Override mode selected
Note: Sequence begins at the currently selected
mode and will repeat.
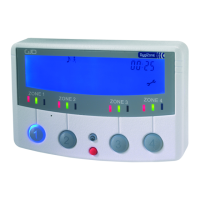
DETECTION INFORMATION DISPLAY
LED Information and Text
• PIR text will ash for approximately 8 seconds for
that zone
• The blue LCD back-light will come on for about 6
seconds during the trigger state and will remain on
for approximately 6 seconds after the trigger has
occurred.
• The text will display for a time duration equal to the
setting of TIME MINS in the engineer programming.
Note: If another PIR activation occurs on any other
zone then the text will be displayed for that new zone
for the same pre-programmed time on duration.
RECORDING A VOICE MESSAGE
1. Press and hold the red button until the microphone
symbol appears on the LCD.
2. Press the required zone button once and then
release. As you release the zone button a horizontal
bar with ten segments will appear below the
microphone symbol on the LCD. This indicates the
amount of recording time available where each
segment is equivalent to one second. Therefore, a
ten second message can be recorded.
3. Speak into the microphone on the front cover of the
DygiZone to indicate location ( e.g. patio area, front
door, side garden, etc)
4. When you have nished speaking into the
microphone quickly press the zone button again
(there will be no audible beep)
5. The recorded message will now automatically play
back. If you are satised with the message then do
nothing. If you wish to re-record the message then
repeat steps 1 to 5. You now need to set-up the
recorded message for the appropriate zone.
6. Press and hold down the red button until the
microphone symbol appears in the LCD and then
release.
7. Now press and continue to hold down the zone
button for which the voice message is to apply until
an audible beep is heard. Release the zone button
and the programming has been completed.
The voice message mode can be conrmed by pressing
the zone button once. A microphone symbol will appear on
the LCD if audible mode has been pre-selected.
Note 1: The normal default status for sensor activation
is an audible beep (i.e. one beep for zone 1, two beeps
for zone 2, etc.)
Note 2: It is possible to mix both audible beeps and
recorded messages (e.g. zone 1 could be in beep and
zone 2 could be in recorded voice playback.)
To change from a voice message to a beep, repeat steps
6 & 7.
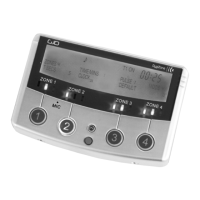
ENGINEER PROGRAMMING
Whichever zone requires adjustment, press and hold down
that zone button until the programming options show on the
LCD display.
Use the red button to cycle through the available options
until the one to be adjusted is reached. The settings for
that option can then be adjusted by using the up button.
Once the required setting is obtained, press the red button
to conrm it. Repeat the above process until all changes
have been completed then press any Zone button to exit
programming.
If buttons are pressed for 30 seconds the DygiZone will
automatically exit the programming mode.
SELECTING NUMBER OF ACTIVE ZONES
1. Press and hold down the zone 1 button, this will enter
programming mode.
2. The zone number will already be selected and can be
changed using the up button
3. Press the red button to conrm the number of zones
Notes: Unused zones will be cleared (i.e. no LCD
information will be displayed and there will be no
illuminated LEDs). An audible beep will be heard if any of
the unused zone buttons are pressed, but no action will be
taken.
4. Press zone 1 button to exit the programming mode.
SETTING TIME ON FOR LIGHTS
When a detector on a zone set to the automatic mode
(green led) is triggered during the hours of darkness, the
lights for that zone will activate. The lights will stay active
for a time duration equal to the setting of TIME MIS in the
engineer programming. This time can be set to 1, 2, 3, 4,
5, 8, 12, 16 or 24 minutes using the red and up buttons.
Once the desired value is set, simply press any of the zone
buttons to exit the engineer programming.
 Loading...