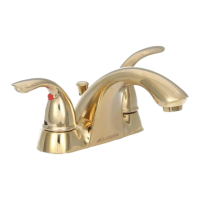
This document is an installation and care guide for a Glacier Bay two-handle lavatory faucet, available in models 7032EC-A8104 (SKU 441-173), 7032EC-A8102 (SKU 481-035), and 7032EC-A8127H2 (SKU 577-614). The guide provides detailed instructions for installation, operation, maintenance, and troubleshooting, along with a parts list.
Function Description
The Glacier Bay two-handle lavatory faucet is designed for use in bathrooms, providing hot and cold water through two separate handles. It includes a pop-up drain assembly for convenient sink drainage. The faucet is intended for residential use and is backed by a limited lifetime warranty for the original consumer purchaser.
Important Technical Specifications
The faucet requires 1/2 inch I.P.S. faucet connections or supply line coupling nuts (not included) with a 3/8 inch O.D. ball-nose riser. The package contents include:
- Faucet Assembly:
- Faucet (1)
- Gasket (1)
- Mounting nut (2)
- Drain Assembly:
- Pop up stopper (1)
- Drain flange (1)
- Rubber washer (1)
- Lock nut (1)
- Drain body (1)
- Ball nut (1)
- Ball rod (1)
- Spring clip (1)
- Thumb screw (1)
- Lift rod strap (1)
- Lift rod (1)
Tools and Hardware Required for Installation:
- Adjustable wrench
- Safety goggles
- Silicone sealant (not included)
- Channel lock pliers
- Supply lines (2)
Usage Features
Installation:
- Faucet Assembly Installation:
- Turn off the water supply and remove the old faucet.
- Clean the mounting surface.
- Ensure the gasket is on the bottom of the new faucet.
- Place the faucet through the mounting holes in the sink.
- Secure the faucet to the sink using the provided mounting nuts (hand-tighten only). If the sink is uneven, use silicone under the gasket.
- Pop-up Assembly Preparation:
- Remove the pop-up stopper and drain flange from the drain body.
- Screw the lock nut all the way down and push the rubber washer down.
- Drain Body Installation:
- Apply silicone sealant (not included) under the drain flange and place it into the sink's drain hole.
- From underneath the sink, screw the drain body onto the drain flange, ensuring the opening for the ball rod faces the rear of the sink.
- Tighten the rubber washer and lock nut on the drain body (do not overtighten).
- Stopper and Ball Rod Installation:
- Insert the stopper into the drain hole.
- Remove the lift rod strap and spring clip from the ball rod.
- Remove the ball nut. Insert the ball rod into the drain body and through the stopper's hole. For easier removal and cleaning, rotate the stopper 90 degrees so the ball rod does not go through its hole.
- Secure the ball nut against the hole in the drain body and tighten it onto the threaded end (do not overtighten). Note: For shallow cabinet installations, the ball rod may need to be shortened using a hacksaw.
- Lift Rod Installation:
- Insert the lift rod through the faucet and down into the lift rod strap.
- Tighten the thumb screw.
- Ball Rod and Strap Attachment:
- Attach the ball rod to the lift rod strap using the spring clip.
- Lift Rod Adjustment:
- Loosen the thumb screw on the lift rod strap.
- Push down on the lift rod until the drain stopper is in the open position.
- Retighten the thumb screw.
- Water Supply Connections:
- Use 1/2 inch I.P.S. faucet connections or supply line coupling nuts (not included) with a 3/8 inch O.D. ball-nose riser.
- Use wrenches to tighten connections (do not overtighten).
Operation:
- Flushing and Checking for Leaks:
- After installation, ensure handles are in the off position, turn on the water supply, and check for leaks.
- Remove the aerator to flush the water lines. Turn on hot and cold handles for at least one minute to flush debris.
- Turn off water and reinstall the aerator and housing.
Maintenance Features
Care and Cleaning:
- Wipe down with a damp cloth and towel dry.
- Do not use abrasive cleaners, steel wool, or harsh chemicals, as this will void the warranty.
Troubleshooting:
- Leaks from the handle: Possible cause is a loose bonnet nut or dirty/damaged washer. Solution: Tighten bonnet nut, clean or replace washer.
- Irregular or reduced water flow from aerator: Possible cause is a dirty or mis-fitted aerator. Solution: Remove aerator and check for debris, ensure rubber washer is properly installed.
- Water not shutting off completely: Possible cause is a dirty or broken cartridge. Solution: Remove handle to check cartridge, clean or replace.
- Leaking from sink drain at the base of the sink: Possible cause is a rough or irregular surface on the sink. Solution: Apply additional silicone sealant to the beveled side of the drain flange, retighten and test for leaks.
Service Parts:
Replacement parts are available and include:
- Handle (RP13041*)
- Set screw (RP50002)
- Index R (RP10004)
- Index B (RP10005)
- Screw (RP50003)
- Inverter (RP64044)
- Bonnet nut (RP70435)
- Washer (RP64124)
- Cartridge H (RP20013)
- Cartridge C (RP20014)
- Gasket (RP80259)
- Mounting nut (RP56001)
- Aerator (RP30074*)
- Drain assembly less lift rod (RP40027*)
- Lift rod (RP40094*)
(*Specify Finish)
Many replacement cartridges, aerators, and drain assemblies can be purchased at local The Home Depot stores or online at HOMEDEPOT.COM.
Warranty:
Glacier Bay products come with a limited lifetime warranty against defects in materials or workmanship for the original consumer purchaser. For industrial, commercial, or business usage, a five-year limited warranty applies. Proof of purchase (original sales receipt) is required for all warranty claims. The warranty excludes incidental/consequential damages and failures due to misuse, abuse, or normal wear and tear.