DESCRIPTION OF THE TELEPHONE
4
T562 GB2 TELEPHONE
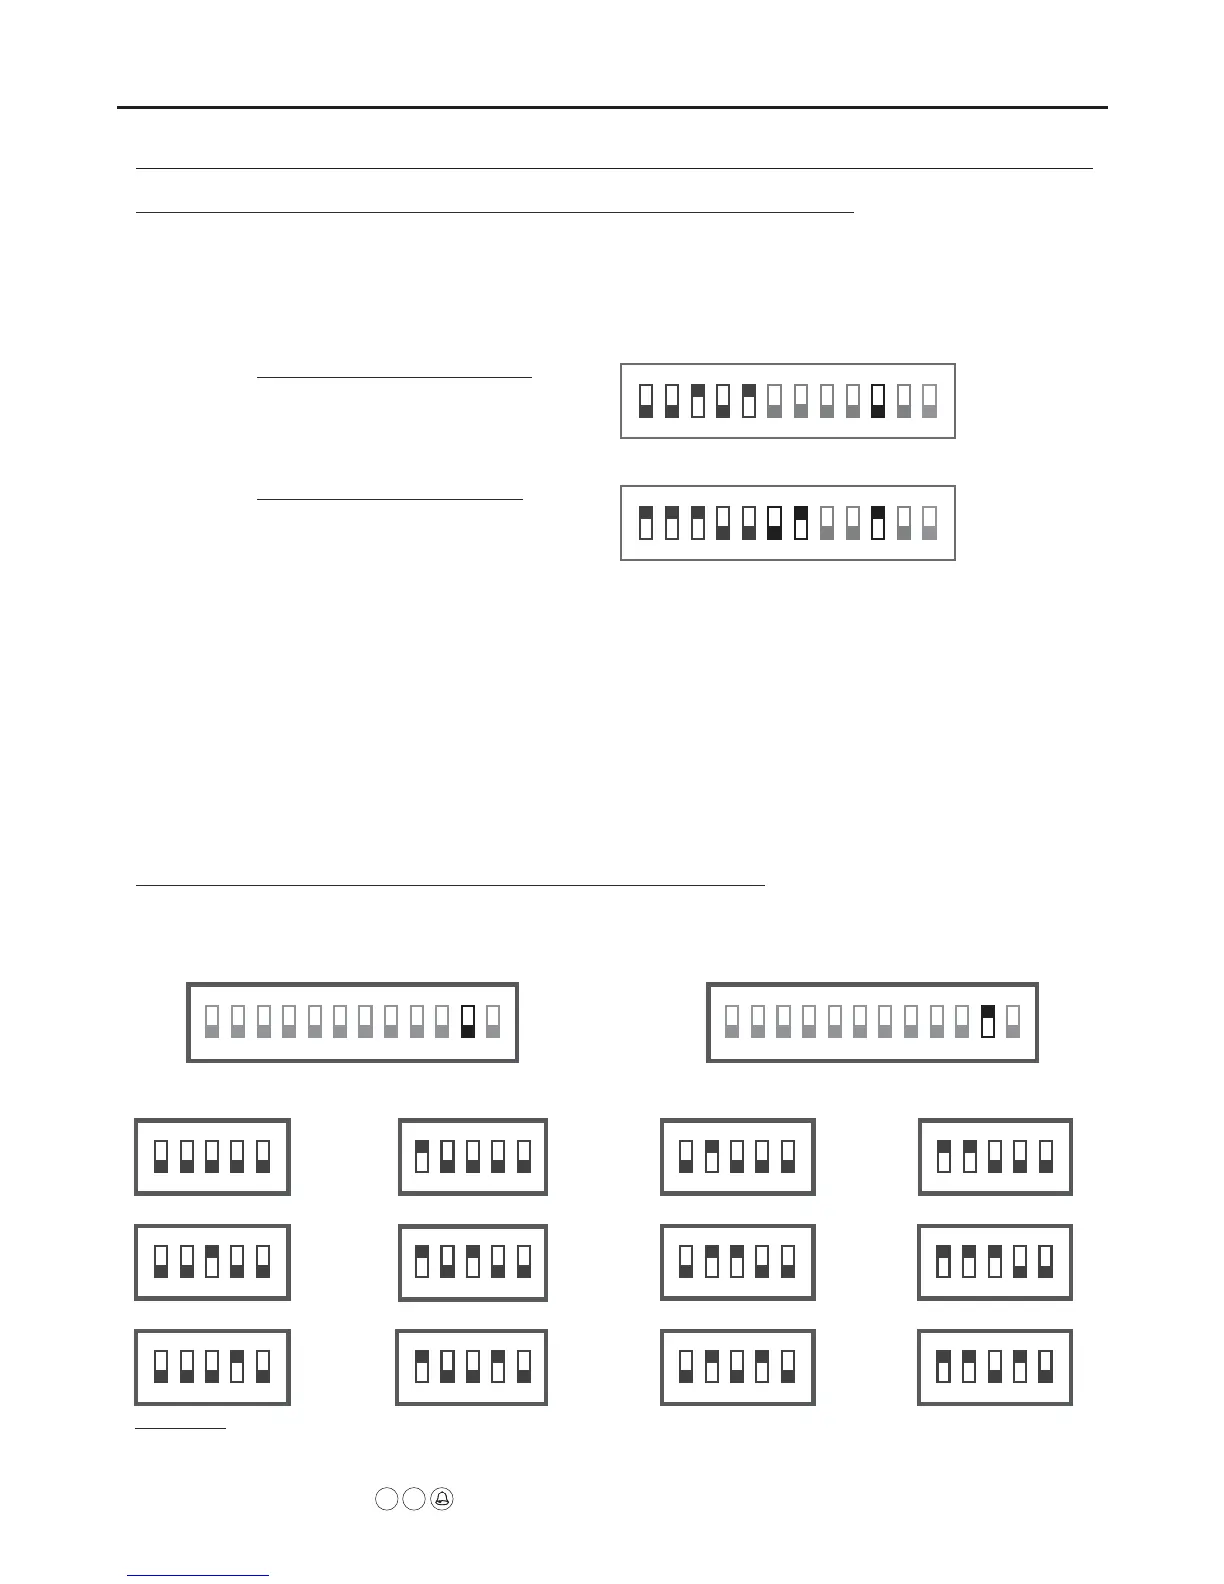
Description of DIP switch and configuration of telephone address (code):
1 2 3
ON
Example: 0 + 0 +4+ 0+16 = 20
Switch number: 1 2 3 4 5
1 2 4 8 16
Value when ON:
Table of values (DIP 10 to OFF)
4 5 6
DIP 1 to DIP 5: Configure telephone address (up to 32 addresses).
DIP 1 to DIP 7: DIP 10 set to ONWith , it enables the telephone address to be configured (up to 128 addresses).
The switches set to the OFF position have a value of zero.
The values of the switches set to ON are shown in the table below.
The telephone code is the sum of the values of the switches set to ON.
DIP 8 and DIP 9: Configure the telephone as master/slave. DIP 8 and DIP 9 to OFF master, DIP 8 to ON and DIP 9 to
OFF slave 1, DIP 8 to OFF and DIP 9 to ON slave 2, DIP 8 and DIP 9 to ON slave 3. If DIP 10 to ON, the telephone is
always 'master'.
DIP 10: Leave in the OFF position for installations of up to 32 telephones (DIP 6 and DIP 7 without function). Set to ON
for installations of up to 128 telephones , DIP 8 and DIP 9(EL632 GB2A/EL642 GB2A sound module required)
have no function, the telephone is always 'master' (maximum 1 telephone per apartment).
DIP 11: Configures the end of line. In installations with telephones only, it must always be in the OFF position. In mixed
installations of monitors with telephones in the same apartment, set to ON for the telephones in which the Bus cable
ends and leave in the OFF position for intermediate telephones.
DIP 12: Leaving it in the OFF position defines the OFF position of the volume control switch as 'mute'.
Setting it to ON defines the OFF position of the volume control switch as 'doctor mode'.
7 8 9 10 11 12
Configuration of telephone address codes (up to 32 addresses):
DIP 11: Configures the end of line. In installations with telephones only, it must always be in the OFF position. In mixed
installations of monitors with telephones in the same apartment, set to ON for the telephones in which the Bus
cable ends and leave in the OFF position for intermediate telephones.
1 2 3
ON
4 5
Apartment code 1
1 2 3
ON
4 5
Apartment code 5
1 2 3
ON
4 5
Apartment code 9
1 2 3
ON
4 5
Apartment code 2
1 2 3
ON
4 5
Apartment code 6
1 2 3
ON
4 5
Apartment code 10
1 2 3
ON
4 5
Apartment code 3
1 2 3
ON
4 5
Apartment code 7
1 2 3
ON
4 5
Apartment code 11
1 2 3
ON
4 5
Apartment code 4
1 2 3
ON
4 5
Apartment code 8
1 2 3
ON
4 5
Apartment code 12
DIP 1 to DIP 5: DIP 10 to OFFTo configure the telephone/apartment address (up to 32 addresses) and .
1 2 3
ON
4 5 6
DIP 11 to ON
DIP 11 to OFF
7 8 9 10 11 121 2 3
ON
4 5 6 7 8 9 10 11 12
1 2 3
ON
Example: 1 + 2+4+ 0 + 0+0+64 = 71
Switch number: 1 2 3 4 5 6 7
1 2 4 8 16 32 64
Value when ON:
Table of values (DIP 10 to ON)
4 5 6 7 8 9 10 11 12
Continued overleaf
( )
**
23
-In door panel systems with call buttons, the first address on the telephone is 'Code 0' (see door panel manual).
-In coded panel systems (N3301/GB2), 'Code 0' is 'Code 32', which means that when a call is made to a telephone with 'Code 0' (DIP 1 to DIP 5
set to OFF), it needs to be entered on the N3301/GB2 numeric keypad (see door panel manual).
-In the software (Address Manager GB2), 'Code 0' is also shown as 'Code 32'.
IMPORTANT: In coded panel systems (N3301/GB2), an EL632 GB2A/EL642 GB2A sound module is required and must be configured
to 'operating mode 5' (see door panel manual).
( )
**
 Loading...