Installation
– Installing a Hose
Installing a Hose on a Bare Reel
1. Locate
the length and size of your hose in the
chart below
. Note how many times you must turn
the reel to properly adjust the spring tension.
Hose Length
No. of Reel T
urns
40 ft (12.2 m) 11
50 ft (15.2 m) 13
60 ft (18.3 m) 15
2.
Place a piece of tape on the side of the reel flange
to use as a visual reference to help you count the
number of reel turns.
WARNING
Always wear heavy gloves when you adjust the
spring tension to protect your hands from being cut
on the hose reel.
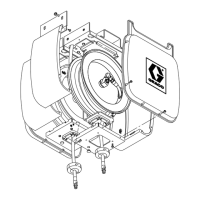
3. W
earing heavy gloves, firmly grab the outside
edge of the reel flange with both hands. See
Fig. 9. Wind the reel the proper number of turns,
rotating it in the direction shown in Fig. 9, and stop
only at latching locations. Stop the reel where
there is access to the hose swivel (34) (see Fig. 8)
and where the reel is securely latched.
4.
Before you install the hose, attach a C-clamp (G)
to the reel flange to help prevent the reel from
unintentionally becoming unlatched and spinning
freely
. See Fig. 9.
WARNING
Never
allow the reel to spin freely
. Doing so causes
the hose to spin out of control, which could cause
serious injury if you are hit by the hose.
5.
Uncoil and extend the hose. Assemble the hose
stop (47) to the outlet end of the hose (48) and
tighten. See Fig. 10 on page 1
1.
6.
Attach the hose (48) to the hose reel swivel (34),
and carefully remove the C-clamp. See Fig. 8.
7.
Pull the hose hard enough to release the latch,
and slowly allow the hose to retract.
8.
Position the hose stop (47) so the hose extends
far enough for all operators to reach the
dispensing valve. See Fig. 10 on page 1
1.
NOTE:
The reel base (303) has two holes (H). Run the
inlet hose through either hole, depending on the
orientation of the hose reel. See Fig. 10 on page 1
1.
Fig. 8
34
48
03722
Fig. 9
40
G
48
22
03723A
 Loading...