EasyManua.ls Logo

Grasslin TOPICA 200 - User Manual

Grasslin TOPICA 200
3 pages
Print Icon
To Next Page IconTo Next Page
Loading...
Grässlin (UK) Ltd
Tel : 01732 359888 Fax : 01732 354445
Programming guide
TOPICA 200
Setting up
The outer dial should be set to the current time. Rotate the dial slowly in a clockwise direction, until the correct
hour is approaching the arrow printed on the dial. Note that the outer dial is printed with the 24 hour clock – 8:00
a.m. = 8 on the dial. 8:00 p.m. = 20 on the dial.
Programming switching times
Set all tappets between the on and off times required, to the outer edge of the dial (see figure 1). E.g. to set
on at 8:00 a.m. – Off at 1:00 p.m., push tappets between dial numbers 8 and 13 to outer edge of dial. Set
any other required switching times in a similar manner.
Figure 1
Manual override
There is a three-position switch built in to the face of the dial.
For automatic timed control, governed by the tappet settings, the switch should be left in the middle position
(as illustrated). The output can be switched ON at any time, by moving the switch lever to the top position,
marked with a I on the dial. Alternatively, the output can be switched OFF at any time, by moving the switch
lever to the lower position, marked with a 0 on the dial. The manual override is a fixed selection – the output
will remain ON or OFF (as selected), until the switch lever is moved back to the middle timed position,
marked with a
on the dial.
http://waterheatertimer.org/Intermatic-timers-and-manuals.html#Talento-400
Question and Answer IconNeed help?

Do you have a question about the Grasslin TOPICA 200 and is the answer not in the manual?

Summary

TOPICA 200 Programming Guide

Setting up

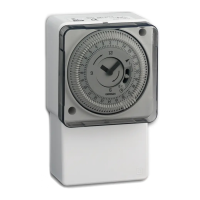
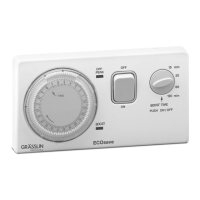
Instructions for setting the outer dial to the current time.

Programming switching times

How to set tappets for ON/OFF switching times on the dial.

Manual override

Explanation of the three-position switch for manual control.

TOPICA 450 (STA450 S) 7 Day Dial Programming Sheet

Set time and day

Guidance on setting the correct time and day on the outer dial.

Setting switching times

How to program ON/OFF switching times using tappets.

Manual override

Explanation of manual control using the three-position switch.

TOPICA 500 (STA500 S) Description & Programming Instructions

Before programming

Preparation steps including resetting the timeswitch.

Set current time and day

Procedure for setting the current time and weekday.

Entering switching times

How to program ON/OFF switching times and select days.

Manual override

Using the button for manual ON/OFF control.

Read or change programmed information

Viewing and modifying stored switching programs.

Overview

The Grässlin Topica series comprises a range of electromechanical and digital timers designed for controlling electrical loads based on programmed time schedules. These devices are suitable for various applications, from simple daily switching to more complex weekly programs, offering both automatic and manual override capabilities.

Topica 200 (Electromechanical Daily Timer)

The Topica 200 is a straightforward electromechanical daily timer, ideal for applications requiring repetitive daily switching.

  • Function Description: This timer operates on a 24-hour cycle, allowing users to set specific ON and OFF times for an connected electrical device. The core mechanism involves a rotating outer dial, which represents the 24-hour period, and a series of tappets that are pushed to the outer edge of the dial to define ON periods.
  • Usage Features:
    • Setting Current Time: To set the current time, the user rotates the outer dial clockwise until the correct hour aligns with an arrow indicator. The dial is marked with a 24-hour clock format (e.g., 8 for 8:00 a.m., 20 for 8:00 p.m.).
    • Programming Switching Times: Switching times are programmed by manipulating small tappets located around the circumference of the dial. To set a period as "ON," the tappets corresponding to that time interval are pushed outwards towards the edge of the dial. Tappets left in their inward position represent "OFF" periods. For example, to switch on at 8:00 a.m. and off at 1:00 p.m., tappets between dial numbers 8 and 13 would be pushed outwards.
    • Manual Override: A three-position switch integrated into the face of the dial provides manual control. In its middle position, the timer operates automatically according to the programmed tappet settings. Moving the switch lever to the top position (marked 'I') forces the output ON, regardless of the programmed schedule. Conversely, moving it to the lower position (marked '0') forces the output OFF. This manual override is a fixed selection, meaning the output remains in the selected ON or OFF state until the switch is returned to the middle timed position (marked with a clock symbol).
  • Maintenance Features: The Topica 200 is designed for robust, continuous operation with minimal maintenance. Its electromechanical nature means no batteries are required for timekeeping, relying instead on mains power.

Topica 450 (STA450S) (Electromechanical 7-Day Timer)

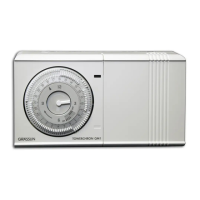
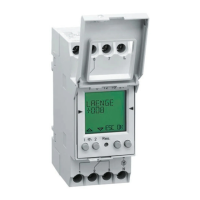
The Topica 450 (STA450S) extends the functionality of the daily timer to a weekly schedule, offering more flexibility for applications that require different switching patterns on different days of the week.

  • Function Description: This timer features a 7-day dial, allowing for distinct ON/OFF programs for each day. Similar to the Topica 200, it uses tappets to define switching periods, but these are applied across a weekly cycle. Each tappet on the Topica 450 controls a two-hour switching period.
  • Usage Features:
    • Setting Time and Day: The outer dial is rotated clockwise until the correct day segment aligns with an arrowhead indicator. The minute hand is then rotated clockwise to set the precise current time within that day segment. It's important to note that the clock hands operate on a 12-hour ring, while the outer dial uses a 24-hour format. Users are cautioned against rotating the dial or clock hands anti-clockwise.
    • Programming Switching Times: Tappets are pushed to the outer edge of the dial for a programmed ON instruction and left at the inner edge for an OFF instruction. All tappets within a desired ON period must be pushed outwards. The examples provided illustrate setting different schedules for weekdays, Saturdays, and no switching on Sundays.
    • Manual Override: A three-position switch on the dial face provides manual control, identical in function to the Topica 200. The middle position enables automatic timed control, the top position ('I') forces the output ON, and the lower position ('0') forces the output OFF. This fixed manual override remains active until the switch is returned to the middle timed position (marked with a clock symbol).
  • Maintenance Features: Like other electromechanical timers, the Topica 450 is built for durability and does not require battery replacement for timekeeping.

Topica 500 (STA500S) (Digital Programmable Timer)

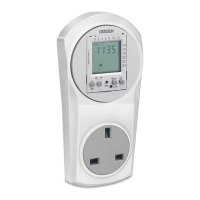
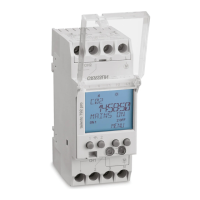
The Topica 500 (STA500S) represents a more advanced, digital solution, offering greater precision, more programming flexibility, and additional features compared to its electromechanical counterparts.
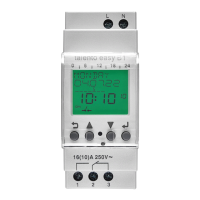
  • Function Description: This digital timeswitch provides 20 storage spaces for ON or OFF switching operations. These operations can be applied to individual days or various day group combinations (e.g., Mon-Sun, Mon-Sat, Mon-Fri, Sat-Sun). With its maximum capacity, it can execute up to 140 switching operations per week. The device is rated for resistive loads up to 13 Amps at 240 Volts AC.
  • Usage Features:
    • Before Programming (Reset): Before initial programming or to clear existing settings, a reset button (accessed with a pencil or similar instrument) must be pressed. This clears the memory and prepares the timeswitch for new programming. The reset function is also recommended if local interference causes the timeswitch to malfunction.
    • Setting Current Time and Day:
      1. Press and hold the 'clock symbol' button.
      2. Use the 'day' button to select the current weekday (1 = Monday).
      3. Use the 'h' button to set the correct hour.
      4. If applicable, press the '+/-1h' button once for Summertime adjustment.
      5. Use the 'm' button to set the correct minute.
      6. Release the 'clock symbol' button; a flashing colon between hours and minutes indicates the clock is running.
    • Entering Switching Times:
      1. Press the 'Prog.' button to access the first free memory location.
      2. Use the 'day' button to select the desired day or day group for the switching event. Options include Mon-Sun, Mon-Sat, Mon-Fri, Sat-Sun, or any individual day.
      3. Use the 'h' button to set the hour for the switching event.
      4. Use the 'm' button to set the minute for the switching event.
      5. Press the 'manual override' button once for an ON instruction or twice for an OFF instruction.
      6. Press the 'Prog.' button again to store the programmed information and move to the next free program space, or press the 'clock symbol' button if programming is complete.
      7. Further instructions can be programmed similarly.
      8. After programming, pressing 'Prog.' again will display the remaining number of program spaces (e.g., 'Fr 18'). 'Fr 00' indicates all spaces are full.
    • Important Note on Activation: After programming and returning to the current time display using the 'clock symbol' button, the timeswitch will not immediately activate any switching instruction scheduled for the current time. Users may need to manually select the desired switching state using the 'manual override' button. Subsequent switching instructions will be activated correctly in real-time.
    • Manual Override: The 'manual override' button allows for temporary or permanent changes to the output state.
      • The first press advances the output to ON or OFF without disrupting the program sequence.
      • The second press fixes the output in a continuously ON state.
      • The third press fixes the output in a continuously OFF state.
      • To revert to the timed condition from either fixed ON or OFF state, the 'manual override' button must be pressed once more.
    • Read or Change Programmed Information: Pressing the 'Prog.' button repeatedly allows users to view each programmed instruction in the order it was entered. Any instruction can be altered using the same buttons as described for 'Entering switching times'.
  • Maintenance Features: The Topica 500, being a digital device, may incorporate an internal battery for retaining programmed settings and timekeeping during power outages. However, this specific manual does not detail battery replacement or type. The reset button serves as a primary maintenance feature for clearing memory and troubleshooting.

Grasslin TOPICA 200 Specifications

General IconGeneral
Operating Voltage230 V AC
Frequency50-60 Hz
Switching Capacity16 A / 250 V AC
MountingDIN rail
Protection ClassIP20
TypeDigital timer
Time SettingManual or Automatic
Contact TypeChangeover contact
Program TypeWeekly program
Shortest Switching Time1 minute

Related product manuals