GRAUPNER GmbH & Co. KG D-73230 KIRCHHEIM/TECK GERMANY
We reserve the right to introduce modifications. Not liable for printing errors!
11/2011
- 6 -
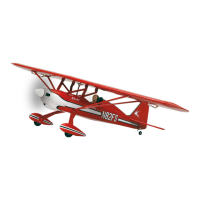
First press the pronged nuts from behind into the motor bulkhead and secure with
glue. Using the 4 M 3x10 mm screws and the washers and locking rings shown,
screw the motor in tight. Position the motor so that the feed cables run under the right
side of the fuselage toward the back.
Pull the motor bulkhead all the way forward, glue it, and insert and glue the 8x8
chamfer strips. Also completely glue the motor bulkhead into the corners from the
front. Then do a test run of the motor. Viewed in flight direction, the motor should
rotate to the right; if this is not the case, switch any two of the leads and re-insert.
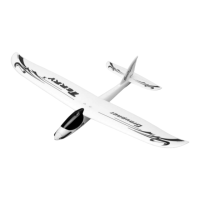
Thinly mark the mid-lines of the attachment tabs for the motor bonnet on the fuselage
so that they can be erased later. Slide on the spinner cap and motor bonnet. Align
the motor bonnet so that the spinner cap is exactly centred and is about 5 mm in front

 Loading...