EN - 29
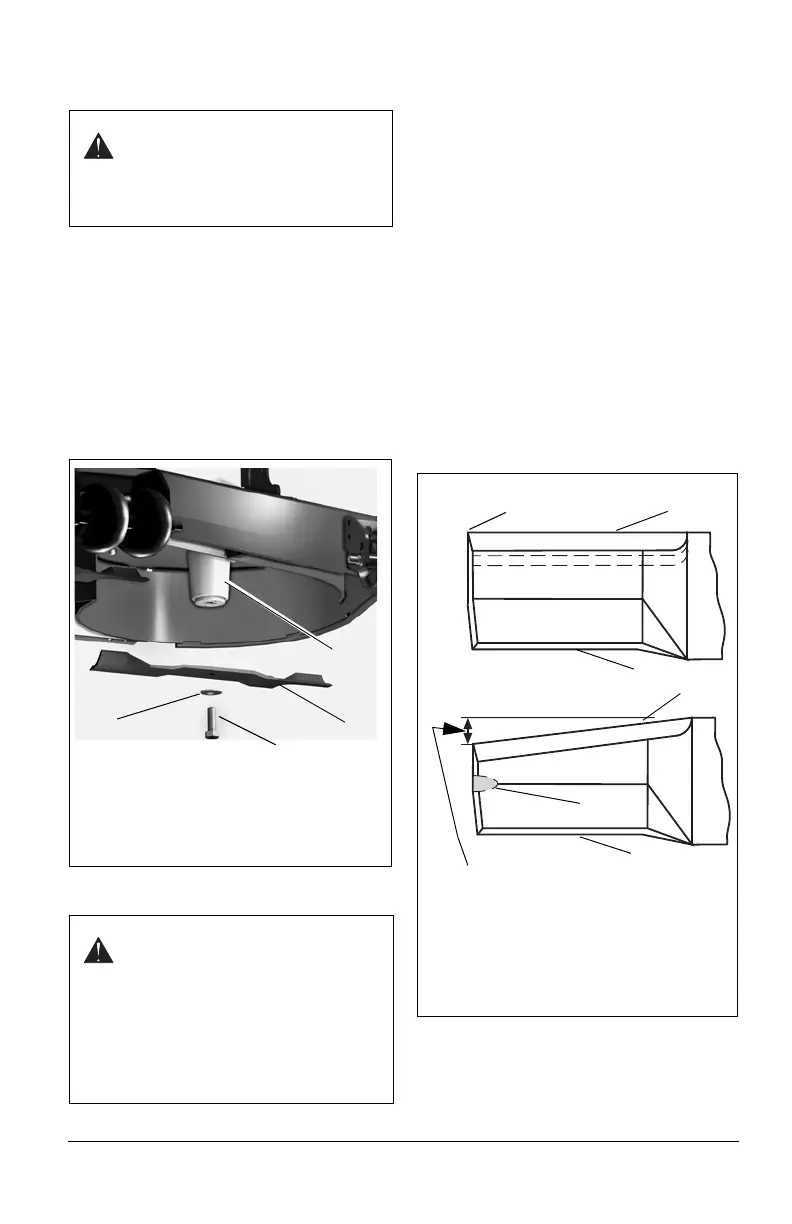
MOWER BLADES
Remove
1. Turn the engine off. Remove the ignition
key. Disconnect spark plug wires.
2. Remove the bolts, bevel washers and
blades from the spindle assemblies.
Replace
1. Install the blades, bevel washers and
bolts on the spindle assemblies.
2. Torque bolts to 115 – 160 lbf-ft
(156 – 217 N•m).
3. Reconnect spark plug wires.
Sharpen the Mower Blades
1. Remove mower blade from unit. Discard
mower blade if:
• More than 1/2” (1.3 cm) of metal is
removed.
• Air lifts become eroded.
• Blade is bent or broken.
2. Sharpen mower blade by removing an
equal amount of material from each end
of mower blade. DO NOT change angle
of cutting edge or round the corner of the
mower blade. See Figure 16.
3. Check mower blade balance.
Slide mower blade on an unthreaded
bolt. A balanced blade should remain in
a horizontal position. If either end of
mower blade moves downward, sharpen
the heavy end until blade is balanced.
See Figure 17.
4. Install mower blade(s) on unit.
5. Torque bolts to 115 – 160 lbf-ft
(156 – 217 N•m).
IMPORTANT: When sharpening blades, be
sure to grind the same amount on each side.
Unbalanced blades will cause excessive
vibration and could cause the spindles to
wear prematurely.
CAUTION: Use sturdy gloves or
padding to protect hands when
working with mower blades.
Rotation of one blade will rotate
the other blades.
CAUTION: DO NOT sharpen
mower blades while on unit. An
unbalanced mower blade will
cause excessive vibration and
eventual damage to unit. Check
mower blade balance before
reinstalling blades.
NEVER weld or straighten bent
blades.
Figure 15
1
3
2
1. Blade
2. Cup Washer
3. Blade Bolt
4. Spindle Assembly
4
Figure 16
1. Cutting Edge
2. Square Corner
3. Air Lift Erosion
4. Air Lift
DO NOT sharpen to this pattern.
Sharpen to this pattern.
DISCARD if more than
1/2” (1.27 cm)
1
1
4
2
4
3