21
Installation and Maintenance
Service Manual
Fig 4.1.3
Fig 4.1.4
2) Insert the M10 expansion bolt into the hole and then knock the nail into the bolt, as
shown in fig 4.1.5, and then remove the pape
shown in fig 4.1.5, and
r pattern.
NOTICE!
of bolt depends on the installation height of the unit, bolts are field supplied.
Fig 9.1.5
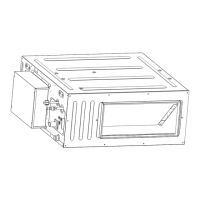
(2) Install the indoor unit temporarily
Assemble suspension bolt on the expansion bolt, attach the hanger bracket to the suspension bolt.
Be sure to fix it securely by using a nut and washer from upper and lower sides of the hanger
bracket. The washer fixing plate will prevent the washer from falling.
GFH(09)~(24)DA-D3DNA1A/I are as follows
Fig 9.1.6
NOTICE!
1)
Before operation, please prepare all pipelines (connection pipe, drainage hose) and
wires (connection wire for wired controller, connection wire for indoor unit).
2)
When drilling holes on ceiling (air return outlet or air outlet), you can need to reinforce
the ceiling to prev
vibration. For detailes, please consult user or builder.
3)
If the strength of the ceiling is not good, please install a beam bracket, and then put
the unit on t
he beam bracket.
(4) Adjust the unit to the right posi
tion.
(5) Check the level of the unit
After the indoor unit is installed, remember to check the horizontal status of the whole unit. It
should be horizontal from front to back and slant 1% from left to right, following the drainage direction.
 Loading...