8K:
Left
Space
to the
wall
above
150mm
Space
to the
wall
above
150mm
Space
to the
wall
above
150mm
Space
to the
wall
above
150mm
Space
to the
wall
above
150mm
Space
to the
wall
above
150mm
Space
to the
wall
above
150mm
Space
to the
wall
above
150mm
Wall Wall
Wall Wall Wall
Left Left
Left
Right
Right
Right
Right
(Rear pipping hole)
(Rear pipping hole) (Rear pipping hole)
(Rear pipping hole)
(Rear pipping hole) (Rear pipping hole)
(Rear pipping hole)
( Rear pippi
ng hole)
Wa
ll
Left
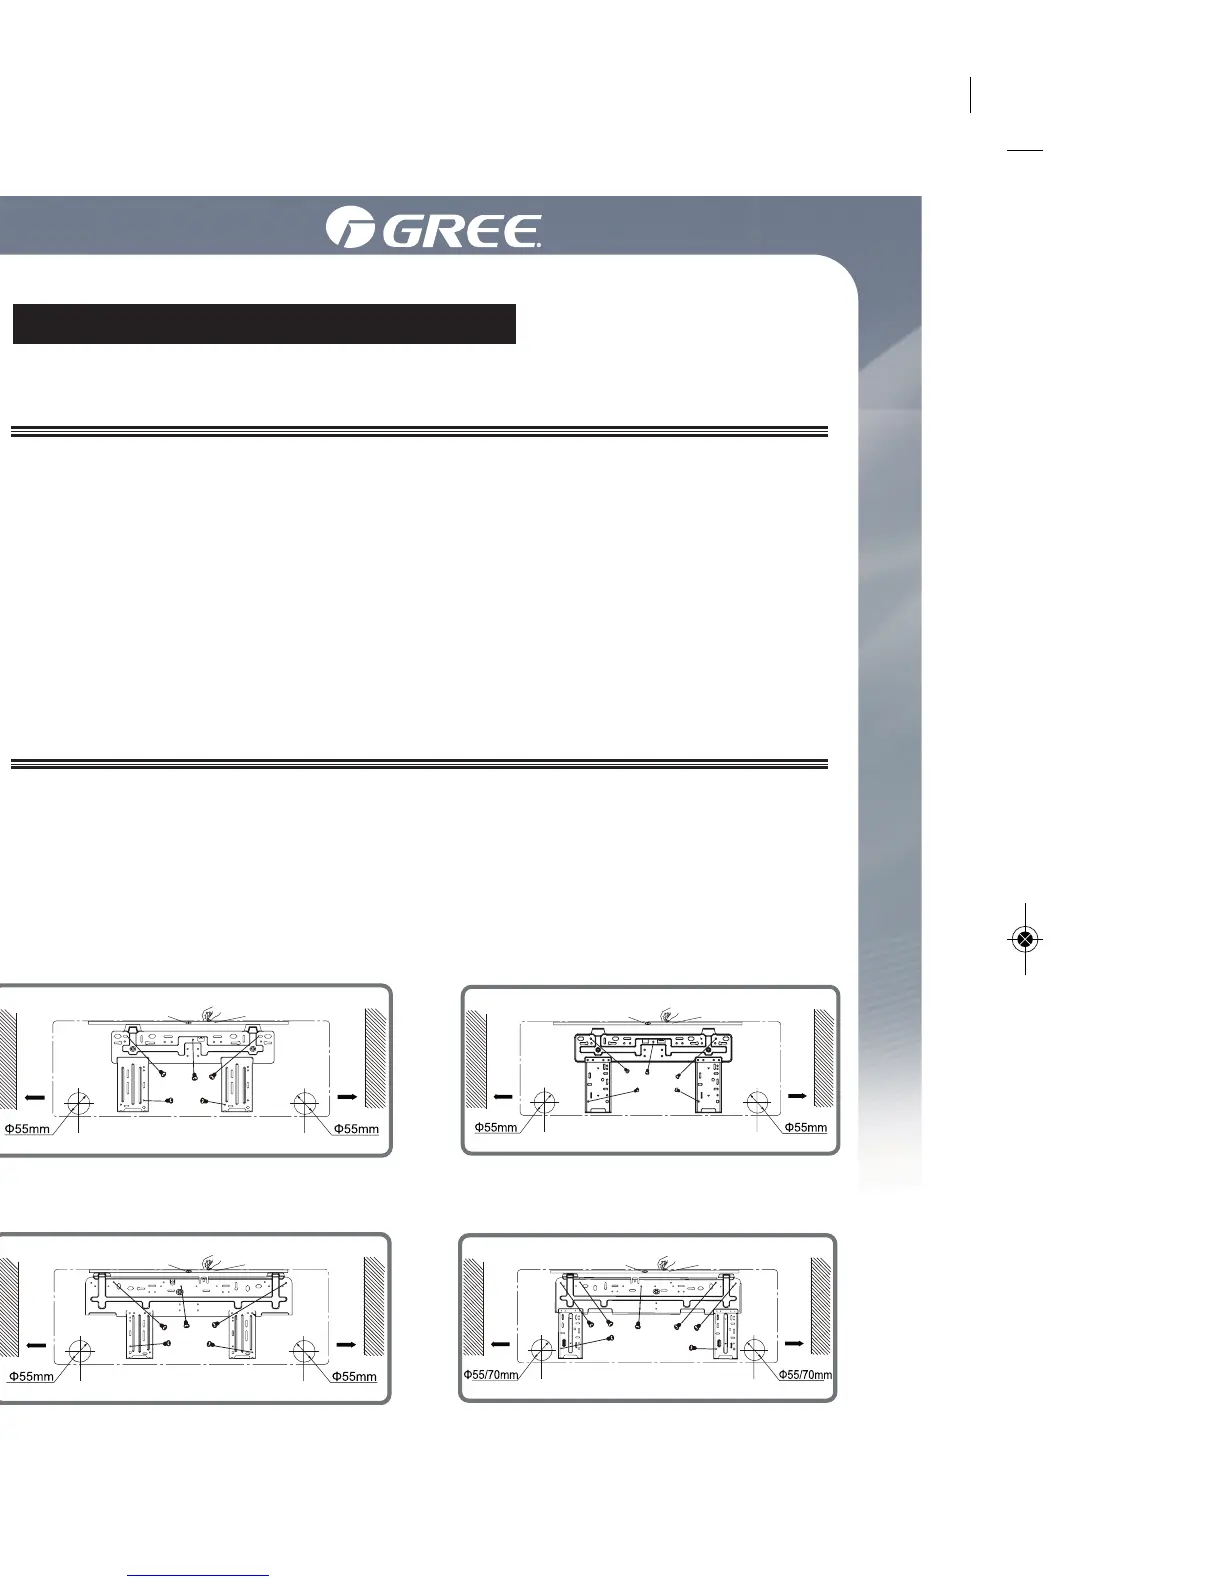
Installation of indoor unit
Step Three: open piping hole
Step Two: install wall-mounting frame
Step One: choosing installation location
Recommend the installation location to the client and then confirm it with the client.
1. Hang the wall-mounting frame on the wall; adjust it in horizontal position
with the level meter and then point out the screw fixing holes on the
wall.
2. Drill the screw fixing holes on the wall with the impact drill (the specifica-
tion of drill head should be the same as the plastic expansion particle)
and then fill the plastic expansion particles in the holes.
3. Fix the wall-mounting frame on the wall with tapping screws
(ST4.2X25TA) and then check if the frame is firmly installed by pulling
the frame. If the plastic expansion particle is loose, please drill another
fixing hole nearby.
1. Choose the position of piping hole according to the direction of outlet
pipe. The position of piping hole should be a little lower than the wall-
mounted frame, shown as below.
2. Open a piping hole with the diameter of ⏀55 or ⏀70 on the selected
outlet pipe position.ln order to drain smoothly, slant the piping hole on
the wall slightly downward to the outdoor side with the gradient of 5-10°.
Installation de l'unité intérieure
Étape 1: choisir l'emplacement
Étape 3: percer un trou pour les tuyaux
Étape 2: installation du support mural
Faites une recommandation sur l'emplacement idéal au client puis validez avec le client.
1. Accrochez le support mural au mur; à l'aide du niveau, ajustez l'angle
horizontal, puis marquez les trous de vis sur le mur.
2. À l'aide de la perçeuse à percussion, percer des trous de vis dans le
mur (la grosseur de la tête à perçage doit être la même que la cheville
de plastique), puis entrez la cheville dans le trou.
3. Fixez le support mural à l'aide des vis auto-taraudeuses
(ST4.2X25TA). Ensuite, assurez-vous que le support est bien ancré en
tirant dessus. Si la cheville en plastique se relâche, percer un autre trou
de vis tout à côté.
1. Choisir l'emplacement du trou pour la tuyauterie pour qu'il soit en ligne
avec le tuyau de sortie. Le trou pour la tuyauterie doit être plus bas que
le support mural, tel qu'illustré ci-après.
2. Faites une ouverture pour la tuyauterie de ⏀55 ou ⏀70 sur le tuyau de
sortie sélectionné. Pour assurer un drainage efficace, faites un trou
avec une légère pente de 5 -10° vers le bas et vers l'extérieur.
Distance
du mur
150mm
Distance
du mur
150mm
Distance
du mur
150mm
Distance
du mur
150mm
Distance
du mur
150mm
Distance
du mur
150mm
Distance
du mur
150mm
D
istance
du mur
150mm
Gauche
Gauche
Gauche
Gauche
Trou arrière pour la tuyauterieTrou arrière pour la tuyauterie
Trou arrière pour la tuyauterie Trou arrière pour la tuyauterie
Trou arrière pour la tuyauterie Trou arrière pour la tuyauterie
Trou arrière pour la tuyauterie
Trou arrière pour la tuyauterie
Marquer le milieu Marquer le milieu
Marquer le milieu
Marquer le milieu
Niveau
Niveau
Niveau
Niveau
Mark in the middle of it
Mark in the middle of it
Mark in the middle of it
Mark in the middle of it
level meter
level meter
level meter
level meter
00708_Owner's manual Lomo_Mise en page 1 15-03-03 14:51 Page29
 Loading...