00967 Deluxe Force Gauge
Greenlee Textron / Subsidiary of Textron Inc. 6 4455 Boeing Dr. • Rockford, IL 61109-2988 USA • 815/397-7070
Setup
Setup / Installation
Installing the Rope
1. Remove the hitch pin clips.
2. Remove the hitch pins.
3. Remove the outer rollers.
4. Lay the rope over the three inner rollers.
5. Replace the outer rollers.
6. Replace the hitch pins.
7. Replace the hitch pin clips.
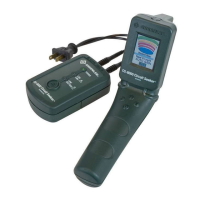
Electrical Connection
1. Plug the patch cable into the load pin.
2. Twist the front of the connector clockwise to lock it
in place.
3. Plug the other end of the patch cable into the back
of the digital display unit. Turn the locking nut
clockwise to lock.
4. Plug the digital display into a 115 VAC receptacle.
5. Use the MAIN POWER toggle switch to turn the
display unit ON. The display will show “RST” fol-
lowed by “STRN” followed by the force reading.
Allow the unit to warm up for 5 minutes.
Note: If the optional strip recorder is used, you may plug
it into the receptacle at the back of the digital display
unit. Use the REAR POWER toggle switch to apply
power to that receptacle.
Patch Cable
Load Pin
Rear Power
Switch
Main Power
Switch