Do you have a question about the GreenWorks G48ST8 and is the answer not in the manual?
Explains the intended use of the machine for cutting grass and light weeds at ground level.
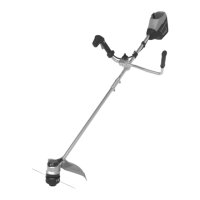
Provides a numbered list of parts and features of the machine, illustrated in Figure 1.
Instructions for safely unpacking the machine and checking for damaged or missing parts before use.
Details the steps to securely attach the guard to the trimmer head using screws and a screwdriver.
Explains how to attach the edge guide to the trimmer head, noting its function in limiting cutting range.
Guides on connecting the upper and lower shaft sections using the coupler and knob.
Steps for attaching the auxiliary handle to the shaft for comfortable and secure operation.
Instructions on how to correctly insert and secure the battery pack into the machine's compartment.
Describes the procedure for safely releasing and removing the battery pack from the machine.
Identifies and explains the function of the machine's main controls, including the lock-out button and trigger.
Step-by-step guide on how to properly start the trimmer, including using the lock-out button and trigger.
Simple instruction on how to stop the machine by releasing the trigger.
Explains how to automatically extend and trim the cutting line by tapping the trimmer head on the ground.
Details how to change the cutting path diameter by rotating the cut-off blade.
Describes the function of the line cut-off blade on the guard for maintaining cutting line length and efficiency.
Provides advice for safe and effective operation, including body clearance and handling grass winds.
Offers guidance on cutting techniques, avoiding obstacles, and managing debris for optimal cutting.
Outlines general maintenance precautions and when to seek professional service.
Instructions for cleaning the machine using a damp cloth and mild detergent, avoiding harsh chemicals.
Step-by-step guide on how to remove the old spool and install a new one, including line extension.
Details the process of cutting, bending, and winding new cutting line onto the spool correctly.
Instructions for removing the old bump knob and installing a new one on the spool housing.
Safety precautions and steps to take when transporting the machine, such as wearing gloves and removing the battery.
Guidelines for safely storing the machine, including removing the battery and keeping it away from children and corrosive agents.
| Voltage | 48V |
|---|---|
| Power Source | Battery |
| Battery Type | Lithium-Ion |
| Battery Runtime | Up to 45 minutes |
| Charging Time | 120 minutes |
| Cutting Width | 12 inches |