5
5
user interface screen, their beverage and size choice. Once these selections are made, the BREW button is
pressed. The brewer is designed to dispense 4 (118), 6 (177), 8 (237), 10 (296), 12 (355) and 16 (473) fluid ounces
(ml). Actual dispensed volume is approximately 10% less to allow for addition of milk, cream or sweetener if desired.
Unpacking Your Brewer
*RealCup™brandhasnoaffiliationwithK‐Cup®orKeurigInc.Keurig®andK‐Cup®areregisteredtrademarksofKeurigInc.
1. Place carton on a table or a stable, firm surface.
2. Open the box. Do not use sharp objects to open the box. Doing so could cause damage to the brewer.
3. Remove enclosed protective materials, printed information, and the brewer.
4. Record the serial number inside the back cover of this manual.
5. After unpacking, check to ensure that your machine has not been damaged during shipping and includes all
components.
6. Notify your service representative regarding any questions or concerns before installing.
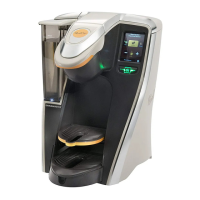
RC400 Features
Screen
Reservoir Lid
Reservoir
Brew Chamber Lid
Brew Button
Bezel
Reservoir LED
Power Switch
(Back side of brewer)
Pull Down Tray
Installation
Where to Install
Brewer should be installed on a firm, stable, level surface. Keep away from pets. Provide supervision for unat-
tended children and assistance for others that require help to operate the brewer.
ENGLISH