This document is a safety, installation, and instruction manual for HABCO® Commercial Refrigerators, specifically models with the "Cassette®" refrigeration package. The manual covers various aspects of the appliance, from initial setup and operation to maintenance and troubleshooting, emphasizing safety and energy efficiency.
Function Description:
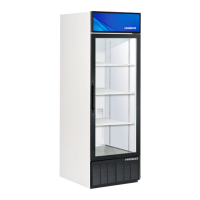
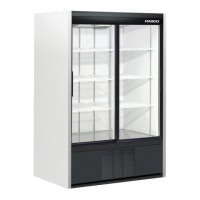
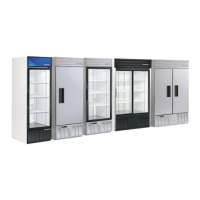
HABCO® Commercial Refrigerators are designed for commercial refrigerated storage and display. They are not intended for outdoor use, direct sun exposure, damp, or extreme heat/cold conditions. The core of these refrigerators is the "Cassette®" system, which is a self-contained, removable refrigeration package. This design allows for easier maintenance and potential replacement of the entire refrigeration unit. The models covered include SE18, SE24, SE28, SE40e, SE42, and SE46, with "HC" suffix indicating R290 (Propane) refrigerant, which is a flammable refrigerant.
Important Technical Specifications:
- Refrigerant: R290 (Propane) is used in "HC" suffix models. This is a flammable refrigerant, requiring repairs to be performed only by trained service personnel. Mechanical devices should not be used to defrost the refrigerator, and refrigerant tubing should not be punctured. The R290 refrigeration system (Cassette) is designed and approved specifically for HABCO units using R290.
- Temperature Range: All HABCO® Cassette® models are factory preset to maintain a temperature range of 33ºF (1ºC) to 38°F (3.3ºC).
- Electrical: The appliance requires a dedicated, 3-prong grounded electrical receptacle. Extension cords, power bars, and/or adapters are explicitly prohibited. The power supply must conform to the data plate located on the upper left interior wall of the cabinet. The power cord should not be altered, impacted, or have pressure placed on it, and adequate space must be allowed for it to float freely between the cabinet and wall without strain or stretching.
- Clearance: A minimum of 1" (2.54 cm) clearance is required at the rear of the appliance for the power cord. The front grill must remain unobstructed to prevent restricted air circulation.
- Load Capacity: The cabinet should not be overloaded with product, and product should not be loaded higher than the load level line located on the left-hand interior wall. Air-return grills inside the cabinet (near the lower left and right of the rear air distribution panel) and the exterior lower front grill must not be obstructed.
Usage Features:
- Leveling: The appliance must be positioned on a level floor, front to back and side to side, to ensure proper door closure and condensate drainage.
- Shelving: Shelving is adjustable in 1/2" increments, with clips snapping securely into shelf pilasters.
- Door Handles: Door handles, where applicable, are installed by inserting screws through interior door frame mounting holes beneath the rubber gasket flap, and then fastening the handle to the protruding screw-ends.
- Digital Thermostat: Equipped with a Micro-Processor Thermostat, the unit allows for set point adjustment. The current set point temperature can be viewed and adjusted using the "WRENCH KEY" and "ADJUST UP/DOWN KEY." The display settings can also be changed between °F and °C.
- Lighting: Solid door models have lights that actuate automatically when the door(s) are opened. Glass door models (SE18/24/28) have a light switch on the right front face of the horizontal lighting assembly, controlling both sign and interior lights. SE42/46 models have a light switch at the rear top of the center post above the lighting array. LED light strips and related driver components require a qualified technician for maintenance and replacement.
- Door Reversal (Swing Doors): The manual provides detailed instructions for reversing swing doors, including removing hinge tensioning brackets, tilting the door out of upper and lower mounting brackets, reversing hinge and pivot plate positions, and reinstalling the door. Factory door reversal is warranted, but field-reversed doors are the customer's responsibility.
- Sliding Door Removal and Adjustment: Instructions are provided for removing sliding doors for maintenance and adjusting door roller skew. This involves locating the door roller removal slot, lifting the door upward and out of the top track, and swinging the bottom away. Reinstallation requires seating rollers into the tracks and ensuring the "V" shaped sealer strip rests freely. Skew adjustment involves repositioning rollers on adjustable mounting brackets.
- Power-Up: After installation, the appliance must be run for a period of 24 hours prior to use to allow it to pull down to optimal temperature and load with product.
Maintenance Features:
- Condenser Coil Cleaning: Maintaining a clean condenser coil (the box-shaped component behind the lower grill) is crucial for preventing damage to refrigeration parts, poor performance, electrical/component overheating, and potential fire. Visual inspection for grease, floor wax, dust, and lint build-up should be done monthly, with cleaning performed using a dusting wand and a vacuum with a soft bristle nozzle. For stubborn residue, a qualified professional should be contacted.
- Interior Cabinet Cleaning: A mild mixture of anti-bacterial detergent and warm water with a soft cloth can be used. Rinsing and thorough drying are recommended.
- Stainless Steel Cleaning: General cleaning of stainless steel floors follows the same instructions as interior cabinet cleaning.
- Evaporator Chamber Cleaning: Requires removal of the refrigeration Cassette®. The general surfaces within the evaporator chamber can be cleaned with a mild anti-bacterial detergent and warm water. Foam gaskets on the cold air side of the insulated Cassette® bulkhead should be inspected for bacterial contamination and replaced if prevalent.
- Condensate Drain Tubes Cleaning: Also requires removal of the refrigeration Cassette®. Debris can be removed from the condensate drain tubes (running from the evaporator pan to the condensate pan) using a nylon soft bristle bottle brush soaked in anti-bacterial detergent and warm water, followed by thorough rinsing.
- Magnetic Positive-Seal Gasket Cleaning: A mild solution of anti-bacterial detergent and warm water with a damp cloth or sponge should be used to clean all appliance door gaskets. They should not be pulled, removed, stressed, or submerged.
- Shelf Cleaning: Shelves should be removed and washed by hand with a mild solution of anti-bacterial detergent and warm water. Soaking shelves in liquids other than water and detergent is not recommended. For hard-to-reach areas or stubborn contaminants, a brush (HABCO® P/N C097589) with soap solution can be used.
- Glass Cleaning: A 50:50 mixture of vinegar and water is recommended for everyday glass cleaning.
- Sliding Door Channel Cleaning: Sliding door channels should be vacuumed daily to remove debris. A mild solution of anti-bacterial detergent and warm water with a soft damp cloth can be used for cleaning. For stubborn residue, a soft bristle nylon brush with soapy solution is recommended.
- Pilaster Removal: Pilaster strips can be removed for cleaning beneath them.
- Air Distribution Panel Removal: The rear Air Distribution Panel can be removed for cleaning, ensuring edges do not scratch interior surfaces.
- Extended Shutdown & Storage: For storage, the refrigerator should be disconnected from power, thoroughly cleaned, shelving removed and cleaned, and an open box of baking soda placed inside. The door should be blocked slightly ajar but secured, and the entire refrigerator covered with an appropriate, breathable cover. Storage should not be outdoors, in direct sun, damp, or extreme heat/cold conditions.
- Odor Prevention: An open box of baking soda placed on a shelf at the rear of the cabinet helps prevent odors and should be replaced every three months.