EasyManua.ls Logo

HAMPTON BAY 545433 User Manual

HAMPTON BAY 545433
18 pages
To Next Page IconTo Next Page
Page #1 background imageLoading...
Page #1 background image
1
4-PACK
4-PACK
4-PACK
4-PACK SOLAR
SOLAR
SOLAR
SOLAR LED
LED
LED
LED POST
POST
POST
POST CAP
CAP
CAP
CAP LIGHT
LIGHT
LIGHT
LIGHT
SKU# 545433
UPC # 873046004697
Thank you for purchasing this Hampton Bay solar light product .
This product has been manufactured with the highest standards
of safety and quality. The finish of this product is weather
resistant but over time will naturally weather and fade.
Questions , Problems, Missing Parts? Before returning to your
local Home Depot, please call our Customer Service Team at 1-
877-527-0313. Please reference the SKU # and keep your
receipt for Proof of Purchase.
PACKAGE
PACKAGE
PACKAGE
PACKAGE CONTENTS
CONTENTS
CONTENTS
CONTENTS
INSTRUCTION
INSTRUCTION
INSTRUCTION
INSTRUCTION MANUAL
MANUAL
MANUAL
MANUAL
Save this manual for future reference
P a r t
D e scr i p t i on
Quantity
A
Post Cap Light
4
B
S crews
8
A
B
Question and Answer IconNeed help?

Do you have a question about the HAMPTON BAY 545433 and is the answer not in the manual?

HAMPTON BAY 545433 Specifications

General IconGeneral
BrandHampton Bay
Model Number545433
Voltage120 V
FinishBrushed Nickel
Fixture MaterialMetal

Summary

Package Contents

Before You Start

How Solar Light Works

Explains the basic function of solar lights and how they store energy.

Choose the Right Location

Guides on selecting an optimal installation spot for maximum sunlight and avoiding interference.

Assembly and Installation Instructions

Step 1: Remove Base

Instructions on detaching the base from the light fixture by twisting.

Step 2: Secure Base to Post

Details on using screws to attach the base onto a wooden post.

Step 3: Release Lens

Guidance on releasing the lens from the top housing using locking tabs.

Step 4: Pull Isolation Strip

Instruction to remove the isolation strip from the underside of the top housing.

Step 5: Replace Lens

Steps to put the lens back into the top housing.

Step 6: Install Light on Base

How to attach the light fixture onto the base and lock it.

Charging the Battery

Advice on optimal charging duration for initial battery performance.

Replacing the Battery

Step 1: Remove Light from Base

Instructions for detaching the light fixture from its base.

Step 2: Remove Lens

How to remove the lens from the top housing to access components.

Step 3: Replace Battery

Guide to removing the old battery and inserting a new one.

Step 4: Replace Lens

Steps to re-attach the lens to the top housing.

Step 5: Re-install Light

Instructions for reattaching the light fixture to the base.

Troubleshooting and Tips

Winter Tips

Advice for maintaining performance during winter conditions, like clearing snow.
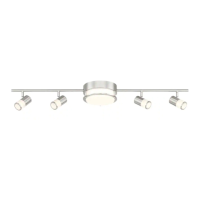
Replacement Parts

Limited Warranty

Related product manuals