This document provides use and care guides for three Hampton Bay outdoor furniture products: the Highgarden Padded Stationary Dining Chair (Model# GC-11209 - SST), the Highgarden Padded Swivel Dining Chair (Model# GC-41021B-SST), and the Highgarden Rectangle Dining Table (Model# GT - 11372-SSS).
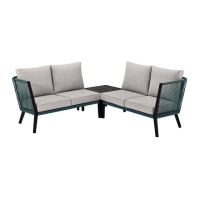
Highgarden Padded Stationary Dining Chair (Model# GC-11209 - SST)
Function Description:
The Highgarden Padded Stationary Dining Chair is a piece of outdoor furniture designed for dining purposes. It features a padded seat for comfort and a stationary design, meaning it does not swivel or recline. The chair is intended for residential use and is part of the Hampton Bay Highgarden collection.
Important Technical Specifications:
- Model Number: GC-11209 - SST
- Warranty: 2-year frame and fabric limited warranty. This warranty covers manufacturing defects in the frame for two years to the original purchaser. It does not cover commercial use, hardware, acts of nature (fire, freezing), or abusive use. Purchased parts are also not covered.
- Hardware Included:
- M6*20 mm combination bolt (8 pieces)
- M6*35 mm combination bolt (4 pieces)
- M6 Allen wrench (1 piece)
- Package Contents:
- Seat panel (1 piece)
- Left arm (1 piece)
- Right arm (1 piece)
- Back panel (1 piece)
Usage Features:
- Assembly: The chair requires assembly. The process involves attaching the arms to the seat panel using M6x20 bolts, and then attaching the back panel to the arms using M6x35 bolts. It is recommended to ensure all bolts are aligned and assembled correctly, and not to fully tighten bolts until the frame assembly is complete. More than one person may be required for assembly.
- Safety: Users are advised to save all instructions and read them before use. Close supervision is necessary when the furnishing is used by or near children or disabled persons. The chair should only be used for its intended purpose, and attachments not recommended by the manufacturer should not be used.
- Residential Use: This product is specifically designed and warranted for residential use. Commercial use is not covered under the warranty.
Maintenance Features:
- Cleaning: To prevent corrosion and freezing damage, do not allow water to build up in the frames. Use a mild soap and water for normal cleaning. Avoid janitorial or alcohol-based cleaners, as some ingredients may cause discoloration or adverse reactions to the finish. Rinse with clean water and dry with a soft, absorbent cloth towel.
- Protection: Treat the frames with a liquid wax for maximum protection against UV rays and/or salty, damp air.
Highgarden Padded Swivel Dining Chair (Model# GC-41021B-SST)
Function Description:
The Highgarden Padded Swivel Dining Chair is an outdoor dining chair that offers the added functionality of a swivel mechanism. It features a padded seat for enhanced comfort, making it suitable for extended use in an outdoor dining setting. Like its stationary counterpart, it is intended for residential use and is part of the Hampton Bay Highgarden collection.
Important Technical Specifications:
- Model Number: GC-41021B-SST
- Warranty: 2-year frame and fabric limited warranty. This warranty covers manufacturing defects in the frame for two years to the original purchaser. It does not cover commercial use, hardware, acts of nature (fire, freezing), or abusive use. Purchased parts are also not covered.
- Hardware Included:
- M6*20 mm combination bolt (6 pieces)
- M6*35 mm combination bolt (4 pieces)
- M8*35 mm bolt (4 pieces)
- M8 washer (8 pieces)
- M8 spring washer (4 pieces)
- M8 nut (4 pieces)
- M6 Allen wrench (1 piece)
- M6-M8 Hex Wrench (2 pieces)
- Package Contents:
- Seat panel (1 piece)
- Right arm (1 piece)
- Left arm (1 piece)
- Back panel (1 piece)
- T-rock (1 piece)
- Chair base (1 piece)
- Steel plate (4 pieces)
Usage Features:
- Assembly: Assembly is required. The process involves attaching the arms to the seat panel using M6x20 bolts, then attaching the back panel to the arms using M6x35 bolts. The T-rock is then attached to the finished frame using M8x35mm hex bolts, M8 washers, rectangular steel plates, M8 spring washers, and M8 nuts. Finally, the chair bucket is inserted into the chair base. It is crucial to ensure all bolts are aligned and assembled correctly, and to only fully tighten bolts after the frame assembly is complete. A M6-M8 hex wrench is provided for tightening. More than one person may be required for assembly.
- Swivel Functionality: The chair includes a T-rock and chair base, which enable the swivel feature, allowing the user to rotate while seated.
- Safety: Users are advised to save all instructions and read them before use. Close supervision is necessary when the furnishing is used by or near children or disabled persons. The chair should only be used for its intended purpose, and attachments not recommended by the manufacturer should not be used.
- Residential Use: This product is specifically designed and warranted for residential use. Commercial use is not covered under the warranty.
Maintenance Features:
- Cleaning: To prevent corrosion and freezing damage, do not allow water to build up in the frames. Use a mild soap and water for normal cleaning. Avoid janitorial or alcohol-based cleaners, as some ingredients may cause discoloration or adverse reactions to the finish. Rinse with clean water and dry with a soft, absorbent cloth towel.
- Protection: Treat the frames with a liquid wax for maximum protection against UV rays and/or salty, damp air.
Highgarden Rectangle Dining Table (Model# GT - 11372-SSS)
Function Description:
The Highgarden Rectangle Dining Table is an outdoor dining table designed to complement the Highgarden dining chairs. It provides a stable and spacious surface for outdoor meals and gatherings. This table is intended for residential use and is part of the Hampton Bay Highgarden collection.
Important Technical Specifications:
- Model Number: GT - 11372-SSS
- Warranty: 2-year frame and fabric limited warranty. This warranty covers manufacturing defects in the frame for two years to the original purchaser. It does not cover commercial use, hardware, acts of nature (fire, freezing), or abusive use. Purchased parts are also not covered.
- Hardware Included:
- M6*25 mm bolt (8 pieces)
- M6 Allen Wrench (1 piece)
- Package Contents:
- Table top (1 piece)
- Table leg (4 pieces)
Usage Features:
- Assembly: The table requires assembly. The process involves placing the table top on a soft, non-abrasive surface and then attaching the four table legs to the table top using M6x25 bolts. It is important to ensure all bolts are aligned and assembled correctly, and to only fully tighten bolts using the M6 Allen wrench after the frame assembly is complete. More than one person may be required for assembly.
- Safety: Users are advised to save all instructions and read them before use. Close supervision is necessary when the furnishing is used by or near children or disabled persons. The table should only be used for its intended purpose, and attachments not recommended by the manufacturer should not be used.
- Residential Use: This product is specifically designed and warranted for residential use. Commercial use is not covered under the warranty.
Maintenance Features:
- Cleaning: To prevent corrosion and freezing damage, do not allow water to build up in the frames. Use a mild soap and water for normal cleaning. Avoid janitorial or alcohol-based cleaners, as some ingredients may cause discoloration or adverse reactions to the finish. Rinse with clean water and dry with a soft, absorbent cloth towel.
- Protection: Treat the frames with a liquid wax for maximum protection against UV rays and/or salty, damp air.
General Customer Service Information for all products:
For questions, problems, or missing parts, customers can contact Hampton Bay Customer Service.
- Phone: 1-855-HD-HAMPTON
- Website: HAMPTONBAY.COM
- Hours:
- Monday – Friday: 8 a.m. - 7 p.m., EST
- Saturday: 9 a.m. – 6 p.m., EST
Customers are encouraged to retain the manual for future use. The manufacturer expresses gratitude for the trust and confidence placed in Hampton Bay products and aims to continually create quality products to enhance homes.