EasyManua.ls Logo

HAMPTON BAY GFM00469A - User Manual

HAMPTON BAY GFM00469A
20 pages
Print Icon
To Next Page IconTo Next Page
Loading...
THANK YOU
We appreciate the trust and confidence you have placed in Hampton Bay through the purchase of this pergola. We strive to continually create .
quality products designed to enhance your home. Visit us online to see our full line of products available for your home improvement needs.
Thank you for choosing Hampton Bay!
Item #
Model # GFM00469A
USE AND CARE GUIDE
ARCHED PERGOLA
Questions, problems, missing parts? Before returning to the store
call Hampton Bay Customer Service.
8 a.m. - 7 p.m., EST, Monday - Friday, 9 a.m. - 6 p.m., EST, Saturday
1-855-HD-HAMPTON
HAMPTONBAY .COM
1001 414 646
Question and Answer IconNeed help?

Do you have a question about the HAMPTON BAY GFM00469A and is the answer not in the manual?

Summary

Safety Information

Product Cautions

Critical product use guidelines, purpose, and supervision requirements.

Safety Warnings

Essential warnings for assembly, handling, and placement to prevent hazards.

Warranty Information

What is Covered

Specifies manufacturing defects covered by the limited warranty for frame and fabric.

What is Not Covered

Lists exclusions from warranty coverage, including misuse and environmental damage.

Pre-Assembly Steps

Planning Assembly

Guidance on preparing the assembly area and surface for safe product construction.

Hardware Included

Identifies and illustrates all necessary hardware components for assembly.

Package Contents

Lists all parts included in the package with their descriptions and quantities.

Assembly Instructions

Step 1: Connecting Connector Bars and Magnet Plate

Connects connector bars (A & B) and attaches magnet iron plate (K).

Step 2: Connecting Connector Bars

Joins left connector bar (B) to right connector bar (A).

Step 3: Inserting Tips into Bars

Inserts end tips (L), center tips (Q), and inner tips (S) into various bars.

Step 4: Attaching Crossbars

Attaches center and lengthways bars to the main structure.

Step 5: Attaching Post Base Plates

Secures post base plates (R) to the four posts (H).

Step 6: Attaching First Two Posts to Structure

Connects posts (H) to the assembled structure using bolts.

Step 7: Attaching Remaining Two Posts to Structure

Connects the remaining posts (H) to the assembled structure.

Step 8: Cutting Plastic Cable Ties

Cuts plastic cable ties on wheels of top and lengthways bars.

Step 9: Inserting Short Shade Rods into Fabric Shade

Inserts short shade rods (F) into the fabric shade (J).

Step 10: Attaching Short Shade Rods

Secures short shade rods (F) to front connector bars (A & B).

Step 11: Connecting Long Shade Rods

Inserts and attaches long shade rods (G) to fabric shades and top bars.

Step 12: Installing Protective Cover and Ground Spikes

Attaches protective cover (I) and inserts ground spikes (EE).

Step 13: Completing the Assembly

Final check to ensure all connections are secure.

Care and Cleaning

Maintenance Procedures

Removing Plastic Parts from Top Bars

Removes plastic parts from the ends of side top bars (D) and center lengthways bar (E).

Replacing Wheels

Replaces wheels and locks plastic parts on the top bars.

Overview

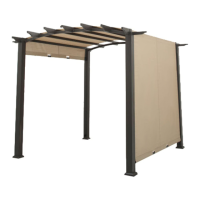
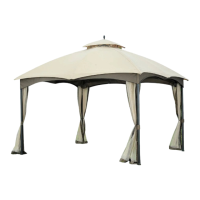
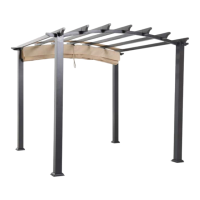
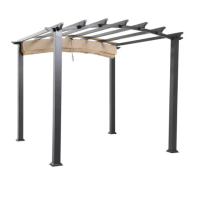
This document is a Use and Care Guide for the Hampton Bay Arched Pergola, Model # GFM00469A, Item # 1001 414 646. It provides comprehensive instructions for assembly, usage, and maintenance of the pergola.

Function Description:

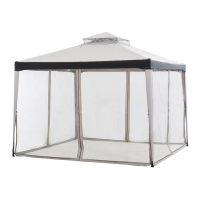
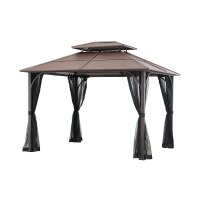
The Hampton Bay Arched Pergola is designed to provide an outdoor functional space, offering shade and an aesthetic enhancement to a home's exterior. It features an arched design and includes a fabric shade that can be adjusted. The pergola is intended for normal outdoor use and is not to be used as a toy or for commercial purposes.

Important Technical Specifications:

  • Model Number: GFM00469A
  • Item Number: 1001 414 646
  • Hardware Included:
    • M6x15 combination bolt (AA): 49+1 pieces
    • M6x18 countersunk bolt (BB): 8+1 pieces
    • M6x35 combination bolt (CC): 4+1 pieces
    • M6x80 combination bolt (DD): 26+1 pieces
    • Ground spike (EE): 16+1 pieces
    • Hex wrench (FF): 2 pieces
  • Package Contents (Parts):
    • Right connector bar (A): 2 pieces
    • Left connector bar (B): 2 pieces
    • Lengthways bar (C): 4 pieces
    • Side top bar (D): 2 pieces
    • Center lengthways bar (E): 1 piece
    • Plastic center fabric wheel (E1): 3 pieces
    • Steel rolling wheel (E2): 1 piece
    • Short shade rod (F): 2 pieces
    • Long shade rod (G): 4 pieces
    • Post (H): 4 pieces
    • Protective cover (I): 1 piece
    • Fabric shade (J): 1 piece
    • Magnet iron plate (K): 1 piece
    • End tip (L): 4 pieces
    • Plastic side fabric wheel (L1): 8 pieces
    • Center tip (Q): 2 pieces
    • Post base plate (R): 4 pieces
    • Inner tip (S): 8 pieces

Usage Features:

  • Assembly: The guide emphasizes the need for three to four adults for safe assembly due to the unit's weight. It recommends assembling the product on a soft, non-abrasive surface like carpet or cardboard to prevent damage. Detailed, step-by-step instructions with diagrams are provided for connecting various components, including connector bars, magnet iron plates, tips, crossbars, posts, and the fabric shade. The BILT Intelligent Instructions app is recommended for quick and easy 3D assembly instructions.
  • Fabric Shade Integration: The pergola incorporates a fabric shade (J) with short (F) and long (G) shade rods. These rods are inserted into slots in the fabric shade and connected to the pergola structure using plastic wheels (E1, E2, L1) and bolts. Elastic ribbons are used to secure the fabric shade components.
  • Stability: Ground spikes (EE) are provided to be inserted through the post base plates (R) and into the ground, enhancing the stability of the pergola.
  • Safety Warnings:
    • Keep children out of the assembly area.
    • Do not locate the product near any heat source.
    • The pergola is heavy and requires multiple adults for assembly.
    • When not in use, secure the product in a cool and covered location.
    • Do not use as a support, shake, lean, or climb on the product.
    • Children under 10 near the product should be supervised by a competent adult.
    • The product is NOT intended for commercial use, which will void the warranty.
    • The manufacturer recommends storing or covering the pergola when severe weather is approaching.

Maintenance Features:

  • Cleaning: For best results, clean the pergola with a damp cloth and dry thoroughly to prevent mildew by removing dirt particles. Do not use abrasive materials, bleach, or solvents for cleaning.
  • Storage: Store the pergola in a dry, sheltered place when not in use.
  • Environmental Protection: Keep the pergola away from fire, extreme heat, freezing conditions, and inclement weather such as rain, hail, sleet, snow, or wind.
  • Plastic Part Removal (for maintenance): Instructions are provided for removing plastic parts at the end of the side top bars (D) and the center lengthways bar (E) using the hex wrench (FF), likely for inspection or replacement of components.
  • Wheel Replacement: The guide includes instructions for replacing the wheels and locking the plastic parts, indicating that these components are designed to be serviceable.
  • Warranty: The product comes with a 1-year frame and 1-year fabric limited warranty covering manufacturing defects to the original purchaser. The warranty does not cover commercial use, hardware, acts of nature, fire, freezing, abusive use, or purchased parts. Freight and packaging charges to and from the service center are the customer's responsibility. The manufacturer reserves the right to substitute similar merchandise if the model is no longer in production.

The manual also provides customer service contact information (1-855-HD-HAMPTON) and the Hampton Bay website (HAMPTONBAY.COM) for assistance with questions, problems, or missing parts.

HAMPTON BAY GFM00469A Specifications

General IconGeneral
BrandHAMPTON BAY
ModelGFM00469A
CategoryOutdoor Furnishing
LanguageEnglish

Related product manuals