Do you have a question about the HAMPTON BAY GFM00471A and is the answer not in the manual?
Read all instructions before assembly. Assemble on a soft, non-abrasive surface.
Lists and illustrates all hardware components required for assembly, with quantities.
Details all parts included in the package, with corresponding labels and quantities.
Connect the left and right connector bars (A1 & A2) using M6x20 bolts (AA).
Insert end tips (G) into the top bar (B) and align holes. Repeat for another top bar.
Attach top bars (B) to connector bars (A1 & A2) using connectors (J) and bolts (AA, CC).
Insert inner tips (H) into top bars (B) and align holes. Repeat for other top bars.
Attach top bars (B) to connector bars (A1 & A2) using M6x70 bolts (CC).
Attach post base plates (I) to the four posts (C) using M6x20 bolts (AA).
Attach posts (C) to the assembled structure using bolts (AA) and (CC).
Attach the remaining two posts (C) to the structure using bolts (AA) and (CC).
Attach the canopy (F) to the assembled pergola structure.
Insert thick shade rods (E) through the canopy (F) and attach connectors (L1, L2).
Insert thin shade rods (D) through connectors (L1, L2) and attach tube covers (K).
Insert ground spikes (DD) through the post base plates (I) into the ground.
Ensure all connections are secure. Adjust canopy length using plastic connectors (L1, L2).
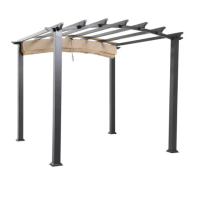
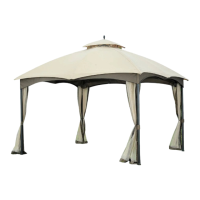
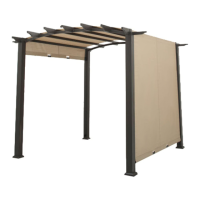
This document is a user and care guide for a Hampton Bay 10x10 FT. Pergola, Model #GFM00471A, Item #1003 516 705.
The Hampton Bay 10x10 FT. Pergola is designed for providing outdoor functions. It is intended for normal outdoor use, offering a shaded area for relaxation and outdoor activities. The pergola features a canopy for sun protection and a sturdy frame structure.
| Brand | HAMPTON BAY |
|---|---|
| Model | GFM00471A |
| Category | Outdoor Furnishing |
| Language | English |