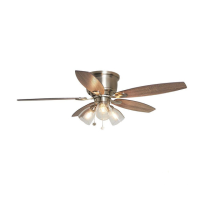
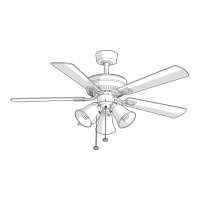
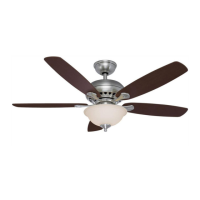
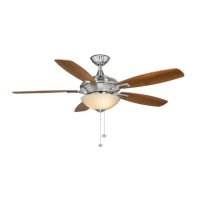
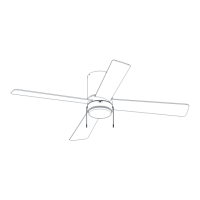
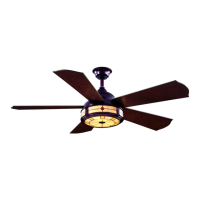
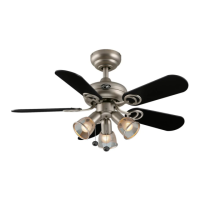
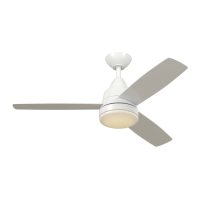
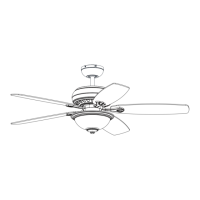
The Hampton Bay Stoneridge 52-inch Ceiling Fan is a versatile and stylish appliance designed to provide comfort and enhance the aesthetic of your home. This ceiling fan is engineered for ease of use and maintenance, offering multiple speed settings and a reversible blade direction to suit various climatic conditions. Its design incorporates features that simplify installation and ensure long-term, reliable operation.
Function Description
The primary function of the Hampton Bay Stoneridge 52-inch Ceiling Fan is to circulate air within a room, providing a cooling effect in warm weather and helping to distribute warm air more evenly in cooler weather. This is achieved through its motor-driven blades, which can rotate in two directions: forward (downward airflow) for cooling and reverse (upward airflow) for warming. The fan offers three distinct speed settings—High, Medium, and Low—allowing users to customize the airflow intensity to their preference. These settings are easily controlled via a pull chain mechanism.
Beyond air circulation, this ceiling fan also includes an integrated light kit, which serves as a functional lighting solution for the room. The light kit is designed to accommodate LED bulbs, providing energy-efficient illumination. The fan can also be assembled without the light kit if preferred, offering flexibility in its application. The fan's operation is designed to be straightforward, with clear instructions for both installation and daily use.
Usage Features
The Hampton Bay Stoneridge 52-inch Ceiling Fan is designed with several user-friendly features that make it a practical addition to any home.
- Speed Control: The fan's speed is controlled by a pull chain. A single pull activates High speed, a second pull switches to Medium, a third pull selects Low, and a fourth pull turns the fan off. This simple mechanism allows for quick adjustments to airflow.
- Reversible Blade Direction: A slide switch, typically located on the fan's switch cup, controls the direction of blade rotation. In warm weather, setting the switch to "forward" (usually to the left) creates a downward airflow, producing a cooling sensation. This can help reduce the need for air conditioning, potentially saving energy. In cool weather, setting the switch to "reverse" (usually to the right) generates an upward airflow, which helps to move warm air from the ceiling down into the living space, making the heating unit more efficient. It is crucial to ensure the fan blades have completely stopped before changing the direction of rotation to prevent damage.
- Optional Light Kit: The fan comes with a light kit fitter assembly and glass shades, allowing it to function as a primary light source. The light kit is designed for easy installation and uses LED bulbs for energy efficiency. For those who prefer a fan without lighting, the light kit can be omitted during assembly, and a separate switch cup cover (available by contacting customer service) can be used to maintain a clean aesthetic.
- Easy Installation: The fan is designed for relatively straightforward installation. It includes a mounting plate that attaches securely to a UL-listed outlet box. The fan-motor assembly can be temporarily suspended from a hook on the mounting plate, freeing up hands for electrical connections. The blade attachment system is described as revolutionary, featuring an alignment post and captive blade bracket screws for quick and easy installation. Screwdrivers can be inserted through an access hole in the switch cup to tighten the blade bracket screws, simplifying the process.
- Quiet Operation: While some initial noise may be present during a "breaking-in" period, the fan is designed for quiet operation. Ensuring all screws are snug and wire connections are properly secured helps to minimize any potential rattling or noise.
- Aesthetic Design: The fan blades are reversible, offering two different finish options. This allows users to select the blade side that best complements their room's decor, providing flexibility in interior design. The overall design of the fan, including its motor housing and decorative ring, is intended to blend seamlessly with various home styles.
Maintenance Features
Maintaining the Hampton Bay Stoneridge 52-inch Ceiling Fan is designed to be simple, ensuring its longevity and continued performance.
- Regular Cleaning: To preserve the fan's appearance, periodic cleaning is recommended. It is important to use a soft brush or a lint-free cloth for cleaning to avoid scratching the finish. Water should not be used for cleaning, as it can damage the motor, wood components, or cause an electrical shock. The plating is sealed with a lacquer to prevent discoloration or tarnishing.
- Wood Protection: For models with wood components, a light coat of furniture polish can be applied to the wood for additional protection and to enhance its beauty. Small scratches on wood parts can be covered with a light application of shoe polish.
- Lubrication-Free Motor: The fan motor is permanently lubricated with sealed ball bearings, meaning it does not require oiling. This eliminates a common maintenance task and contributes to the fan's long-term reliability.
- Connection Checks: Due to the fan's natural movement during operation, some connections may loosen over time. It is recommended to check the support connections, blade brackets, and blade attachments twice a year to ensure they are secure. This check does not require removing the fan from the ceiling.
- Troubleshooting Guide: The manual includes a comprehensive troubleshooting section to help users address common issues such as the fan not starting, excessive noise, or wobbling. This guide provides practical steps, such as checking circuit breakers, ensuring snug connections, and verifying blade levels, to resolve problems without professional assistance. For instance, fan wobbling often stems from unequal blade levels, which can be corrected by measuring and adjusting the blades relative to the ceiling.
- Safety Precautions: Before any maintenance or cleaning, it is crucial to turn off the power at the main fuse box or circuit breaker to prevent electric shock. This safety measure is emphasized throughout the manual to ensure user safety during any interaction with the fan.
- Customer Support: Hampton Bay provides customer service for questions, problems, or missing parts. A toll-free number and website are available for support, ensuring that users can get assistance when needed, especially for issues beyond routine maintenance.
In summary, the Hampton Bay Stoneridge 52-inch Ceiling Fan is a well-designed appliance that combines functionality, ease of use, and simple maintenance to provide a comfortable and aesthetically pleasing environment in any room. Its thoughtful features, from reversible blades to an optional light kit and a comprehensive troubleshooting guide, make it a practical and reliable choice for homeowners.