Do you have a question about the HAMPTON BAY YJAF052-MI and is the answer not in the manual?
Details warranty coverage for the frame and fabric of the umbrella.
Specifies the manufacturing defects covered under the warranty terms.
Outlines exclusions from the warranty, such as commercial use or damage.
Lists and illustrates all hardware components required for assembly.
Details all the parts included in the umbrella package for assembly.
Instructions for connecting the upper and lower brackets of the umbrella base.
Steps to connect the main umbrella pole to the assembled base brackets.
Guide on how to insert corner connectors into the base brackets.
Instructions for sliding the lock panels into the umbrella base structure.
Steps for sliding side panels and connecting support tube rims to the base.
Instructions on how to place sand bags into the umbrella base for stability.
Detailed steps for filling sand bags and ensuring proper stability with sand.
Instructions to set the locking mechanisms on panels and covers to the open position.
Steps to lock base covers and attach the upper base cover using the wrench.
Guide on attaching the locking knob to the umbrella pole using bolts and a hex wrench.
Instructions for adjusting the umbrella shade by snapping hinge slides into place.
Steps to attach the solar receiver to the umbrella shade and charge it.
How to insert the umbrella shade into the lower pole and secure it with the locking knob.
Instructions for connecting and removing the umbrella crank for use.
Steps to loosen the knob, lift the handle, and extend the umbrella fully.
Guide on undoing the velcro, turning the crank, and securing the belt to open the umbrella.
Instructions for rotating the umbrella to the desired position and locking it.
How to control the LED light and adjust the umbrella's angle for shading.
Steps to loosen the velcro, turn the crank counterclockwise, and secure the umbrella.
Instructions for tying the umbrella to the pole with a velcro belt when not in use.
Guidance on cleaning the umbrella frame and fabric, and storage recommendations.
Steps to disconnect and remove the light bar from the umbrella rib.
Procedure for inserting and connecting a replacement light bar to the umbrella.
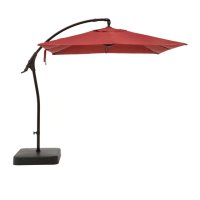
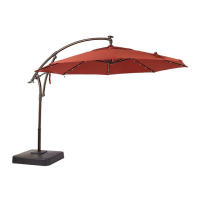
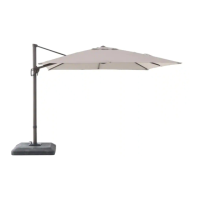
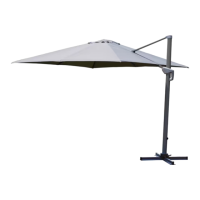
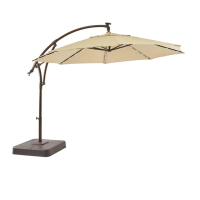
This document is a comprehensive use and care guide for an 11 ft. LED Offset Solar Umbrella from Hampton Bay. It covers everything from initial assembly to operation, maintenance, and storage, ensuring users can maximize the lifespan and functionality of their umbrella.
The Hampton Bay 11 ft. LED Offset Solar Umbrella is designed to provide outdoor shade and ambient lighting. Its offset design allows for flexible placement without a central pole obstructing views or seating arrangements. The integrated LED lights, powered by a solar receiver, offer illumination for evening use, extending the usability of outdoor spaces. The umbrella features a crank mechanism for easy opening and closing, and a locking knob to adjust the canopy's angle and rotation, providing versatile shade coverage throughout the day. The base is designed to be filled with sand for stability, ensuring the umbrella remains secure in various outdoor conditions.
The umbrella's assembly begins with attaching the upper and lower brackets to form a stable base. It is crucial to assemble the umbrella in its desired location, as it becomes very heavy once the sandbags are filled. The lower umbrella pole is then securely attached to these brackets using hex bolts and a wrench. Corner connectors, lock panels, and side panels are subsequently installed to complete the base structure. Sandbags, which are filled with sand (110 lbs per bag for a total of 220 lbs), are placed within the base to provide the necessary stability. Locking mechanisms on the base covers ensure the sandbags are securely enclosed.
The locking knob, an essential component for operation, is attached to the lower umbrella pole. Before attaching the umbrella shade, it's important to prepare it by pushing the long bent tube outwards while holding down a tap on the short bent tube, allowing the hinge slide to snap into place. The solar receiver, which powers the LED lights, is then attached to the umbrella shade. It is recommended to leave the solar receiver in a sunny area to charge before the first use of the LED lights. Finally, the umbrella shade is inserted into the lower umbrella pole, and the locking knob is rotated to secure it in place.
Operating the umbrella involves several steps. The crank, which can be attached and detached using two different methods (one requiring a hex wrench), is used to open and close the canopy. To raise the umbrella, the knob on the umbrella shade is loosened by turning it counterclockwise. The umbrella handle is then pushed upward until the long bent tube is fully extended, and the knob is tightened clockwise to lock it. To open the canopy, the velcro belt on the canopy is undone, and the crank is turned clockwise. Once fully open, a belt under the hinge of the short bent tube is fastened to stabilize the umbrella.
The umbrella offers significant flexibility in positioning. The locking knob can be rotated 180 degrees clockwise to allow the umbrella to be rotated up to 360 degrees. Once the desired position is achieved, the knob is rotated 180 degrees clockwise again to lock it. The angle of the umbrella can also be adjusted by fully loosening the knob on the umbrella shade and sliding the umbrella handle down. The LED lights are operated via an ON/OFF switch.
Closing the umbrella involves reversing some of these steps. The velcro belt is loosened, and the crank is turned counterclockwise to close the canopy. When the umbrella is closed, the knob is fully loosened, the handle is pulled downward on the long bent tube, and then the knob is tightened clockwise to secure it. To return the umbrella shade to its original position before closing, the knob on the umbrella shade is fully loosened, the handle is slid upwards on the long bent tube, and once the long bent tube is pushed to the top, the knob is fully tightened clockwise.
Proper maintenance is key to extending the life of the Hampton Bay umbrella. For storage, the umbrella should be tied to the umbrella pole with the velcro belt when not in use. This helps keep the canopy compact and protected.
For cleaning, both the frame and fabric should be wiped with a damp cloth and dried thoroughly. This practice helps prevent mildew by removing accumulated dirt particles. It is explicitly stated not to use abrasive materials, bleach, or solvents for cleaning, as these can damage the umbrella's materials.
When not in use, especially during off-season or severe weather, the umbrella should be stored in a dry, sheltered place. On windy days, the canopy should be tied closed to prevent damage. Furthermore, the umbrella should be kept away from fire, extreme heat, freezing conditions, and inclement weather such as rain, hail, sleet, snow, or strong winds, all of which can cause damage.
The guide also provides instructions for replacing the light bar, a useful maintenance feature. To remove the light bar, the umbrella cover is removed from the umbrella rib. The wire is gently pulled out until the plug connection appears, then disconnected. The light bar can then be pulled out. To install a replacement light bar, the new bar is inserted into the umbrella rib, its plug is connected to the umbrella rib's plug, and any extra wire is inserted into the rib. Finally, the umbrella cover is placed back onto the umbrella rib.
| Brand | Hampton Bay |
|---|---|
| Model | YJAF052-MI |
| Category | Patio Furniture |
| Cushion Material | Polyester |
| Color | Brown |
| Assembly Required | Yes |
| Cushion Color | Beige |