PLAn
Now we can choos e one of the
exis ti ng 7 pre-progr ammes .
Press the button OK
OK
PL : 0 1
P l an 0 1 appear s f i r s t. Choos e the
programme or pl an you des i re. F or
exampl e, we choos e P l an 03.
Press the buttons
PL : 0 3
You havejust chan
ed the P l an 01 (
ener al
us e) to Plan 03 (children's room). T he values
of thes e pro
rammes can be s een in the
Tablen.1(page4)
.
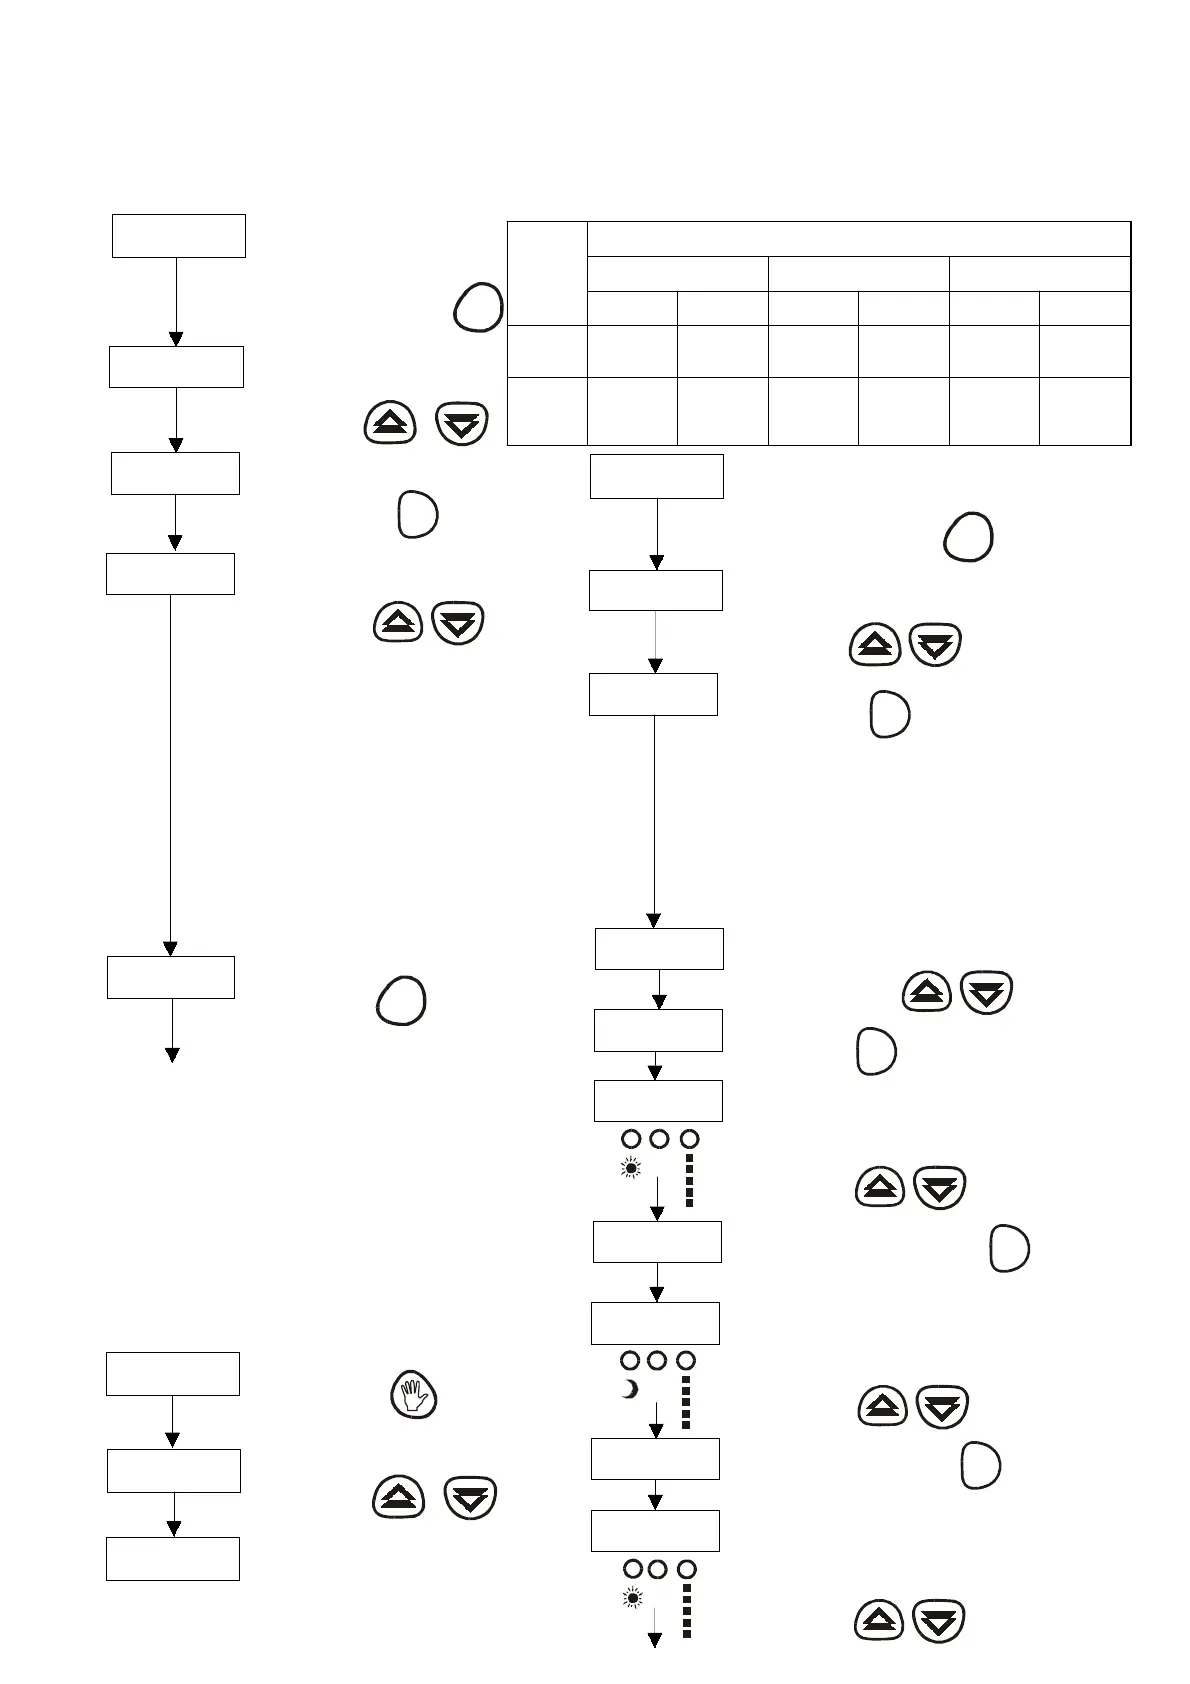
CHANGING T HE HEAT ING PLAN
19.0 C
T he r oom temperatur e appear s on
the di s pl ay. Now we ar e goi ng to
change the pr ogr ammed heati ng
pl an.
Press the button PROG 1,5 sec..
PROG
HorA
HOUR appears in the display.
Press thesearchbuttons till PLAN
appear s on t he di s pl ay.
Press the buttons
As previously mentioned, the thermal transmitter
i s pr e- pr o
rammedaccordin
to the plan 01 which
is a
ener al us e plan ( S ee aboved tabl e).
We are
oin
toexplain how to chan
etothe
des i r ed pl an accor di n
to the s even pre-pro
rammed
pl ans .
T o put into action this plan, pres s
the P R OG button.
PROG
19.0 C
T he actual room temperature
appear s on t he di s pl ay.
23.0 C
Mar k the des i r ed temperatur e. F or
example 23. 0 º C.
Press the button
(the led of the button is lit up)
MANU AL OP T I ON
Press the buttons
19.0 C
I n 3 s econds , the actual room
temper atur e wi l l appear agai n on
the display. T he transmitter will
s tar t heati ng up ti l l i t r eaches the
mar k ed temperatur e i n thi s cas e
23.0 º C
S E T U P IN T HE MANUAL
MODE
.
T his opti on is for the cas e you do not want to
useanyofthe7availablepro
rammes or you
do not wis h to undertake any confi
ured plan.
In this case, the transmitter will work as a
normal heatin
systemappliance.
PLAn
Now we can choos e the pl an we
want to conf i gur e.
Press the button OK
OK
PL : 0 3
T he plan chosen earlier will show on
thedisplay. Ifitis thefirsttimeyou
ar e confi gur i ng P l an 0 1 wi l l appear .
Now find PL AN CF
PL : C F
CONFIGURAT ION OF A HEAT ING PLAN ACCORDING
TOYOUR REQUIREMENTS
19.0 C
T he r oom temper atur e appear s i n
the di s pl ay. Now we ar e goi ng to
configure the configurable heating
systemplan.
Press the button PROG 1,5 sec..
PROG
HorA
HOUR will appear on the display.
P ress the s earch button till PL AN
appear s on t he di s pl ay.
Press the buttons
In cas e that none of the 7 pro
rammes correspond to your
heatin
needs , we are
oin
to explain how you can confi
ure
your own heatin
systemplan.
In this pro
ramme you can confi
ureall theparameters to
fit your needs .
OK
00 : 00
Theplantobeconfiguredwouldbethefollowing:
HEAT ING PE RIOD S
PERIOD 1 “P1” PERIOD 2 “P2” PERIOD 3 “P3”
DAYS OF
THE
WEEK
ST AR T
COM F OR T
ST AR T
ECONOMY
ST AR T
COM F OR T
ST AR T
E C ON OM Y
ST AR T
COM F OR T
ST AR T
E C ON OM Y
Monday
to Fr iday 7:00 h 10:00 h 13:00 h 14:00 h 18:30 h 23:00 h
Satur day
to
Sunday
9:00 h 12:00 h 14:00 h 23:00 --------- ---------
P1
07 : 00
Once P l an CF appear s on the
displaypress OK
OK
00 : 00
Now we ar e goi ng to i ntroduce the s tart of the F i r s t P er i od of
Comf or t f r om Monday t o F r i day. T he Comf or t, F i r s t P er i od P 1
and days Monday to F r i day l eds wi l l l i ght up. I n our cas e, the
firs t comfort period starts at 7:00
P1
10 : 00
P r es s the button OK to accept the
hour.
OK
00 : 00
T he following s tep will be the introduction of the s tarting of the
S econd Comfort Period from Monday to Friday. T he Comfort,
S econd P er i od P 2 and days fr om Monday to F r i day l eds wi l l
light up. In our case the S econd Comfort period starts at 13:00.
P2
L
M
X
J
V
L
M
X
J
V
L
M
X
J
V
Press the buttons
Press the buttons
P r es s the button OK to accept the hour.
Now we ar e goi ng to intr oduce the fi r s t E conomy P er i od fr om
Monday t o F r i day. T he E conomy, F i r s t P er i od P 1 and days fr om
Monday to F riday leds will light up. In our case the first economy
per i od s tar ts at 1 0 : 00 .
Press the buttons
Press the buttons
 Loading...