USE ONLY HAYWARD GENUINE REPLACEMENT PARTS 4
RETURN FITTING INSTALLATION (From the Pump to the Pool)
1. The return fitting furnished with these skimmers is a SP1023. The hole required through the pool wall to install this
fitting is 2.38±.03 inches. DO NOT CUT THE LINER.
2. Place one rubber gasket over the threads of the return fitting adapter and push the threaded end against the liner
and through the return cutout in the wall.
3. Applying outward pressure to the return fitting cut and “X” in the center of the exposed liner from outside the pool.
The return fitting will now be fully pressed against the liner and the wall on the inside of the pool. Using a razor
knife, trim the excess liner material from around the fitting threads on the outside of the pool.
4. Place the second rubber gasket and then the cork gasket over the threads of the return fitting now exposed outside
of the pool. Screw on the lock nut and tighten.
5. Screw on the adjustable directional ball fitting into the face of the return fitting from the outside of the pool.
Position ball fitting opening away from skimmer opening. Do not over-tighten.
Note: On-going leaks from the skimmer or wall fittings may cause pool wall damage
that eventually may result in pool wall failure.
RECOMMENDED WINTERIZING PROCEDURE
Drain pool level approximately six inches (6”) below skimmer opening. Remove
Hydrostream Eyeball fitting and securely plug wall fitting (1 ½” threaded plugs are
available from the dealer). Disconnect filter hoses from the skimmer and the wall fitting.
Be sure that the skimmer is kept free of water accumulation. Warranty does not include
damage caused by the formation of ice in the skimmer.
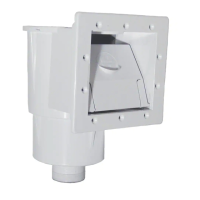
TO CLEAN SKIMMER BASKET
Remove top cover; or fold weir forward and squeeze tabs toward center to remove
weir. Remove and clean basket.
Deluxe Skim-Vac Accessory
SKIM-VAC attaches to vac hose and is inserted in skimmer over basket, allowing
you to conveniently vacuum through the skimmer basket.
TO-VACUUM WITH SKIM-VAC
1. Remove weir from front of skimmer.
2. Attach vacuum hose to vac head and handle, and fill vacuum hose with water
(place over pool inlet). Place SKIM-VAC over skimmer basket. Going through the
skimmer opening in the pool wall, attach the vacuum hose to the SKIM-VAC hose
adapter.
3. Hold SKIM-VAC in place until any air hose is evacuated by pump. Once air is
removed, the pump suction will hold the SKIM-VAC firmly in place.
Take care not to damage or scuff the Skim-Vac’s specially designed seal surface.
SPARE PARTS FOR SP1091WM
REF PART # DESCRIPTION REQUIRED
1 -------- Skimmer Body N/A
2 SPX1091B Cover 1
3 SP11041 Skim Vac 1
4 SPX1091C Basket w/ Handle 1
5 SPX1091K1 Weir 1
6 SPX1091G Standard Butterfly Gasket 1
7 SPX1091E Widemouth Extension 1
8 SPX1090Z7A Extension 1 Set
9 SPX1091GW Widemouth Butterfly Gasket 1
10 SPX1091F Widemouth Face Plate 1
11 SPX1090Z7A Face Plate Screw Pack (Includes screws for extension) 1 Set
SP1500UNPAK2 Union Set for using Outside Threads
SPARE PARTS FOR SP1091LX
REF PART # DESCRIPTION REQUIRED
1 -------- Skimmer Body N/A
2 SPX1091B Cover 1
3 SP11041 Skim Vac 1
4 SPX1091C Basket w/ Handle 1
5 SPX1091K1 Weir 1
6 SPX1091G Standard Butterfly Gasket 1
12 SPX1091D Face Plate 1
13 SPX1090Z6A Face Plate Screw Pack 1 Set
 Loading...