Do you have a question about the Heatilator Novus GNRC36 and is the answer not in the manual?
Emphasizes reading all instructions before installation to prevent malfunction and injury.
Installation must conform to all local, regional, state, and national codes and regulations.
Installation and repair must be done by a qualified service person; annual inspection is recommended.
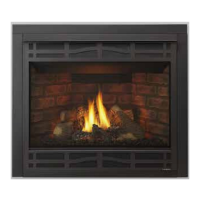
The appliance is a vented decorative gas appliance and should not be used for burning wood.
Children should never be left unattended when the appliance is burning.
Only approved venting systems should be used; do not connect to solid/gas fuel appliance chimney.
Never use gasoline, lantern fuel, or similar liquids; keep flammables away.
Always shut off electricity and gas before servicing to prevent electrical shock or burns.
Do not use if any part has been under water; call technician for inspection and replacement.
Ensure adequate clearances around air openings and for servicing and proper operation.
Appliance tested and listed per ANSI standards, certified by UL, AGA, CGA, or CSA.
Installation must conform with local codes; follow National Fuel Gas Code or CAN/CGA B149.
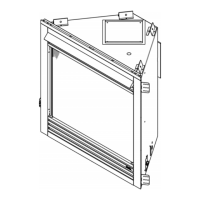
Illustrates components and configuration for a typical horizontal venting installation.
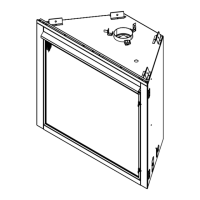
Illustrates components and configuration for a typical vertical venting installation.
Lists essential tools and building materials required for the installation process.
Lists various installation components with their corresponding part numbers and descriptions.
Provides dimensional data for GNRC33, GNRC36, and GNRH36 models for installation planning.
Details clearances required for different vent termination types.
Discusses where the appliance can be installed (bedroom, mobile homes) and general placement.
Specifies required clearances from the appliance to combustible surfaces.
Details minimum air space requirements for horizontal and vertical vent runs.
Illustrates typical framing requirements for the appliance using combustible materials.
Specifies mantel height requirements based on mantel projection for decorative models.
Specifies mantel height requirements for heater models, including hood availability.
Instructions on placing the appliance on a flat surface, including carpet/tile considerations.
Describes how to secure the appliance using nailing flanges for drywall installation.
Details various horizontal venting setups using 0, 1, 2, or 3 elbows with specific run limits.
Covers assembling chimney sections, installing wall shields, and rear vent heat shields.
Specifies rules for vent termination location, cap installation, and clearance dimensions.
Details required air space clearances around vertical vent sections.
Explains configurations for maximum vent lengths and support requirements.
Covers firestop spacer installation and chase/termination specifics including roof pitch and vent heights.
Step-by-step guide on connecting the first vent section to the appliance collars.
Instructions on how to join consecutive vent sections, ensuring proper locking.
How to cut and assemble non-unitized MI sections for proper overlap and connection.
Method for assembling slip sections with a 1.5" overlap, secured by screws.
Procedure for safely separating assembled vent sections by aligning seams.
Guidelines for installing the appliance at higher elevations and potential input rating adjustments.
Instructions for connecting the gas line, including shutoff valve and flexible connector.
Details optimum gas pressure information for Natural Gas (N.G.) and Propane (L.P.).
Emphasizes compliance with local codes and NEC/CSA standards for electrical wiring.
Explains the wiring diagram for standing pilot ignition systems.
Details wiring requirements for electronic ignition systems, including transformer connections.
Recommendations for wiring junction boxes for independent operation of appliance and fan.
Defines combustible, noncombustible materials, and high-temperature sealant for finishing.
Important warnings regarding covering grilles and using appropriate sealant.
Steps for attaching the hood above the glass panel.
Procedures for removing the upper grille panel and control access panel.
Instructions for placing log sets, lava rock, vermiculite, and rock wool for visual effect.
Guidance on replacing glass/screen and placing the control access panel.
How to identify if the appliance has standing pilot or electronic ignition by checking wiring.
Critical safety warnings and 'what to do if you smell gas' before lighting.
Step-by-step procedure for lighting an electronic ignition appliance.
Detailed steps for lighting the pilot and main burner on a standing pilot system.
Instructions on how to safely turn off the gas supply to the appliance.
Alerts about high surface temperatures, burns, and supervision of children.
List of checks a qualified technician should perform before operating the appliance.
Procedures for shutting down for long periods for both ignition types.
Information on fuel conversions and using approved conversion kits.
Lists common issues like condensation, blue flames, odors, and film on glass with causes/solutions.
Instructions for cleaning the burner and control compartment annually.
Recommends periodic testing of the venting system for proper operation.
How to check flame patterns (color, lifting) and ignitor/thermopile coverage.
Covers inspecting venting, checking flame patterns, and cleaning the glass.
Instructions for removing and replacing the log set.
Lists various remote control options for different ignition types and functions.
Describes available fan kits and blower control units for the appliance.
Lists bay doors, cabinet-style doors, and decorative glass options.
Details various trim kits available for decorative appliances and bay doors.
Provides a detailed list of replacement parts with item numbers, part numbers, and descriptions.
Details the components covered under the Limited Lifetime and 1 Year Limited Warranties.
Lists conditions, exclusions, and limitations of liability for the warranty.
Instructions on how to obtain service under the warranty terms.
| Product Type | Gas Fireplace |
|---|---|
| Model | Novus GNRC36 |
| Fuel Type | Natural Gas or Propane |
| Efficiency | Up to 70% |
| Firebox Size | 36 inches |
| Vent Type | Direct Vent |
| Log Set Material | Ceramic Fiber |
| Ignition Type | Electronic Ignition |
| Thermostat Compatibility | Yes |
| Control Type | Remote Control |
| Fireplace Type | Insert |