15 / 27
PL
SK
EN
CS
HU
• Do not throw away packaging materials until you have not reviewed carefully if they did not
remain a part of the product.
• Parts of the packaging (plastic bags, paper clips, etc.) do not leave within reach of children,
could be a possible source of danger. There is a danger of swallowing or suffocating!
• If you notice transport damage or while unpacking, notify your supplier immediately. Do not
operate the product!
• We recommend save the package for future use. The packaging materials must still be
recycled or disposed of in compliance with the relevant legislation. Sort different parts of
the packaging according to material and hand it to the appropriate collection sites. For
further information contact your local administration.
C Fasteners can become loose during transport in the packaging.
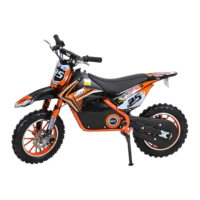
PACKAGE CONTENTS
pre-assembled body, handlebars with grips, front wheel, mudguards, front plate, charger,
accessories, user guide
• Standard accessories are subject to change without notice.
• This product requires assembly. The product must be assembled correctly before use.
ASSEMBLY
• It is recommended to use the Gola set and the side combination wrenches for the assembly.
HANDLEBARS
• Remove the plastic bandage, remove and unpack the handlebars. Do not pull at the bowdens.
• The handlebars are pre-assembled to simply remove the nuts that are on the screws, put
the screws through the holes in the fork (pic. 1) and return the nuts to the screws and
tighten firmly.
• Due to the limited space, we recommend using a long extension to tighten (pic. 2).
MUDGUARD, FRONT LABEL
• Turn the motorcycle body over to the side.
• Remove the two short socket heads from the underside of the fork and one larger in
the front (pic. 3).
• Attach the mudguard and tighten (pic. 4).
• Remove the longer socket head - the screw with the spacer tube - from the top of the fork
(pic. 5).
• Insert the screw into the front label hole and attach the spacer tube (pic. 6).
• Attach the two lower holes on the label onto the mudguard mandrels and mount to the fork
using the prepared screw (pic. 7).
• Attach the bowdens by a strap at the top of the label (pic. 8).
FRONT WHEEL
• Remove the front wheel axle from the front fork loops. Pay attention to the spacers (pic. 9) .
• Attach the screw into the left fork loop, then attach the shorter spacer (pic. 10) , pass
the screw through the centre of the wheel (pic. 11) , attach the longer spacer (pic. 12) and
pass the screw through the right loop of the fork and attach the nut (pic. 13).
• Do not tighten the nut too much to avoid distortion of the spacers.