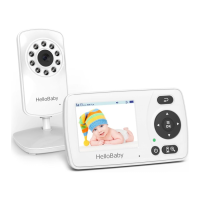
6. 3 BABY UNIT OVERVIEW:
O
O
O
O
O
O
Light sensor
Infrared LEDs
Lens
Power LED
o
8
MIC
DC-Jack
Pair key
o O c. 0 0 00
00000
U
7. KEY OPERATION
7.1 POWER SAVE/ SCREEN OFF
Short press the power (b key to turn on / off the screen.
7.2 VOLUME ADJUSTMENT
Press the A keyto increase the volume; Press the V keyto decrease the volume;
7.3 BRIGHTNESS ADJUSTMENT
Press the < key to decrease the brightness; Press the key to increase the brightness;
7.4 CAMERA VIEW / SCAN
Press Scan n key to view scan camera; During scan mode, the scan icon Nowill be displayed
on the top of screen. And each camera's video will stay on the LCD around 10 seconds and
then turn to next camera alternately;
7.5 DIGITAL ZOOM & PAN / TILT
Press andhold then keyaround2 secondsto operate Zoomin / out; At the Zoommode,
press the < key to Pan left; press keyto Panright; press A key to tilt up; press
key to tilt
down;During digital zoom mode, the zoom icon O. will be displayed on the top of screen.
Warm reminder: If you want to adjust the volume/Brightness, you have to exit the Zoom
mode before you operate it.
8. MENU OPERATION
8.1 PAIRING THE CAMERA AND PARENT UNITS
The baby unit is pre-registered to your parent unit. You do not need to register it again
unless the baby unit loses connection with the parent unit. To re-register your baby unit,
or register a new baby unit, follow the steps below:
Note: Camera icon with
means it is well registered. You should select and pair with
the camera icon without sign.
8.1 .1 ADD CAMERA
1.Pressthe MENU@keythenthe menuwill popup;
 Loading...