Technical Service:
800-417-8405
937-456-8405
technicalservice@hennypenny.com
www.hennypenny.com
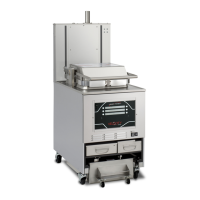
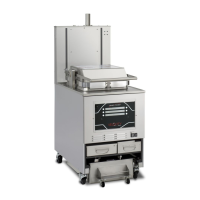
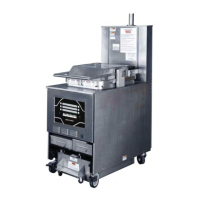
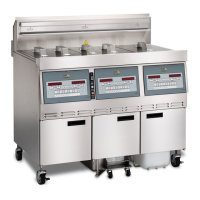
General Market PXE-100 Quick Reference Guide
Basic Operation
Filling the Fresh Oil Tank
Drain Pan Assembly
Product Racking Recommendations
Filter Menu
Preventive Maintenance
Error Codes
The rack positions are referenced starting at the bottom. Product is represented with 0 in
the charts below.
The fresh oil tank automatically tops off the oil in the vat when it senses the oil level is
low. User should add fresh oil to the tank as needed. DO NOT add fresh oil directly to
the vat.
1. Fill empty vat with new oil to the lower level indicator.
2. Turn the POWER switch to the ON position.
3. Allow fryer to heat until set point for “COOL” is reached.
4. Select product button and allow the temperature to reach set point. Once setpoint
has been reached, the display will read “READY”.
5. Before loading product onto the racks, lower racks into the hot shortening to keep
the product from sticking to the racks.
6. Slide racks of breaded product into carrier on the lid. See Product Racking
Recommendations below.
7. Lower and lock the lid down according to instructions located on lid and press the
appropriate product button.
8. At the end of the cycle, pressure begins venting automatically, alarm sounds, and
the display shows “DONE”. At this time, press the “DONE” button.
9. Unlock and raise the lid slowly.
10. Using the rack handles, remove the racks of product from the carrier, starting with
the top rack.
• Push the (i) button to see set point and true
temperature of oil.
• The heat cycles on and off approximately
10 degrees before the setpoint temperature
to help prevent overshooting the setpoint
temperature.
1. Push and hold until the display reads “*MAIN*”.
2. Press 1 to enter the “Filter” menu. Use the buttons next to the arrows on the display
to access the next set of options.
3. Push the menu button again to cycle to next set of options.
1. QUICK
2. DAILY
3. POLISH
4. DRAIN TO PAN
5. FILL FROM PAN
6. FILL FROM OIL TANK
7. DISPOSE
8. FILL FROM BULK
x. EXIT MENU
Procedure Frequency
Changing of oil ..........................................As indicated
Changing the lter envelope .....................Daily
Cleaning the vat .........................................Daily
Code Cause Correction
E-4
“CPU TOO HOT”
Turn switch to OFF position, then turn switch back to
ON
E-5
Oil Overheating Have heat circuits and temp. probe checked
E-6
(A or B)
Temp. probe open
or shorted
Have temp. probe checked
E-10
High Limit Tripped
Reset the high limit switch located under the control
board, above the condensation pan
E-14
Pressure too High
• Check deadweight chamber for any obstruction
• Check the steam exhaust passage for obstruction
Fully loaded with 8-head
(all 4 racks used)
4
3
2
1
8-Head: Load all four racks as shown.
6-Head: Load only racks 1, 2 and 3.
4-Head: Load only racks 2 and 3.
2-Head: Load only rack 2.
1. Slide a lter envelope onto the lter screen so the plug is
protruding through the hole.
2. Slide the two handle clamps onto the ends of the lter
screen assembly with the handles opposite sides of the
plug.
3. Place the lter screen plug up in the bottom of the drain
pan.
4. Lining up the hole of the pickup tube with the plug of the
lter screen, press the tube down.
5. Position the pick up tube so that the guides slide into
the notches located on the hold in the front of the drain
pan. Press down on the pick up tube to conrm it is fully
engaged on the lter screen plug and in the holder.
6. Place the crumb catcher onto the handles of the clips.
Slide the drain pan under the fryer lining up the plug and
play.
7. Place lid onto drain pan.
8. Push the drain pan into place and lock it into place using
the locking latch.
9. To remove the drain pan to clean, reverse procedure.
During assembly, be sure to apply oil to all O-rings to lubricate to
help prevent tears and loss
Temporary document for test units only
July 27, 2017
High Limit Reset Switch
DO NOT ATTEMPT TO LIFT HANDLE BEFORE THE CONTROL
ALARM SOUNDS AND BLINKING “DONE” IS DISPLAYED.
ESCAPING STEAM AND OIL WILL RESULT IN SEVERE BURNS.