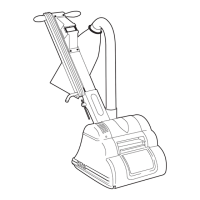
SPECIFICATION
The HTF Orbital Floor & Deck Sander will sand wood floors and
most types of decking, including fine parquet, engineered and pre-
finished wood flooring systems, cork and composition floors to a
fine finish. Ideal for sanding between coats of floor varnish and
lacquers were a very high quality, score free finish is required. The
finally balanced orbital action will not leave swirl marks in the floor
surface which may be highlighted when varnished. Designed for
sanding floors that are level and in generally good condition were
the existing varnish has worn and requires re-finishing. Completely
self contained with a powerful dust pickup the HTF-2 is a high
performance floor sander suitable for professional and home
owner use.
Power Supply 110/120 V 50/60 Hz
220/240 V 50/60 Hz
Off Load Current 110/120 V 8A
220/250 V 5A
Average Load Current 110/120 V 15A
220/250 V 8A
Noise 95dBa at 1metre (3’ 3”)
Vibration 8.89 m/s² r.m.s.
Switch Bias Off, double pole.
Motor Continuous heavy duty AC/
DC self cooling 4 brush.
Motor RPM 10,000
Sanding Pad RPM 3,000
Sanding Pad 400mm (15¾”) x 115mm
(4½”) MDF back with hook
and loop face.
Drive Non-slip toothed timing belt
and toughened steel pinion
and drive gear.
Moving Parts Sealed for life ball bearings.
Dust Pickup Seated oversize vacuum fan,
disposable paper dust or cloth
bag
Abrasive 400mm (15¾”) x 115mm
(4½”) random fibre abrasive
pad 280 grit and backing
pad.
400mm (15¾”) x 115mm
(4½”) anti-clog adhesive
backed sheet 40 to 180 grit
Power Cable 7m (23’) Non-marking outer
insulation.
Weight Net 45.0kg (94.8lbs) excluding
HTF weight.
Shipping Weight 52.0kg (110.3lbs)
Shipping Dimensions 77 x 39 x 57cm
(30.3” x 15.4” x 22.4”)
Warranty 2 years
Read the following Safety and Operational notes before
using your Hiretech Floor Sander.
SAFETY
1. For safety it is recommended that a residual current circuit
breaker (ground fault interrupter) is used with this machine.
2. Check the operating voltage is correct and that the machine is
switched OFF (O) before connecting to the power supply.
3. Never attempt to lock the switch in the ON (I) position with
tape or by any other means.
4. Always disconnect from the power supply when changing the
abrasive, servicing the floor sander, replacing the dust bag or
leaving the machine unattended.
5. Always replace the dust bag when the dust in the bag reaches
the ‘MAX’ line or when the machine is left unattended.
6. Never dispose of or empty the contents of the dust bag into a
fire or incinerator.
7. Never reuse the paper dust bag or use a non standard bag.
8. Always wear a dust mask when using the floor sander,
handling the dust bag or cleaning the machine after use.
9. Wear ear protection when using the floor sander.
10. Ensure adequate ventilation of the work area to avoid the
formation of a combustible mixture of flying dust and air.
11. Never smoke when using or servicing the floor sander or when
handling the dust bag. Make sure that all possible sources of
ignition are removed from the work area.
12. Never expose the machine to rain or damp. Always store in a
dry place.
13. Stop the floor sander immediately if damage to the machine
or abrasive is suspected.
14. Never allow the power cable to come into contact with the
sanding pad when the floor sander is in operation. If the
power cable becomes damaged and the inner conductors
are exposed switch the power OFF (O) and remove the plug
before attempting to move the machine. The cable must be
replaced by an authorized agent or qualified electrician using
genuine Hiretech© pare parts only.
15. Keep hands, feet and loose clothing away from all moving
parts of the machine.
16. Punch down or remove all nails, screws, tacks and other
fixings from the floor before sanding to prevent contact with
the sanding pad.
17. Keep children and pets clear at all times.
18. If the machine should fail to operate refer to the fault finding
guide on page 8.
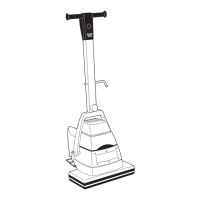
ASSEMBLY & TRANSPORT
1. The HTF-2 breaks down into two component parts, the main
body and handle assembly for easy handling and transport.
To assemble loosen the Handle Clamp Handle and fit the
handle assembly to the Handle Yoke which should be locked
in the upright position. Tighten the Handle Clamp firmly.
2. Pull the Dust Bag Frame down to its operating position.
Connect the Handle Cable to the Body Twist Lock at the rear
left hand side of the floor sander body. Align the plug with the
pins, push in and twist clockwise to lock.
3. Fit a Hiretech disposable paper dust bag following the
instructions printed on the bag.
4. Tip the floor sander back so that it rests on the Dust Bag Frame
to fit the selected abrasive. Remove the power cable from the
handle assembly. Check that the cable is in good condition
2
© Hiretech

 Loading...