and the strain relief and plug are secure. The floor sander is
now ready to connect to the power supply and start sanding.
5. To dismantle the floor sander reverse the procedure 1 to 4
above.
6. Always carry the floor sander by the front hand grip and the
handle yoke which must be locked in the upright position with
the handle detached. The dust bag frame should be stowed in
the up position.
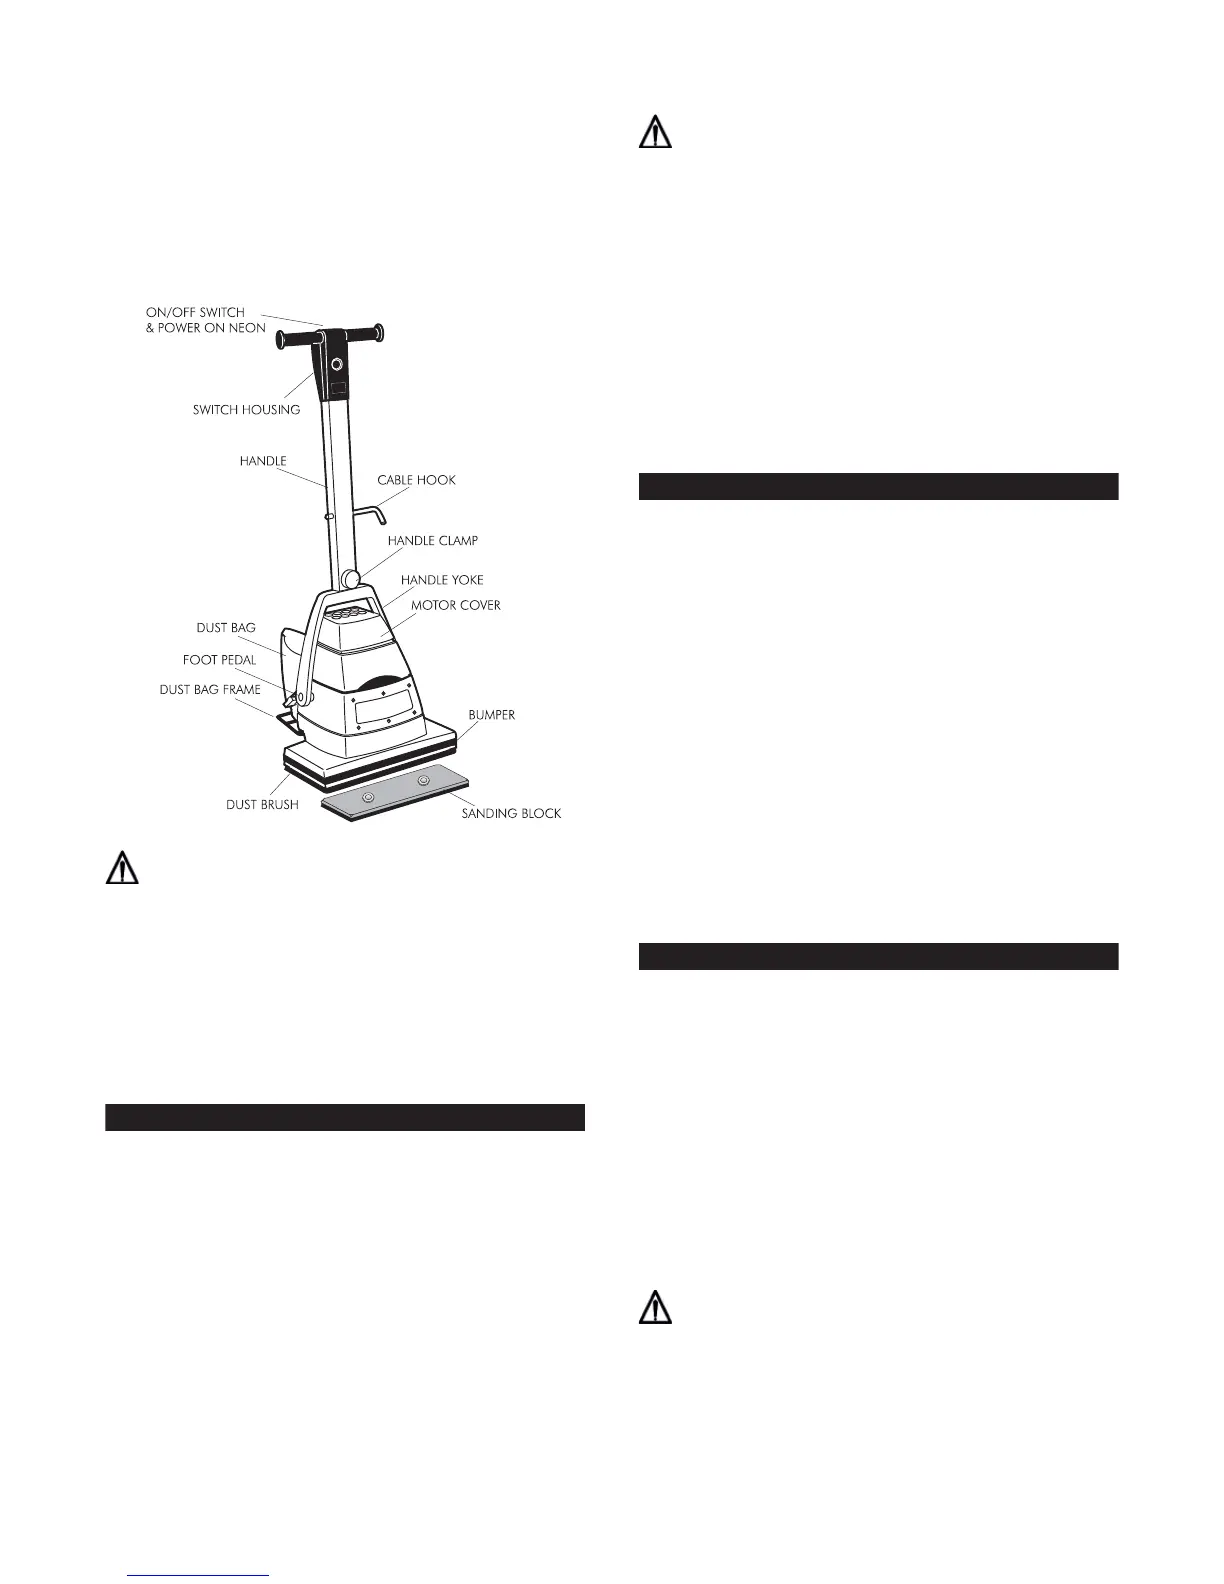
HTF Main Components
WARNING: Never carry the floor sander by the handle
assembly and body or with the handle assembly attached.
Failure to observe this rule may result in personal injury
and/or damage to the floor sander.
7. Transport the sander with the sanding block and abrasive
pad in place this will help maintain the dust brushes in good
condition. Always ensure that the floor sander is secure and
cannot move when being transported in a vehicle. The floor
sander is heavy. Take care when lifting and carrying the
machine.
INSTALLING ABRASIVE
1. Ensure the power cable is disconnected from the power
supply.
2. Lock the handle in the upright position and tip the floor sander
backwards so that it rests on the dust bag frame. If a sanding
block is already fitted the abrasive may be fitted with the
sanding block left in place or it may be removed if required.
To remove the sanding block take hold of each end of the
block and pull it off its mounting posts. Take care to pull the
block off evenly and avoid trapping your fingers between the
block and the body of the floor sander.
3. Refer to the Abrasive Guide on page 6 for the correct abrasive
to use.
4. Abrasive Pad - fit an abrasive pad to the sanding block.
Carefully line the pad up with the face of the sanding block
and push down. The pad is both a fine abrasive and a
backing pad for the coated abrasive sheets. It is important
that the pad is maintained in good condition and not used
beyond its useful working life.
CAUTION: Do not use any other type of abrasive pad
or backing material as this may damage the floor and/or
floor sander.
5. Abrasive Sheets - peel off the backing to exposure the adhesive
back and carefully fix the abrasive to the face of the abrasive
pad making sure it is in line. When changing abrasive sheets
peel off carefully so as not to destroy the face of the abrasive
pad.
6. With the abrasive fixed to the sanding block re-fit the block (if
removed) to the floor sander.
7. Stand the floor sander up, it is now ready to use.
8. Periodically check that the abrasive pad is still in line with
the sanding block. If the machine is tipped back when in
operation the abrasive pad may become misaligned.
PREPARATION
1. Where possible remove all furniture from the room. The HTF-2
Floor Sander features an efficient dust pick-up, however, some
dust will escape. Protect all vulnerable furnishings with dust
sheets, masking films and tape.
2. Remove all tacks, staples and other unwanted fixings from the
floor. Failure to do so will result in damage to the sanding pad
and abrasive sheet or pad.
3. Punch all nails below the surface of the floor using a suitable
nail punch and hammer. Any screws used to fix boards should
be counter sunk below the surface. During sanding, any nails
or screws that become exposed must be punched or counter
sunk further.
4. Firmly fix all loose boards or blocks.
5. Remove heavy wax, grease and dirt deposits by hand.
6. Sweep and vacuum the floor thoroughly to remove dirt and
discarded fixings.
7. Ensure good ventilation by opening windows.
OPERATION
1. Move the floor sander to the location of your work.
2. Make sure the switch is in the OFF (O) position then connect
the main cable to a suitable power supply ideally located
behind or to one side of the machine and work area.
3. Wear a dust mask and ear defenders.
4. Hold the handle with both hands and depress foot pedal with
your right foot. This will release the handle.
5. Switch ON by pushing the ON/OFF switch down using the
thumbs of one hand to ON (I) position and hold in place.
Start moving immediately. To switch OFF (O), release the
pressure on the switch and it will automatically return to the
OFF position.
CAUTION: the HTF-2 Floor Sander is a powerful machine
always ensure you have a firm grip before switching on.
6. Follow the instructions carefully for sanding and re-finishing a
floor. Walk slowly forward and back, working progressively
across the floor. Do not dwell in one place. The floor sander
will glide easily across the surface of the floor.
7. When the dust in the dust bag reaches the ‘MAX’ line stop
sanding. Switch OFF, disconnect the power cable from the
power supply and remove the paper dust bag. Turn the top
of the paper dust bag over to stop the escape of dust and
3
© Hiretech

 Loading...