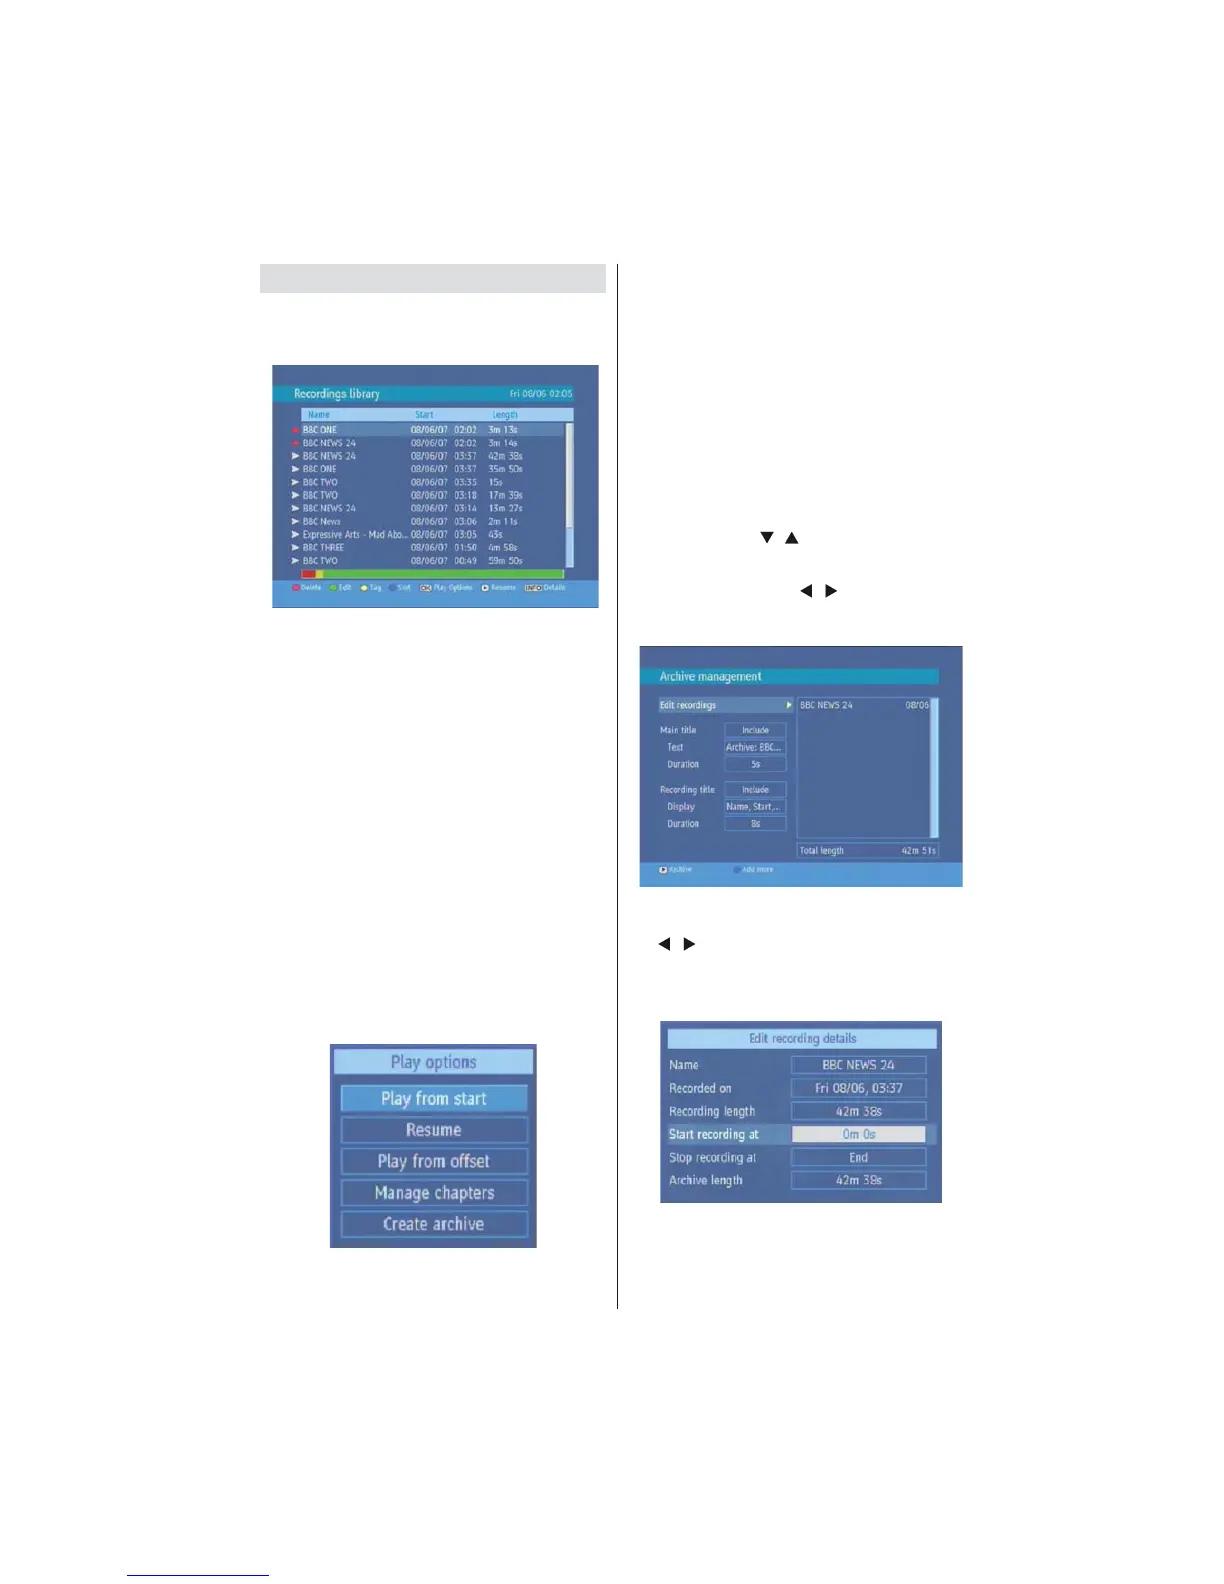
EasyManua.ls Logo

Hitachi HDR505 User Manual

Hitachi HDR505
28 pages
To Next Page IconTo Next Page
To Previous Page IconTo Previous Page
Page #15 background imageLoading...
Page #15 background image
English - 13 -
Recordings Library
All the recordings are kept in list. To show the list of
recordings press either LIB button on the remote or
access it from the main menu.
RED BUTTON (DELETE) : Erase the recordings
GREEN BUTTON (EDIT) : make changes to the
recordings
YELLOW BUTTON (TAG) : marks the recordings
for archiving
BLUE BUTTON (SORT) : change the order of the
recordings
INFO (DETAILS) : displays the short extended
programs in detail
OK BUTTON : opens the play options menu
X (RESUME): recommence the recordings
Red bar: indicates the used space of the recordings
on the hard disk.
Yellow bar: displays the approximate capacity
required for the timers currently set.
Green bar: shows the free space on the hard disk.
Play Options:
Play from start: Plays the recording from the
beginning.
Resume: Begins with playing from the last stopped
position.
Play from offset: Begins with playing, from the time
which is entered.
Manage chapters : It will display any marked chapters
(To set chapter marks, press the Menu button during
playback and enter the “Chapter Options” menu) and
begin with playback from the selected chapter.
Create archive (Archive management): Using this
option, you will be able to archive your recordings to
an external device like a DVD player. Press the LIB.
Button and come to the “Recordings Library”. In this
library, the saved recordings are listed. To select a
recording which should be archieved, highlight one
of them using the “
”/“ buttons and select the
TAG option, by pressing the yellow button. After then,
press the OK button to open the “Play Options” menu.
In this menu, using the “ ”/“ buttons, select the
“Create Archive” option and enter it by pressing the
OK button. You will see the menu below:
Edit Recordings
While the “Edit recordings” option is highlighted, using
the “
”/“ ” buttons come to the list of recordings on
the right of this menu. Select one of them, which
should be archived and press the OK button. You will
come to the following menu:
Here, only the “Start recording at” and “ Stop recording
at” options are active. If you have alrady separated
recording, you could select any chapter to begin
with the archiving and stop it. If it is not separated
in chapters, the beginning and ending time of the

Questions and Answers:

Hitachi HDR505 Specifications

General IconGeneral
Recording Capacity500GB
Recording Time (SD)Up to 250 hours
Ethernet PortNo
Video FormatMPEG-2
Output PortsHDMI
USB PortYes
Recording Resolution576i

Summary

Safety Precautions

Power and Cord Safety

Safe handling of power adaptor, cord, and electrical connections.

Environmental and Placement Safety

Precautions for temperature, humidity, ventilation, and placement to ensure safe operation.

Safe Use Guidelines

Essential Dos and Don'ts

Key safety practices and warnings for operating electrical equipment.

Remote Control Overview

Button Functions

Explains the function of each button on the remote control.

Device Connections

Front and Back Panel Ports

Identifies and describes all physical connection ports on the device.

Power Connection and Management

Power Adapter and Connection

Details on connecting the 12V DC power adapter and initial setup.

Power On/Off and Standby Modes

Explains how to turn the device on/off and its power saving modes.

Initial Setup and Interface

First Time Installation

Guides the user through the initial setup process, including TV type and channel scan.

Menu System Navigation

Explains how to navigate and use the device's main menu system.

Channel Management

Navigating and Editing Channels

Detailed steps for browsing, deleting, and renaming channels.

Program Guide and Favorites

Electronic Program Guide (EPG)

How to view and navigate the 7-day electronic program guide.

Program Guide Features

Program Options

Accessing options like Select Channel, Record, Set Reminder, and Check Conflicts.

Recording and Timer Management

Setting and Canceling Timers

How to set, delete, and manage recording timers and reminders.

Timer Configuration

Adding and Editing Timers

Step-by-step guide to adding, editing, and saving timer settings.

Recordings Library

Setup Menu Options

Hard Disk Management

Hard Disk Information

Details on total space, used space, free space, and estimated recording time.

Hard Disk Operation Precautions

Environmental Considerations

Precautions for placement and operation to prevent HDD damage or malfunction.

Security and Language Settings

Parental Locking and Menu Lock

Setting parental controls, PIN codes, and locking menu access.

Installation and Channel Setup

Automatic Channel Scan

Steps to perform an automatic scan to find and tune channels.

Channel Scanning and Remote Functions

Advanced Viewing Features

Time Shifting (Pause Live Recording)

How to pause, resume, and adjust playback of live broadcasts.

Important Notes and Precautions

Power, Leads, and Environment

Notes on power supply, cable management, and environmental conditions.

Troubleshooting Guide

Common Problems and Solutions

Lists common issues like no LED, no picture/sound, remote not working, and their solutions.

Related product manuals