HOBO MX Temp/RH Data Logger (MX1101) Manual
1-800-LOGGERS 5 www.onsetcomp.com
a. Choose one of two memory options:
• When Memory Fills. The logger will continue recording
data until the memory is full.
• Never (Wrap When Full). The logger will continue
recording data indefinitely, with newest data
overwriting the oldest. This option is not available if
the Logging Mode is set to Burst (see Burst Logging).
b. Select On Button Push if you want to be able to stop
logging by pushing the Start/Stop button on the logger
for 3 seconds. Note that if you also choose On Button
Push for the Start Logging option, then you will not be
able to stop logging until 30 seconds after logging begins.
If you select On Button Push for the Stop Logging option,
then you also have the option to select Allow Button
Restart. This allows you to stop and then resume logging
during the deployment by pushing the Start/Stop button
on the logger for 3 seconds.
Important: When Allow Button Restart is selected and
you use the Start/Stop button to stop and restart logging,
logging will restart on the next even logging interval, not
at the time the button was pushed. For example, a logger
started logging at 7:00 AM with a logging interval set to 1
hour. If you press the Start/Stop button to stop the logger
at 8:45 AM and then press the button again at 10:15 AM,
logging will not begin immediately at 10:15 AM. Instead,
logging will begin again at 11:00 AM, which is the next
even interval time based on your 1-hour logging interval.
Therefore, depending on the logging interval, the gap
between the time you press the button to resume logging
and the time actual logging begins could be significant.
The faster the logging interval, the less time will elapse
before logging resumes.
c. Select one of the following time options for when to stop
logging:
• Never. Select this if you do not want the logger to stop
at any predetermined time frame.
• On Date/Time. Select this if you want the logger to
stop logging on a specific date and time. Select the
date and time and then tap Done.
• After. Select this if you want to control how long the
logger should continue logging once it starts. Choose
the amount of time you want the logger to log data
and then tap Done. For example, select 30 days if you
want the logger to log data for 30 days after logging
begins.
d. Tap Done.
8. Select the sensor measurement types that will be logged.
By default, both the temperature and RH sensors are
enabled. Both sensors are required to calculate dew point,
which is an additional data series available for plotting after
reading out the logger. You can also set up alarms to trip
when a sensor reading rises above or falls below a specified
value. See Setting up Alarms for details on enabling sensor
alarms and selecting the associated audible and visual
alarm settings.
9. Tap Logging Mode. Select either fixed interval logging or
burst logging. With fixed interval logging, the logger records
data for all enabled sensors and/or selected statistics at the
logging interval selected (see Statistics Logging for details
on choosing statistics options). In burst mode, logging
occurs at a different interval when a specified condition is
met. See Burst Logging for more information. Tap Done.
10. Enable or disable Show LCD, which controls whether the
LCD on the logger will remain illuminated while the logger is
logging. If you disable Show LCD, the LCD on the logger will
not show the current reading, status, or other information
while the logger is logging. You will, however, be able to
temporarily turn the LCD screen on by pressing the
Start/Stop button on the logger for 1 second. In addition,
you can always view the status of any in-range logger on
your mobile device regardless of the logger’s LCD setting
(may require a logger password as applicable).
11. Tap Start in the upper right corner of the Configure screen
to load the settings onto the logger if you are ready to start.
Logging will begin based on the settings you selected.
Deploy the logger using the mounting materials (see
Mounting the Logger). After logging begins, you can read
out the logger at any time (see Reading Out the Logger for
details).
Setting up Alarms
You can set an alarm to trip on the logger when a sensor
reading rises above or falls below a specified value. This can
alert you to problems so you can take corrective action. To set
an alarm:
1. Tap and select a logger in the In Range list to connect
to it.
2. Once connected, tap Configure.
3. In Sensor & Alarm Setup, tap an enabled sensor.
4. Enable the High Alarm if you want an alarm to trip when the
sensor reading rises above the high alarm value. Drag the
slider to the reading that will trip the alarm or tap the value
field and type a specific reading. In this example, an alarm
will trip when the temperature rises above 85°F.
5. Enable the Low Alarm if you want an alarm to trip when the
sensor reading falls below the low alarm value. Drag the
slider to the reading that will trip the alarm or tap the value
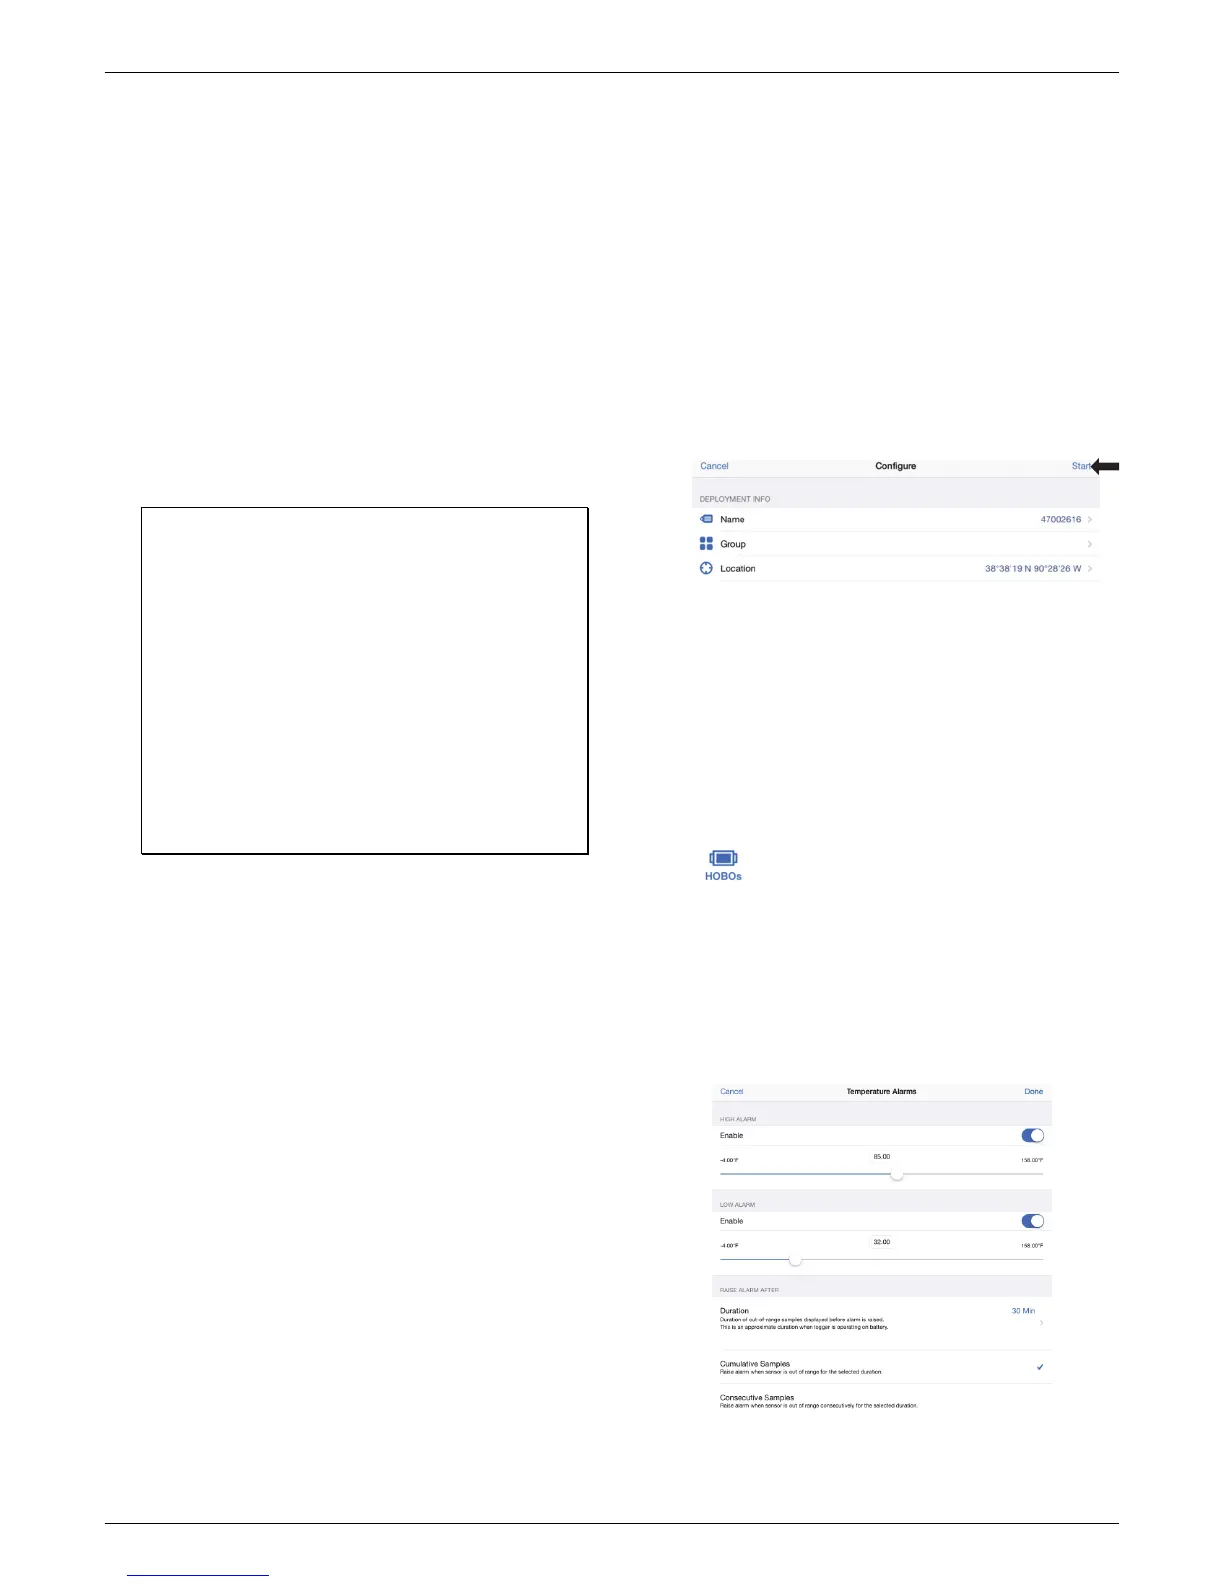 Loading...