Structure and function of the machine
Hohner Maschinenbau GmbH EXACT 06/2010 15
3.4 Installation of the stitching table
3.4.1 Installation of stitching table: flat stitching
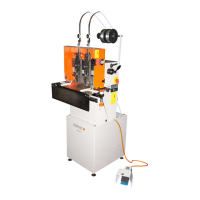
- Fig. 3.3 -
- Remove the finger guard.
- Open the front plate.
- Carefully insert the stitching table -1- with broad table part into the machine, then with
flat mount -4-, bring into position via the centring plates -2- on the left and right side.
- Lower the stitching table -1- until it rests. Successively push the three-cornered grips -3- on the
left and right side slightly upwards and screw them firmly.
- Mount the finger guard in the "block stitching" position and note the markings (see 3.2).
- Close the front door.
- Dismantling of the stitching table -1- in reverse order
3.4.2 Installation of stitching table for brochures stitching
- Fig. 3.4 -
- Remove the finger guard.
- Open the front panel.
- Slide the stitching table -1- with the small side into the machine. Tilt the small side of the stitching
table downwards in 45°. Move the stitching table -1- with both fixed angle-supports -5- over the
centering disks -2-.
- Put down the stitching table -1- until it will be supported. Push the triangle-handles -3- upwards
and tighten it.
- Mount the finger guard in the "saddle stitching" position and note the markings (see 3.2).
- Close the front door.
- Dismantling of the stitching table -1- in reverse order