EasyManua.ls Logo

Home Styles 5004 692 User Manual

Home Styles 5004 692
7 pages
To Next Page IconTo Next Page
Page #1 background imageLoading...
Page #1 background image
Hardware List
Part List
Home Styles Customer Service: www.homestyles-furniture.com,
servicedesk@homestyles-furniture.com,
888-680-7460, 877-831-0319
Tool(s) required for assembly: Phillips screwdriver, Level, Drill (8 volts or less), 3/8” Drill Bit
5004 692-
Pantry
IMPORTANT
Carefully remove all the parts from the carton and
place them individually on a soft cloth to prevent
scratches or other damage.
Carefully and strictly follow these assembly instructions
to ensure a completed product as designed.
Do not use power tools above 8 volts to assemble.
Cam Lock Screw
24 pcs. (+1 extra)
Cam Lock
24 pcs. (+4 extra)
M3.5x16
Wood Screw
16 pcs. (+1 extra)
Adjustable Pin
16 pcs. (+1 extra)
Knob
4 pcs.
M4x25
Machine Screw
4 pcs.
A.
Top
1 pc.
B.
Side Panel
2 pcs.
C.
Side Panel
2 pcs.
D.
Back Stretcher
4 pcs.
E.
Back Upright
2 pcs.
F.
Back Panel
4 pcs.
G.
Middle Panel
1 pc.
H.
Base
1 pc.
I.
Shelf
4 pcs.
J.
Door
2 pcs.
K.
Door
2 pcs.
Question and Answer IconNeed help?

Do you have a question about the Home Styles 5004 692 and is the answer not in the manual?

Home Styles 5004 692 Specifications

General IconGeneral
BrandHome Styles
Model5004 692
CategoryIndoor Furnishing
LanguageEnglish

Summary

Product Overview

Part List

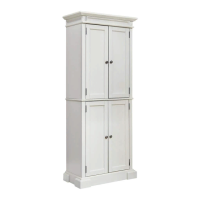
Comprehensive list of furniture components for assembly.

Hardware List

Inventory of screws, locks, and other fasteners.

Assembly Guide

Step 1: Prepare Panels with Screws

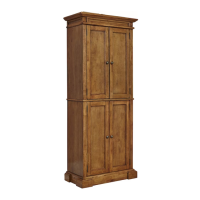
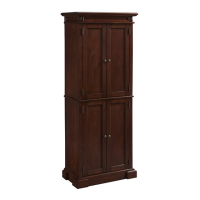
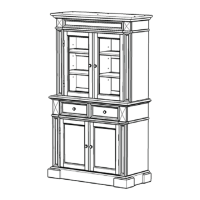
Inserting cam lock screws into top, side, middle, and base panels.

Step 2: Construct Side Frames

Attaching back stretchers and uprights to side panels.

Step 3: Attach Doors and Middle Shelf

Securing doors and middle panel to the structure.

Step 4: Assemble Back Panels and Side Panels

Connecting back panels, stretchers, and side panels.

Step 5: Join Cabinet Sections

Connecting the upper and lower cabinet sections.

Step 6: Install Shelves and Doors

Placing adjustable shelves and mounting doors.

Step 7: Final Leveling and Securing

Using levelers and wood screws for stability.

Step 8: Install Anti-Tip Restraint

Anchoring the unit to the wall for safety.

Care and Maintenance

Preventative Care Guidelines

Avoid liquids, direct sunlight, writing, hot objects, and certain polishes.

Cleaning Procedures

How to clean the furniture using soap and water.

Related product manuals