EasyManua.ls Logo

Home Styles Arts & Crafts Dining Buffet User Manual

Home Styles Arts & Crafts Dining Buffet
6 pages
To Next Page IconTo Next Page
Page #1 background imageLoading...
Page #1 background image
Buffet Unit Part List
88 5180 691
Dining Buffet
Arts & Crafts
IMPORTANT NOTE
Carefully remove all the parts from the carton and put
them individually on a soft cloth to prevent scratches
or other damages occuring to the wood parts.
We have taken great care in the design of this
product and request that you carefully and strictly
follow our assembly instructions to ensure a
completed product as it was designed.
Casual Attire For Today's Home
Hardware List
Hex Wrench
1 pc.
Head Cap Bolt
28 pcs. (+1 extra)
Cam Lock
8 pcs.(+1 extra)
Cam Lock Screw
8 pcs.(+1 extra)
Machine Screw
8 pcs.
A.
Top
1 pc.
Wood Screw
24 pcs. (+1 extra)
Wood Screw (long)
16 pcs. (+1 extra)
Drawer
Pull Handle
2 pcs.
Adjustable Pin
16 pcs. (+2 extra)
N.
Base
1 pc.
Tools required for assembly : Phillips screwdriver
Home Styles Consumer Assistance Line 888-680-7460 and 877-831-0319
servicedesk@homestyles-furniture.com
For assembly see instructions in carton 88 5180 692
Wood Screw
for Megnet
8 pcs. (+1 extra)
Magnet
4 pcs.
M.
Rack
1 pc.
O.
Leg
2 pcs.
P.
Leg
1 pc.
L.
Shelf
4 pcs.
Small
Hex Wrench
1 pc.
Door
Pull Handle
2 pcs.
(Cottage Oak)
Question and Answer IconNeed help?

Do you have a question about the Home Styles Arts & Crafts Dining Buffet and is the answer not in the manual?
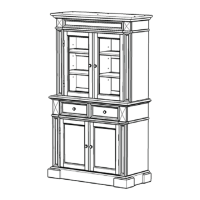
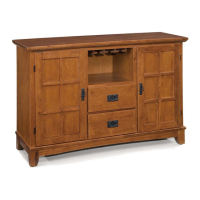
Home Styles Arts & Crafts Dining Buffet Specifications

General IconGeneral
MaterialWood
StyleArts & Crafts
Number of Doors2
Number of Drawers2
Assembly RequiredYes
TypeBuffet
Weight120 lbs

Summary

Buffet Unit Part List

Hardware List

Part List (in this carton)

Assembly Instructions

Prepare Panels and Attach Magnets

Insert Cam Lock Screws into panels and attach magnets to middle panels using wood screws.

Attach Back Panels and Stretchers

Connect back stretchers to side panels and slide in back panels using cam locks.

Install Middle, Front, and Side Panels

Attach middle, fixed shelf, front, and side panels using head cap bolts and cam locks.

Attach Base Panel

Secure the base panel to the main unit using head cap bolts.

Attach Legs

Attach the legs to the base using head cap bolts and tighten the remaining leg.

Attach Rack to Top Panel

Install the rack onto the top panel using head cap bolts.

Install Top, Drawers, Shelves, and Doors

Place top panel, insert drawers and shelves, and attach doors with lift hinges.

Secure Back with Wood Screws

Insert and tighten wood screws from the back of the unit for stability.

Assemble Drawers

Assemble the drawers by joining parts with wood screws and attaching hardware pulls.

Related product manuals