EasyManua.ls Logo

Honeywell DF8M - User Manual

Honeywell DF8M
8 pages
Go to English
Print Icon
To Next Page IconTo Next Page
Loading...
HW-500-004 1 I56-3683-001
DF8M – Wireless optical smoke detector – Installation instructions
I56-3683-001
7.6 m
60 cm
10 cm
Optimal / Óptimo / Optimal / Optimaal / Ottimale / Optimal
Satisfaisant / Satisfactorio / Zufriedenstellend / Voldoende / Sufficiente / Satisfactory
Bouton de test / Conmutador Test /
Testknopf / Testknop /
Interruttore di test /
Test Switch
LED verte / Diodo
electroluminiscente verde /
Grüne LED / Groene
LED / LED verde /
Green LED
LED rouge / Diodo
electroluminiscente rojo /
Rote LED / Rode LED /
LED rosso / Red LED
A
ppuyez sur le bouton encastré avec un outil de 4,6 mm de diamètre maximum /
Pulse el conmutador empotrado con una herramienta de 4,6 mm (0,18") de diámetro como máximo. /
Drücken Sie den eingelassenen Knopf mit einem Werkzeug mit einem Durchmesser von maximal 4,6 mm (0,18 Zoll). /
Druk de verzonken knop in. Gebruik hiervoor een gereedschap met een diameter van max. 4,6 mm /
Premere l'interruttore rientrato con un utensile dal diametro massimo di 4,6 mm. /
Push the recessed switch with a 0.18” max. diameter tool
Couvercle amovible du détecteur /
Tapa extraíble del detector /
Abnehmbare Abdeckung /
Afneembare dekplaat /
Coperchio del rilevatore rimovibile /
Removable Detector Cover
Chambre de détection avec écran
anti-moustique (partie supérieure) /
Pantalla / cámara de detección
(mitad superior) / Schutzgitter/Sensorkammer
(obere Hälfte) / Filter detectiekamer
(bovenste helft) / Camera di rilevamento /
schermatura (metà superiore) /
Screen SensingChamber(top half)
Boîtier du détecteur /
Carcasa del detector /
Gehäuse /
Detectorbehuizing /
Alloggiamento del
rilevatore /
Detector Housing
Orifices de montage direct / Orificios de montaje directo /
Löcher zur Direktmontage / Direct Mount Holes
Klikmontagesleuven / Fori di montaggio diretto /
Direct Mount Holes
Languette d'autoprotection (découpez la languette pour activer la fonction
autoprotection) / Lengüeta de antiforzamiento (corte la pequeña lengüeta
para activar lafunción de antiforzamiento) / Manipulationsschutzlasche
(kleine Lasche abschneiden, um die Manipulations-schutzfunktion
zu aktivieren) / Vals-alarmpreventie (Tabje afsnijden om preventie
van vals alarm te activeren) / Linguetta antimanomissione
(tagliare la linguetta per attivare la funzione antimanomissione) /
Tamper Resistant Tab(Cut off small tab to activate tamper resist feature)
Battery Flag must be pressed
down before inserting the battery.
When the battery is removed,
the battery flag will prevent the
detector from mounting to the base
ALPHA
(par défaut) / (predeterminado) / (Standard) /
(standaard) / (predefinito) / (Default)
V2GY
Sélection du protocole / Seleccione el protocolo /
Protokoll auswählen / Protocolselectie /
Selezionare il protocollo / Select protocol
S0318-02
S0303-00 S0306-01
S0307-00
S0304-02
S0325-00
S0324-00
S0305-00
Figure 1:
Figure 4:
Figure 6: Figure 7:
Figure 5:
Figure 2:
Figure 3:
REVISED
by the Graphic Development Department
Please review all content carefully.
9:09 am, Nov 22, 2010
Question and Answer IconNeed help?

Do you have a question about the Honeywell DF8M and is the answer not in the manual?

Overview

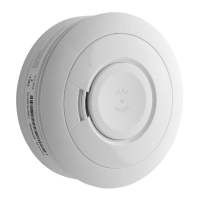
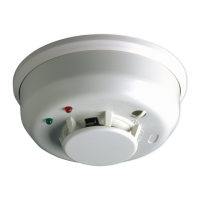
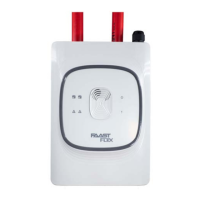
The DF8M is a wireless optical smoke detector designed for use with alarm systems that support the ALPHA or V2GY protocols and control panels from Honeywell Domonial. It communicates wirelessly with the control panel, providing information on its operational status, battery level, and any detected smoke. The device is designed for easy installation and maintenance, with features to ensure reliable operation and long battery life.

Function Description

The DF8M functions primarily as an optical smoke detector, designed to detect the presence of smoke particles in the air. When smoke is detected, the device sends a wireless signal to the connected alarm system, triggering an alarm. In addition to smoke detection, the DF8M also monitors its own operational status, including battery level and tamper events.

The detector incorporates a photoelectric sensor that responds to visible smoke particles. When smoke enters the detection chamber, it scatters an infrared light beam, which is then detected by a photodiode. This triggers an alarm signal. The device is designed to differentiate between actual smoke and false alarms caused by dust or other environmental factors.

The DF8M includes a piezoelectric sounder that emits an audible alarm when smoke is detected, providing immediate local notification. It also features two LEDs (green and red) that indicate its operational status. The green LED typically blinks to indicate normal operation, while the red LED illuminates during an alarm or fault condition.

The device supports two communication protocols: ALPHA and V2GY. This allows for compatibility with a range of Honeywell Domonial control panels. The wireless communication ensures flexible placement within a property without the need for extensive wiring.

Important Technical Specifications

  • Detection Method: Photoelectric (optical) smoke detection.
  • Communication Protocol: ALPHA or V2GY wireless protocol.
  • Power Source: Typically powered by a 3V CR123A lithium battery. The battery life is designed for several years under normal operating conditions.
  • Audible Alarm: Integrated piezoelectric sounder, emitting an alarm sound of at least 85dB at 3 meters.
  • Visual Indicators: Green LED for normal operation, Red LED for alarm/fault conditions.
  • Operating Temperature: Designed to operate within a temperature range of -10°C to +55°C.
  • Humidity Range: Operates effectively in relative humidity conditions from 0% to 95% (non-condensing).
  • Radio Frequency: Operates on a specific radio frequency (e.g., 868 MHz) for wireless communication with the control panel.
  • Dimensions: The device has a compact design, typically around 135 mm in diameter and 58 mm in height, allowing for discreet installation.
  • Tamper Protection: Includes a tamper switch that triggers an alarm if the detector is removed from its mounting base.
  • Supervision: The detector periodically sends supervision signals to the control panel to confirm its presence and operational status. If a supervision signal is not received, the control panel will indicate a fault.

Usage Features

  • Easy Installation: The DF8M is designed for simple installation. It typically mounts to a ceiling or wall using a mounting base. The base is secured with screws, and the detector twists onto the base.
  • Wireless Operation: Being wireless, the detector can be placed in optimal locations for smoke detection without the constraints of wiring. This includes areas like bedrooms, living rooms, hallways, and kitchens (with caution to avoid false alarms from cooking).
  • Battery-Powered: The use of a long-life lithium battery eliminates the need for external power wiring, further simplifying installation and allowing for placement in areas without easy access to power outlets.
  • Status Indicators: The green and red LEDs provide clear visual feedback on the detector's status. A blinking green LED indicates normal operation, while a red LED indicates an alarm or a fault condition (e.g., low battery).
  • Test Button: A test button is usually present on the device, allowing users to manually test the detector's functionality and the alarm sound. Pressing the test button simulates a smoke event, triggering the local sounder and sending a test signal to the control panel.
  • Low Battery Warning: The detector provides a low battery warning, typically indicated by a specific LED blink pattern (e.g., red LED blinking every 45 seconds) and/or a chirp from the sounder. This allows users to replace the battery before it fully depletes.
  • Tamper Detection: The tamper switch ensures that the detector remains securely mounted. If the detector is removed from its base, a tamper alarm is sent to the control panel, enhancing security.
  • Environmental Adaptability: The detector is designed to operate reliably in a range of indoor environments, with specified temperature and humidity limits. However, it is important to avoid placing it in areas with extreme conditions, such as direct sunlight, high humidity, or near strong drafts.
  • Placement Guidelines: For optimal performance, it is recommended to install at least one detector on each floor of a multi-story home, especially in hallways leading to bedrooms. Detectors should be placed at least 1.5 meters from any fluorescent light fixtures and away from areas with high air movement (e.g., near air vents or fans) to prevent false alarms or delayed detection. Avoid placing detectors in "dead air" spaces, such as corners where walls meet the ceiling, as smoke may not reach these areas effectively.

Maintenance Features

  • Battery Replacement: The battery is designed for easy replacement. When the low battery warning is triggered, the user can twist the detector off its mounting base, replace the old battery with a new one (typically a CR123A lithium battery), and then reattach the detector to the base. It is crucial to use the specified battery type to ensure proper operation and battery life.
  • Cleaning: Regular cleaning of the detector is essential to prevent dust and debris from accumulating in the smoke chamber, which can lead to false alarms or reduced sensitivity. The detector can be gently cleaned using a soft brush or a vacuum cleaner with a brush attachment to remove dust from the vents and the exterior casing. It is recommended to clean the detector at least once a year, or more frequently in dusty environments.
  • Regular Testing: Users should regularly test the detector's functionality using the test button, typically once a month. This confirms that the sounder is working and that the detector is communicating with the control panel.
  • Supervision Signals: The control panel continuously monitors the detector through supervision signals. If a detector fails to send its periodic supervision signal, the control panel will indicate a fault, alerting the user to a potential issue with the detector (e.g., out of range, dead battery, or malfunction).
  • Firmware Updates: While not typically user-serviceable, the detector's firmware may be updated by a technician if necessary, to improve performance or address any known issues.
  • Troubleshooting: The manual provides troubleshooting steps for common issues, such as false alarms, no alarm during testing, or persistent low battery warnings. These steps often involve checking battery installation, cleaning the detector, or verifying communication with the control panel.
  • End-of-Life Indication: Some detectors may have an end-of-life indicator, signaling when the device needs to be replaced due to its age. Smoke detectors typically have a lifespan of 7-10 years, after which their effectiveness may diminish.
  • Professional Inspection: For comprehensive maintenance and to ensure compliance with safety standards, periodic professional inspection and maintenance by a qualified technician are recommended. This can include checking the detector's sensitivity, verifying communication with the alarm system, and ensuring proper placement and coverage.

Honeywell DF8M Specifications

General IconGeneral
BrandHoneywell
ModelDF8M
CategorySmoke Alarm
LanguageEnglish

Related product manuals