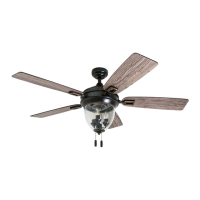
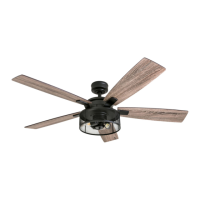
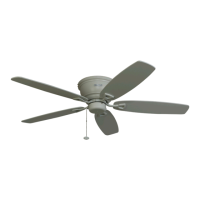
This document is a user manual for the Honeywell Glen Alden 52" Ceiling Fan, Model #50180. It provides comprehensive instructions for assembly, installation, operation, maintenance, and troubleshooting, along with a parts list and warranty information.
Function Description:
The Honeywell Glen Alden 52" Ceiling Fan is designed to provide air circulation and can be used to optimize room comfort in both warm and cool weather. It features a reversible motor that allows for downward airflow (wind chill effect) in warmer weather and upward airflow (to circulate warm air off the ceiling) in cooler weather, potentially leading to energy savings. The fan is equipped with a pull chain for operation and has provisions for a light kit (though the light kit itself is not explicitly detailed as included or optional in the provided pages, the wiring diagram and reverse switch location imply its presence).
Important Technical Specifications:
- Model Number: 50180
- Fan Size: 52 inches
- Estimated Assembly Time: Under 60 minutes
- Fan Weight: 12.54 lbs. (5.69 kg)
- Minimum Clearance from Blades to Floor: 7 ft. (2.14 m)
- Minimum Clearance from Blades to Obstruction: 30 in. (76 cm)
- Outlet Box Support Requirement: Must be marked "ACCEPTABLE FOR FAN SUPPORT" and able to support at least 35 lbs. (15.88 kg) of moving weight.
- Electrical Connections: Must comply with local codes, ordinances, the National Electrical Code, and ANSI/NFPA 70-199.
- Motor: Covered by a limited lifetime warranty.
- Parts (excluding motor and glass): Covered by a one-year warranty.
Usage Features:
- Reversible Motor: A reverse switch, located on the side of the light kit, allows the fan to operate in two modes:
- Warmer Weather (Switch Left): Creates downward airflow for a wind chill effect, allowing the thermostat to be set a few degrees warmer for energy savings.
- Cooler Weather (Switch Right): Creates upward airflow to help move hot air off the ceiling area, mixing the air and potentially reducing heating costs.
- Pull Chain Operation: The fan speed and potentially the light (if installed) are controlled via pull chains.
- Fast Attach™ System: The blades attach to the blade arms using a twist-lock mechanism for easier installation.
- Separate Light and Fan Control (Optional): If a second hot power wire is available from the outlet box, the blue (light power) wire from the fan can be connected to it for independent control of the light and fan.
Maintenance Features:
- Regular Inspection: At least twice a year, the canopy should be lowered to check the downrod assembly, and all screws on the fan should be tightened.
- Cleaning:
- Motor Housing: Clean with a soft brush or lint-free cloth to avoid scratching the finish.
- Blades: Clean with a lint-free cloth. A light coat of furniture polish can be applied to wood blades for added protection.
- Safety Precaution: Always shut off the main power supply before beginning any maintenance tasks. Do not use water or a damp cloth to clean the ceiling fan.
- Troubleshooting Guide: The manual includes a section to help diagnose and resolve common issues such as the fan not moving, being noisy, or having excessive wobbling. Solutions include checking power, connections, screws, and blade balance.
Installation Process Highlights:
- Safety First: Disconnect power at circuit breakers and wall switch.
- Site Selection: Ensure adequate clearance from blades to floor (7 ft.) and obstructions (30 in.).
- Mounting Bracket: Secure the upper mounting bracket to an "ACCEPTABLE FOR FAN SUPPORT" outlet box using provided screws and flat washers.
- Hanging the Fan: Attach the lower mounting bracket to the upper mounting bracket, then secure it with screws.
- Wiring: Connect supply and fan wires (ground, live, neutral) according to the provided diagrams. Optional separate light control wiring is also detailed.
- Motor Housing Installation: Attach the motor housing to the mounting bracket, aligning slotted holes and securing with screws.
- Blade Installation: Attach the blades to the blade arms using the Fast Attach™ system, then secure the blade arms to the motor with screws.
- Final Assembly: Connect the motor plug to the switch housing cap plug, align and secure the switch housing cap with screws. Attach pull chain extensions.
- Limited Lifetime Warranty for Motor: Covers defects in workmanship and material for the life of the product.
- One-Year Warranty for Other Parts: Covers defects in workmanship and material for all other ceiling fan parts (excluding motor and parts with glass) for one year from the date of purchase.
- Exclusions: Ordinary wear and tear, accident, misuse, improper installation, and damage to parts with glass or finishes of metal and other surfaces are not covered.
- Voided Warranty: The warranty is void if the original purchaser ceases to own the fan or if service is performed by a non-licensed electrician.
- Claim Process: Contact customer service with model number and proof of purchase. HKC's sole responsibility is to repair or replace defective parts or the entire product.