69-0624—2 4
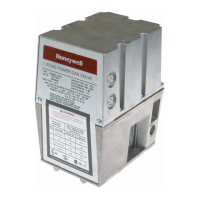
Fig. 5—Proper use of wrench on gas control.
APPLY WRENCH
FROM TOP OR
BOTTOM OF GAS
CONTROL TO
EITHER SHADED AREA
WHEN FLANGE IS NOT USED
APPLY WRENCH
TO FLANGE ONLY
WHEN FLANGE IS USED
M3083
Connect Pilot Gas Tubing
1. Cut tubing to desired length and bend as necessary for
routing to pilot burner.
CAUTION
Do not make sharp bends or deform the tubing. Do
not bend tubing at gas control or pilot burner after
compression fitting is tightened, because this may
result in gas leakage at the connection.
2. Square off and remove burrs from the end of the
tubing.
3. Unscrew compression fitting from the pilot outlet
(Fig. 4). Slip the compression fitting over the tubing and
slide out of the way.
NOTE: When replacing a gas control, cut off old compres-
sion fitting and replace with the new compression fitting
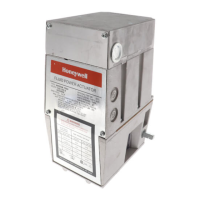
Fig. 4—Top view of gas control.
OUTLET
PRESSURE
TAP
INLET
OUTLET
WIRING
TERMINALS (3)
INLET
PRESSURE TAP
PRESSURE REGULATOR
ADJUSTMENT
(UNDER CAP SCREW)
PILOT OUTLET
PILOT ADJUSTMENT
(UNDER CAP SCREW)
GAS
CONTROL
KNOBRED RESET BUTTON
M1639C
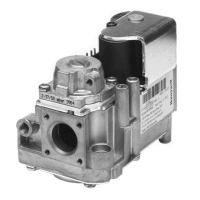
GAS CONTROL
TIGHTEN NUT ONE TURN
BEYOND FINGER TIGHT
FITTING BREAKS OFF AND CLINCHES
TUBING AS NUT IS TIGHTENED
TO
BURNER
M3076A
provided on the gas control. Never use the old compres-
sion fitting because it may not provide a gas-tight seal.
4. Push tubing into the pilot gas tapping on the outlet end
of the control until it bottoms. While holding tubing all the
way in, slide compression fitting into place and engage
threads—turn until finger tight. Then tighten one more turn
with a wrench. Do not overtighten. See Fig. 6.
5. Connect the other end of the tubing to the pilot burner
according to the pilot burner manufacturers instructions.
Connect Thermocouple
Connect thermocouple lead as shown in Fig. 7. See
Tables 6 and 7. This is an electrical connection and must be
clean and dry. Never use pipe compound. Tighten only 1/4
turn beyond finger tight to give good electrical continuity.
Do not overtighten.
Fig. 6—Always use new compression fitting.

 Loading...