595
550
22
546
578
552
17
595
560
440
FR
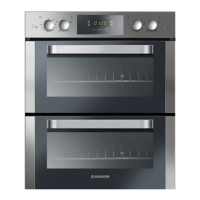
Four en colonne (dimensions en mm)
ES
Horno en columna (dimensiones en mm)
PL
Piekarnik w kolumnie (wymiar w mm)
GB
Oven in column (dimensions mm)
4x4.5x25
Opening 500 x 45
Ouverture 500 x 45
FR
GB
560
min
590
560
Si le meuble est équipé d’un fond à
l’arrière : prévoir une ouverture pour le
passage du câble d'alimentation.
If the furniture is equpped with a
bottom at the back part, provide an
opening for the power supply cable.
GB
FR
Si el mueble tiene fondo en la
parte trasera hacer una apertura
para el cable eléctrico.
ES
Jeśli meble posiadają dno w
tylnej części, należy zadbać o
odpowiedni otwór na kabel zasilający.
PL
2mm
2mm
Apertura 500 x 45
ES
Otwór 500 x 45
PL
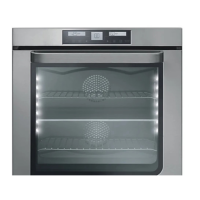
INSTALLATION GB
INSTALLATION DU FOUR FR
INSTALACIÓN ES
INSTALACJA
PL
¡ATENCIÓN!
Más presión de la necesaria para fijar los tornillos podría cerrar los canales de
ventilación de ambos lados. Asegurar una apertura de 2 mm de los canales de
ventilación después de instalar el horno en el mueble.
UWAGA!
Należy zwrócić uwagę, aby nie przykręcić śrub zbyt mocno, gdyż może to
spowodować zamknięcie kanałów wentylacyjnych z obu stron. Proszę upewnić
się czy kanały wentylacyjne mają prześwit 2 mm po zamontowaniu
urządzenia.
ATTENZIONE!
Un serrage excessif des vis de fixation peut entraîner une obstruction de la
ventilation sur les deux côtés du produit. Assurez-vous qu'un espace de 2 mm
est toujours présent après installation dans le meuble.
Ouverture 500 x 10
GB
FR
Opening 500 x 10
Apertura 500 x 10
ES
Otwór 500 x 10
PL
ATTENTION !
Applying torque more than needed to fix the screws can close the ventilation
channels on both sides. Please be sure that, these ventilation channels are
2mm open after installation to furniture.
INSTALLATION DE
Öffnung 500 x 45
DE
Wenn der Küchenschrank mit einer
Hinterwand ausgestattet ist, dann ist eine
Öffnung notwendig damit das Stromkabel
angeschlossen werden kann.
DE
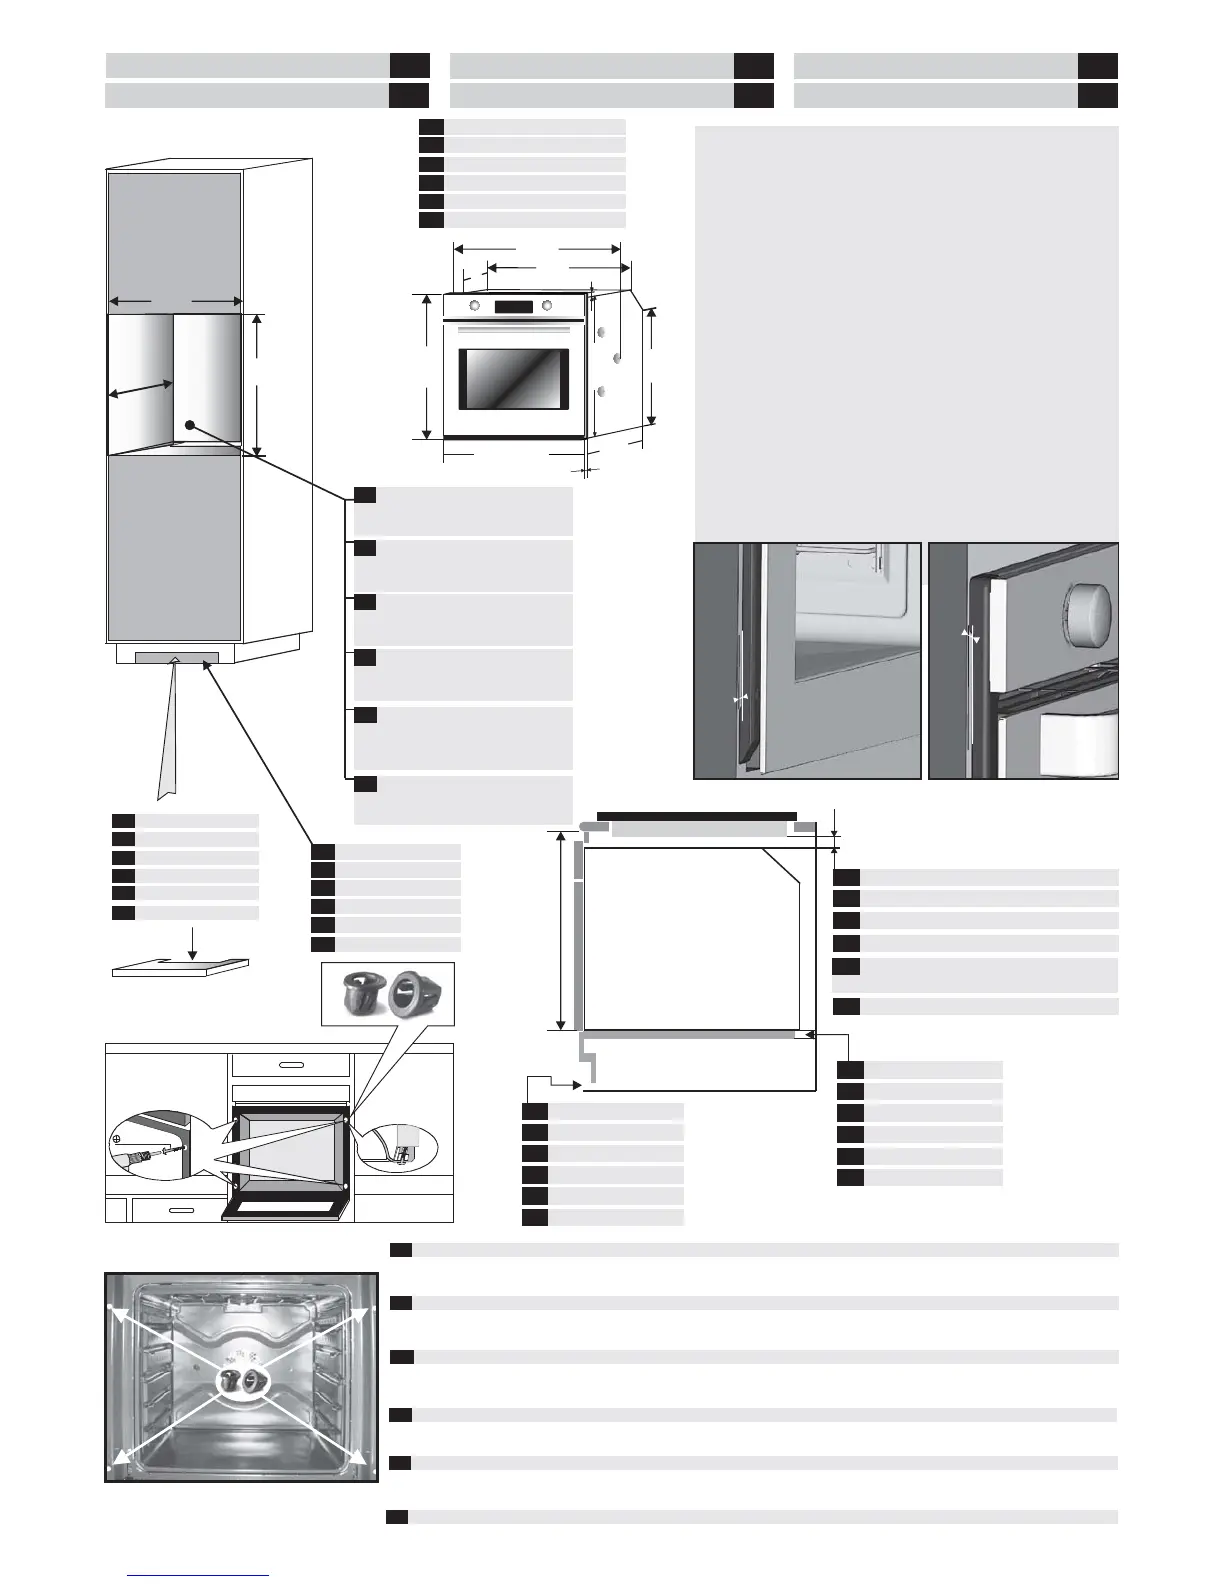
FR
Fixation dans la niche d'encastrement
Vous trouverez dans un sachet à l'intérieur du four les vis de fixation. Pour la fixation: lorsque la porte du four est ouverte, les trous sont accessibles,
ils sont situés de chaque côté des montants latéraux. Utiliser les vis fournies pour fixer le four.
ES
Fijación del horno
Dentro del horno hay una bolsa con tornillos fijadores. Fijación:Con la puerta abierta se accede a los agujeros y se encuentran a los lados. Para fijar el horno
utilizar los tornillos que se proporcionan con el mismo.
PL
Fixing in the location
Inside the oven there is a bag with four fixing screws. Fixing: When the oven door is open, holes are accessible, they are located on each side. Use the screws
provided to fix the oven.
GB
Fixing in the location
Inside the oven there is a bag with four fixing screws. Fixing: When the oven door is open, holes are accessible, they are located on each side. Use the screws
provided to fix the oven.
DE
Montage (Fixierung der Schrauben)
Im Inneren des Backofens befindet sich ein Plastikbeutel mit insgesamt 4 Befestigungsschrauben. Fixierung: Wenn Sie den Backofen öffnen, sehen Sie
auf der linken und rechten Seite 2 Löcher die für die Fixierung vorgesehen sind. Verwenden Sie für die Fixierung die mitgelieferten Schrauben.
Achtung!
Vergewissern Sie sich, dass Sie beim Einbau des Backofens einen 2 mm Spalt zu
den Küchenschränken einhalten. Dieser Spalt muss für die Lüftungskanäle
sichergestellt werden.
Öffnung 500 x 10
DE
DE
Fabmessungen (mm)
INSTALACE
CZ
CZ
Trouba ve vysoké skříni (rozměry v mm)
Pokud je nábytek vybavený stěnou v
zadní části, udělejte otvor pro přívodní
kabel.
CZ
Otvor 500 x 45
CZ
Otvor 500 x 10
CZ
FOUR / OVEN
600 min
10 min
TABLE / TOP
FR
Ouverture 500 x 10
GB
Opening 500 x 10
ES
Apertura 500 x 10
PL
Otwór 500 x 10
Oven fitted under worktop (dimensions mm)
GB
Four enchâssé sous plan de travail
FR
Horno colocado debajo de la encimera
ES
Piekarnik umieszczony pod blatem.
PL
FR
Ouverture 560 x 45
GB
Opening 560 x 45
ES
Apertura 560 x 45
PL
Otwór 560 x 45
DE
Opening 500 x 10
DE
Opening 560 x 45
Backofen unter der Arbeitsplatte montiert
(Abmessungen mm)
DE
Trouba pod pracovní deskou
CZ
CZ
Otvor 560 x 45
CZ
Otvor 500 x 10
Upevnění v pozici
Uvnitř trouby je sáček se čtyřma upevňovacími šrouby. Upevnění: Po otevření dvířek zpřístupníte upevňovací otvory, jsou v rozích. Použijte dodané šrouby k
upevnění.
Upozornění!
Použitím většího než potřebného tahu při utažení šroubů můžete uzavřít
ventilační kanály po stranách. Ujistěte se, zda jsou ventilační kanály otevřené
2 mm po instalaci do nábytku.
CZ
 Loading...