EasyManua.ls Logo

Hoover HOE3161IN - User Manual

Hoover HOE3161IN
15 pages
Print Icon
To Next Page IconTo Next Page
Loading...
MANUALE D’ISTRUZIONI
FORNO
IT
15
USER INSTRUCTIONS
OVENS
CANDY HOOVER GROUP S.R.L. Via Privata Eden Fumagalli 20047 Brugherio Milano Italy
KULLANIM KILAVUZU
FIRINLAR
EN
02
TR
28
HOE3161IN
HOT3161BI
HOT3161WI
POKYNY PRO UŽIVATELE
TROUBY
CZ
43
Question and Answer IconNeed help?

Do you have a question about the Hoover HOE3161IN and is the answer not in the manual?

Summary

General Instructions

Safety Indications

Detailed safety precautions for oven use and electrical connections.

Electrical Safety

Guidelines for safe electrical connection and grounding of the oven.

Recommendations

Tips for cleaning, using accessories, and energy saving.

Installation

Instructions for proper oven installation and ventilation requirements.

Waste Management and Environmental Protection

Information on WEEE disposal and environmental protection practices.

Declaration of Compliance

Statement of compliance with European directives for food contact and safety.

Product Description

Overview

Visual identification of oven components and control panel elements.

Accessories

Description and function of included accessories like drip pan and grill.

First Use

Preliminary cleaning and initial setup procedures before first operation.

Use of the Oven

Display Description

Explanation of the oven's control panel display and its functions.

Cooking Modes

Detailed explanation of different cooking functions and their usage.

Oven Cleaning and Maintenance

General Notes on Cleaning

Guidelines for safe and effective cleaning of oven parts and accessories.

Hydro Easy Clean Function

Step-by-step guide for using the steam cleaning function.

Side Racks and Oven Window Maintenance

Procedures for removing and cleaning side racks and the oven window.

Glass Door Maintenance

Instructions for removing and cleaning the oven's glass door.

Troubleshooting

FAQ

Frequently asked questions and their solutions for common oven problems.

Overview

This document outlines the functions, usage, and maintenance of a Hoover oven, covering models HOE3161IN, HOT3161BI, and HOT3161WI.

General Instructions and Safety

The oven is designed solely for cooking food; any other use, such as a heat source, is considered improper and potentially dangerous. The manufacturer disclaims responsibility for damage resulting from improper or unreasonable usage. When using the appliance, it's crucial to observe fundamental electrical safety rules: avoid pulling the power cable to disconnect, do not touch the appliance with wet hands or feet, and generally refrain from using adapters, multiple sockets, or extension cables. In case of malfunction, switch off the appliance and do not attempt to tamper with it.

Electrical connections must be made by a qualified electrician in accordance with local regulations. The oven requires a 220-240 Vac 50 Hz power supply with an earthed wall outlet or a multipole disconnector. Before connecting, verify the power voltage and disconnector settings. The grounding wire must be connected to the earth terminal of the power supply. The manufacturer is not responsible for accidents caused by improper grounding.

After each use, a minimum of cleaning helps maintain the oven. Avoid lining oven walls with aluminum foil or single-use protection, as direct contact with hot enamel can cause melting and deterioration. To prevent excessive soiling and strong odors, avoid using the oven at very high temperatures; extending cooking time and lowering the temperature slightly is recommended. Only use dishes and baking molds resistant to very high temperatures.

The oven can be installed in a column or under a worktop. Proper ventilation in the oven space is essential for cooling and protecting internal parts. The appliance must not be installed behind a decorative door to avoid overheating. When placing a shelf, ensure the stop is directed upwards and towards the back of the cavity, and the shelf is fully inserted. Never remove the oven door seal.

Product Description and First Use

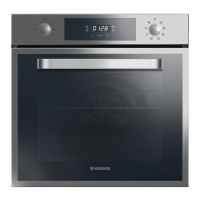
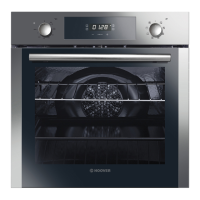
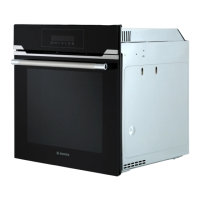
The oven features a control panel, shelf positions (with lateral wire grids if included), a metal grill, a drip pan, a fan (behind a steel plate), and an oven door. Accessories include a drip pan for collecting residues and a metal grill for holding baking trays and plates.

Before first use, perform a preliminary cleaning. Wipe external surfaces with a damp soft cloth. Wash all accessories and clean the oven interior with hot water and washing-up liquid. Then, set the empty oven to maximum temperature for about an hour to remove any lingering newness smells.

The display includes a minute minder, clock setting, cooking time, end of cooking, temperature or clock display, LCD display adjustment controls, a thermostat selector knob, and a function selector knob. After installation or a power interruption, the first step is to set the correct time. This is done by pushing the central button, setting the time with the "-" and "+" buttons, and then releasing all buttons. The oven will only operate once the clock is set.

Use of the Oven and Cooking Modes

The oven offers various functions:

  • Key Lock: Activated by touching "Set (+)" for 5 seconds, locking all other functions. Deactivated by touching "Set (+)" again for 5 seconds.
  • Minute Minder: Sounds an alarm at the end of a set time. Can be used as an alarm clock, with or without the oven operating.
  • Cooking Time: Allows presetting the cooking duration. The oven automatically switches off when the time elapses.
  • End of Cooking: Enables setting a specific time for the oven to switch off. If selected without setting a cooking time length, the oven starts immediately and stops at the set end time.

Cooking modes include:

  • Lamp: Turns on the oven light.
  • Defrost: Circulates room temperature air around frozen food for quick defrosting without altering protein content.
  • Fan Cooking: Uses heat penetration for poultry, pastries, fish, and vegetables, reducing cooking and preheating times. Allows cooking different foods simultaneously without mixing smells.
  • Conventional Cooking: Uses both top and bottom heating elements for traditional roasting and baking, ideal for red meats, roast beef, lamb, game, bread, and flaky pastry.
  • Fan + Lower Element: Uses the bottom heating element with fan circulation, ideal for juicy fruit flans, tarts, quiches, and pâté. Prevents food from drying and promotes rising in cakes and bread dough.
  • ECO Function: A healthier cooking method using grill and fan with a pulsating air cycle, retaining moisture and grilling surfaces with shorter cooking times. Suitable for meat, roasted vegetables, and omelets.
  • Grill: Uses the top heating element with the door closed. Requires five minutes of preheating. Suitable for grills, kebabs, and gratin dishes. White meats should be placed further from the grill, while red meats and fish fillets can be placed on a shelf with a drip tray underneath.
  • Pizza: Circulates hot air for perfect results with dishes like pizza or cake.

Oven Cleaning and Maintenance

Regular cleaning extends the appliance's lifecycle. Always wait for the oven to cool before manual cleaning. Avoid abrasive detergents, steel wool, or sharp objects to prevent damage to enamelled parts. Use only water, soap, or bleach-based detergents.

  • Glass Parts: Clean the glass window with an absorbent kitchen towel after each use. For stubborn stains, use a detergent-soaked sponge, well wrung out, and rinse with water.
  • Oven Window Seal: Clean with a slightly damp sponge if dirty.
  • Accessories: Wash with a wet, soapy sponge, then rinse and dry. Avoid abrasive detergents.
  • Drip Pan: After grilling, remove the pan, pour out hot fat, and wash with hot water, sponge, and washing-up liquid. For greasy residues, immerse the pan in water and detergent, or use a commercial oven detergent. The pan can also be washed in a dishwasher. Never return a dirty pan to the oven.

The Hydro Easy Clean function uses steam to help remove fat and food particles. Pour 300 ml of water into the container at the bottom of the oven, set the oven function to Static or Bottom heater, and set the temperature to the Hydro Easy Clean icon. Allow the program to run for 30 minutes, then switch it off and let the oven cool. Once cool, clean the inner surfaces with a cloth. Ensure the appliance is cool before touching it to avoid burns. Use distilled or drinkable water.

Maintenance procedures include:

  • Removal and Cleaning of Side Racks: Unscrew the bolt anti-clockwise, pull out the racks, clean them in a dishwasher or with a wet sponge, dry, and reinsert, ensuring bolts are fully tightened.
  • Removal of the Oven Window: Open the front window, push down the hinge housing clamps on both sides, and then replace the window by reversing the procedure.
  • Removal and Cleaning of the Glass Door: Open the oven door, lock the hinges, remove screws, and remove the upper metal cover. Carefully extract the glass (and second/third glass in pyrolytic ovens). Reassemble in reverse order. The "Low-E" indication on all glass must be legible and positioned on the left side of the door, near the left-hand lateral hinge, so the printed label of the first glass is inside the door.
  • Changing the Bulb: Disconnect the oven from the mains supply, undo the glass cover, unscrew the old bulb, replace it with a new one of the same type, and then replace the glass cover.

Troubleshooting

Common issues and solutions:

  • Oven does not heat up: The clock may not be set, or a cooking function and temperature may not be correctly selected. Set the clock and ensure necessary settings are correct.
  • No reaction of the touch user interface: Steam and condensation on the user interface panel can cause this. Clean the user interface panel with a microfiber cloth to remove condensation.

Hoover HOE3161IN Specifications

General IconGeneral
TypeBuilt-in
Oven TypeElectric
Energy ClassA
Number of Functions8
Number of Ovens1
Built-in HobNo
ColourStainless Steel
Number of Cooking Levels5
ThermostatYes
TimerYes
LightYes
GrillYes
ConvectionYes
Weight30 kg
Door GlassDouble
Oven Capacity60 L
Dimensions (H x W x D)595 x 595 x 550 mm

Related product manuals